Adding a new hard disk to my Esxi Server
Add physical disk to ESXi host and assign to VM
https://www.nakivo.com/blog/run-mac-os-on-vmware-esxi/
Adding a new hard disk to my Esxi Server
Add physical disk to ESXi host and assign to VM
https://www.nakivo.com/blog/run-mac-os-on-vmware-esxi/
https://video.amiga-archive.com/videos/local
The Computer Chronicles
The Computer Chronicles (400+ episodes)
The Computer Chronicles Book (H.D. Lechner)
Batch download almost all episoeds of Computer Chronicles
SIMKL Computer Chronicles episode info
Amiga related episodes from Computer Chronicles
Featured Amiga software on Computer Chronicles
InfoMinder
Download all files attached to a item page at archive.org
Navigate to the item page you want to download all the files from.
Download the XML filelist (named as the item, get the file ending with “_files.xml”).
Parse the filelist for the files (quick and ugly):
grep "file name=" someitem_files.xml | sed s:\<file\ name=:\<a\ href=:g | sed s:\>:\>file\<\/a\>:g
This will keep the lines containing “file name=” and create a output only containing (relative, as in the file list) html links to each file.
Redirect the output to a file (I assume you know how), then download with wget:
wget -r -H -nc -np -nH --cut-dirs=1 -e robots=off -l1 -F -i someitem.items -B "https://archive.org/download/someitem/"
For more advanced downloading, I have created a set of script (not yet released) that allow downloads of a complete collection (of other item pages) or download of everything uploaded by a specific user. My scripts will also create ‘md5sum -c’ compatible lists from the _files.xml files, execute the checking and optionally delete corrupt files for re-downloading.
14 April 2022 a lot of Oracle Cloud users got an email stating their VM public IPs have been lost.
Read the easy step-by-step solution following the email below to get (new) public IPs for your virtual machines.
We have identified an issue affecting a subset of customers who have become unable to access their Oracle Cloud Infrastructure resources.
Customer Impact: Some customers with Free Tier accounts, using Ephemeral or Reserved Public IPs will be unable to access their resources due to the unintentional reclamation of the IPs associated with their Virtual Machines.
While we have taken steps to ensure no further impact occurs, any affected Public IPs will need to be re-established by reassigning a new Public IP through the Oracle Cloud Infrastructure Console, REST API, SDK CLI or other tools, as described in the following documentation:
https://docs.oracle.com/en-us/iaas/Content/Network/Tasks/managingpublicIPs.htm
If a preferred public IP is configured, the public IP assignment may still be reassigned subject to its availability.
Solution:
Assign a new IPv4 address to your virtual machines:
1. Log in to Oracle Cloud (you have the URL somewhere in an email)
2. Find your machines (the listing), menu: compute / instances
(https://cloud.oracle.com/compute/instances)
2b. You might have to select the compartment where your VMs are located, even if you only have the ‘root’ compartment.
3. In the machine list, click the machine name.
4. Scoll down to the “Resources” section (at the left edge), click “Attached VNICs”.
5. In the VNIC list, click the name (Primary VNIC).
6. Scroll down to “Resources”, and click “IPv4 Addresses”.
7. At the right side of the window, click the three dots (which are hidden beneath the “Support” icon), then click “Edit” from the menu that pops up.
8. Click the “Ephemeral public IP” option, fill in an optional name, then click “Update”
Now, the remaining steps are updating DNS for stuff pointing to the servers (if you have any), and updating connections (SSH) to reflect the new IP.
Quizzer was written by me mostly in between 1999 and 2000. I wrote this system entirely in Perl (CGI script on a Solaris host) because there was no good enough applications out there. As this was a private project, I did no attempts to sell it (even if I had it prepared for that, see the extensive documentation).
You can find Quizzer up and running on https://quizzer.webit.nu/
Documentation updated to some point in time: https://quizzer.webit.nu/docs/
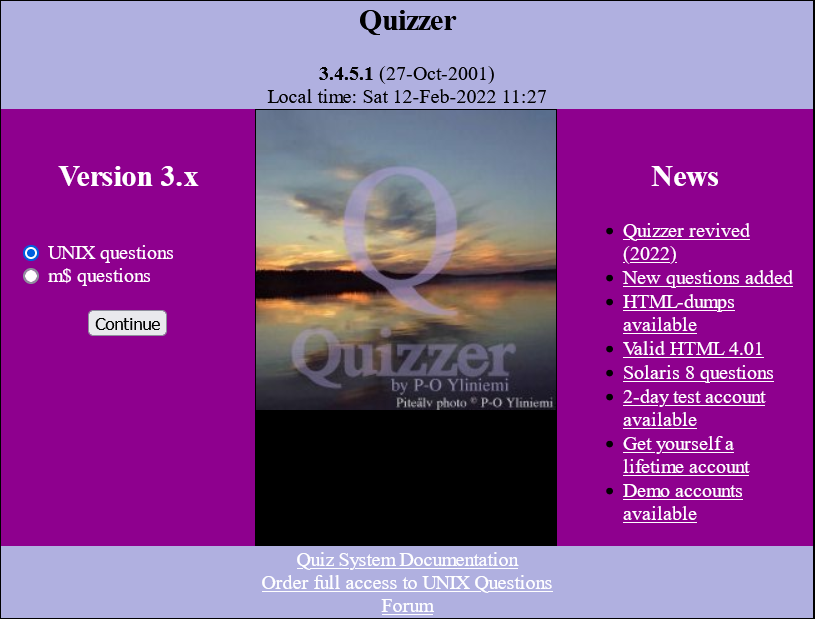
Most of the question databases (plain text following some rules) were rewritten from existing resources, but the questions shown in the video is from what I wrote myself from reading the Solaris 8 System Admin manuals.
Besides my standard setup for a Linux server for Apache/PHP/MySQL, I also switched over to using fcgid and php-fpm to be able to use PHP 8.1 as default and use a per-directory or per-vhost configuration to switch over to PHP 7.4 when needed.
Enable CGI-execution module for Apache
a2enmod cgid
Enable CGI-execution for the virtual host
Add these lines to the virtual host configuration. The below additions also adjusts what is considered to be an index page and adds configuration to prevent downloading of files with some specific extensions (this should be done in the server main configuration).
  DirectoryIndex index.cgi index.php index.html index.htm
  <Directory /var/www/quizzer.webit.nu/html>
    AllowOverride All
    Options +ExecCGI
  </Directory>
  AddHandler cgi-script .cgi
  <FilesMatch "\.(?:inc|pl|py|rb)$">
    Order allow,deny
    Deny from all
  </FilesMatch>
Check that CGI-script works
Use this simple CGI script to check that it works (test.cgi):
#!/usr/bin/perl
print "Content-type: text/html\n\n";
print "Hello, World.";
Also, the script has to be executable, then restart apache to reload configuration:
chmod 700 test.cgi
service apache2 restart
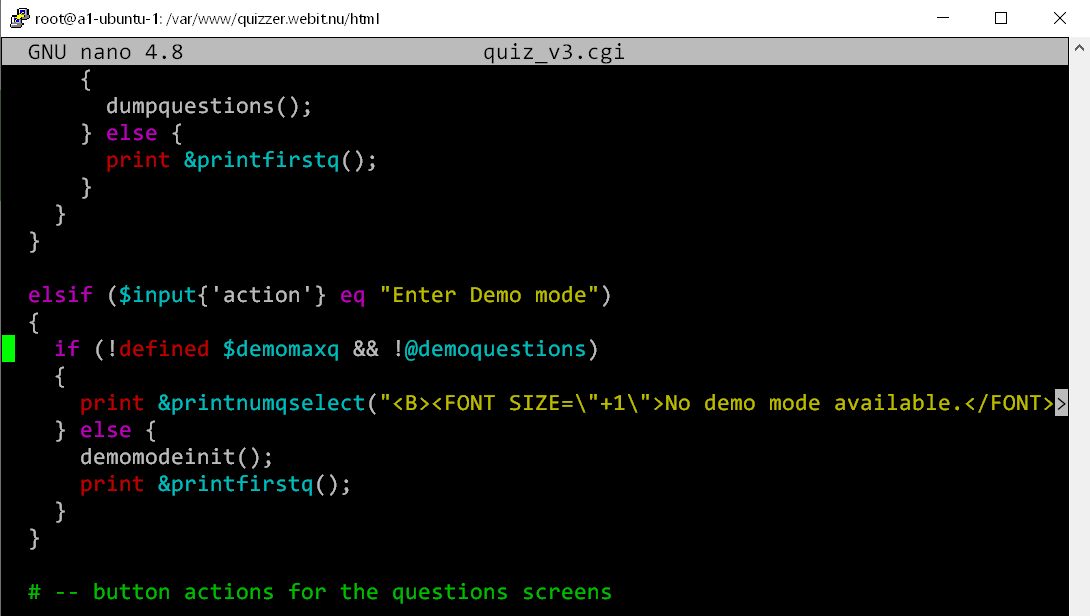
(Screens from my actual code)
How to make Perl include files in the current directory
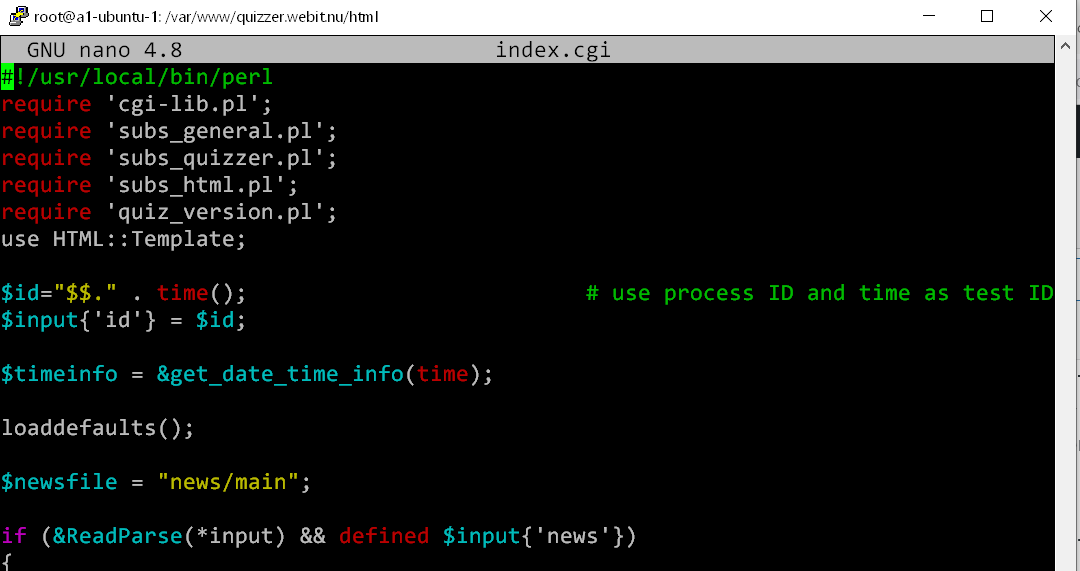
At some point in time, Perl got a security fix that no longer allows the current directory (the script directory) to be considered when including other code files. This broke my script badly.

There are several methods around this problem, and I ended up solving it my own way: I wrote a two-line wrapper for ‘/usr/bin/perl’, and saved it as ‘/usr/local/bin/perl’ (which was my command line in all scripts):
#!/bin/sh
PERL_USE_UNSAFE_INC=1 /usr/bin/perl $1
This method required no modification of any of my source files to get them execute correctly and find their included files.
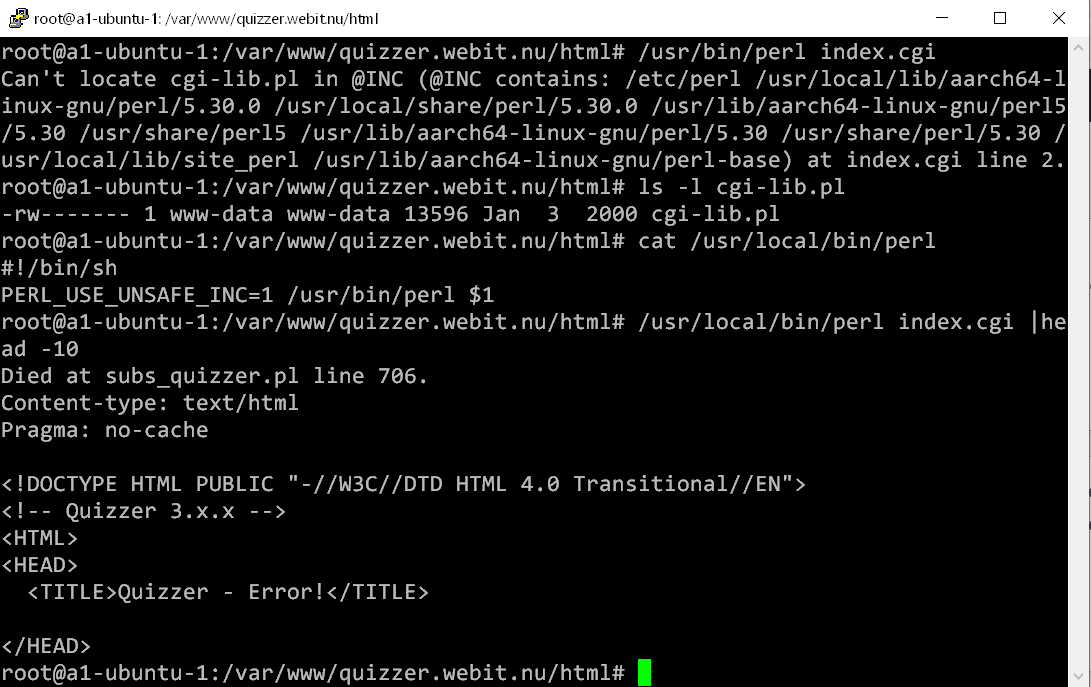
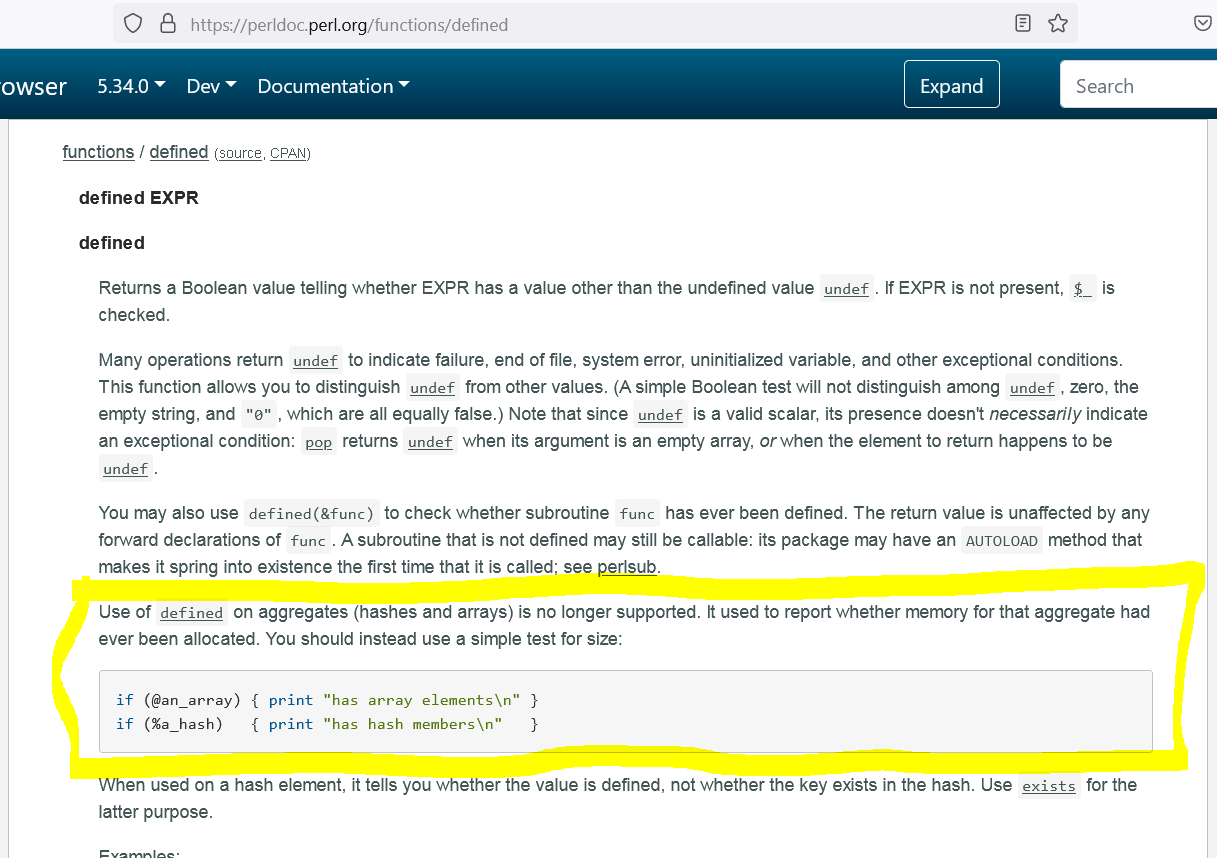
defined not allowed on array anymore
For some reason, it is no longer possible to use ‘defined @array’ to check if the variable has been set. So I had to replace every occurrence of the ‘defined @’ with just ‘@’, which made my code much more unreadable:

Before:

After:
According to Perldoc:
After these modifications everything worked fine, except some small configuration mistakes of the quiz system itself (handling compressed question databases and pointing to some incorrect temporary locations).
It took me some to find out how to create new users for storing personal test history. I had made this as simple as you just have to type in anything unique (not already registered) that looks like an email address, and a password you want to use.
The system sets up a demo account for you if that user name is not in use.
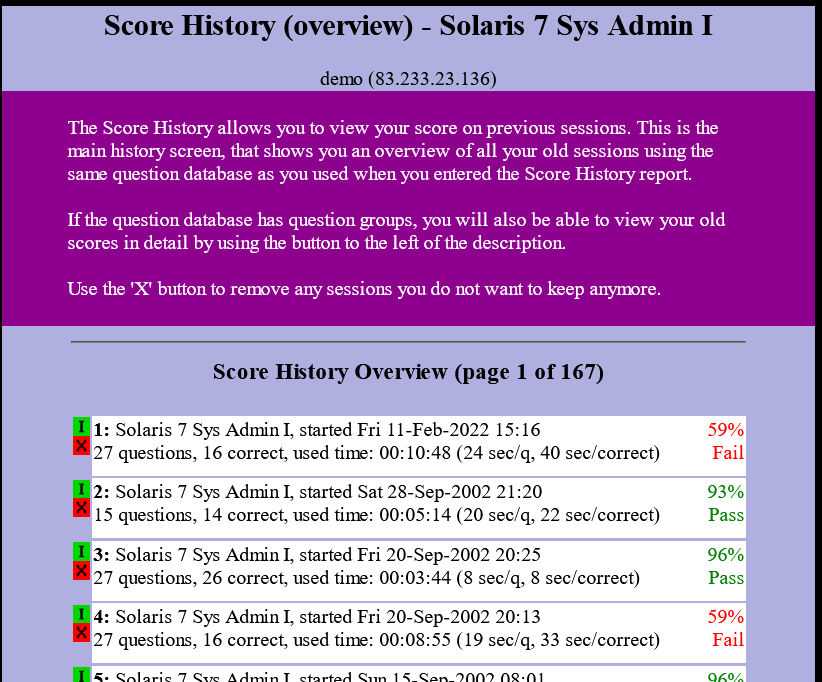
“Personal” history for the non-logged in demo user looks like this:
(upper part)
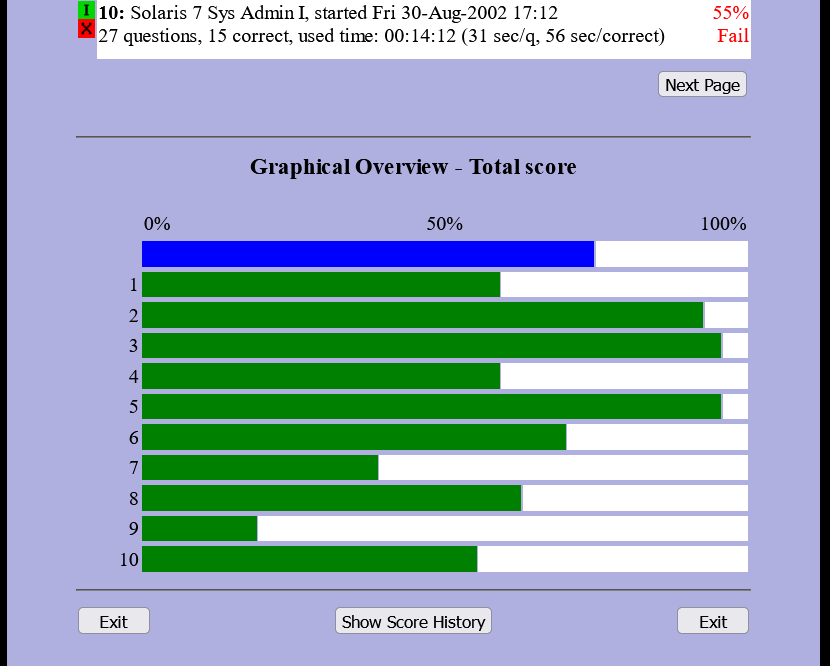
(graphical overview)
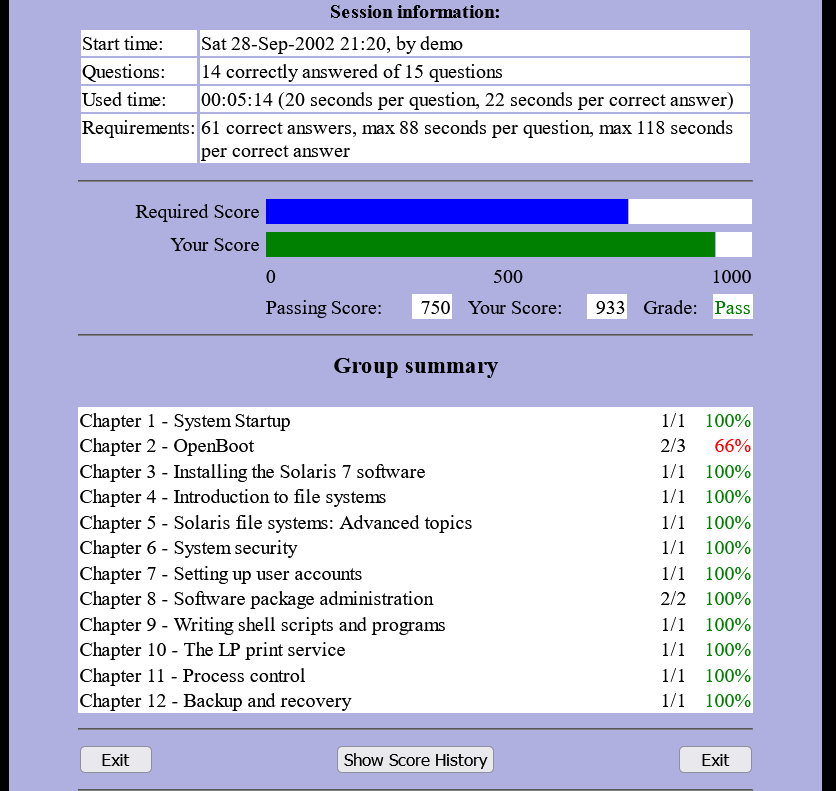
(detailed report)
As this is old revived code, and no reports of holes in the code were reported at the time it was online (1999-2002), I had to make a hole 🙂
This is valid as long as I make no new databases for the system (then if that happens, I decide what to do at that point).
Get full access to all UNIX questions
All m$ questions are available in demo mode, so no fully activated account needed for these. I recommend you create your own personal ‘demo’ account for the m$ questions to be able to view history.
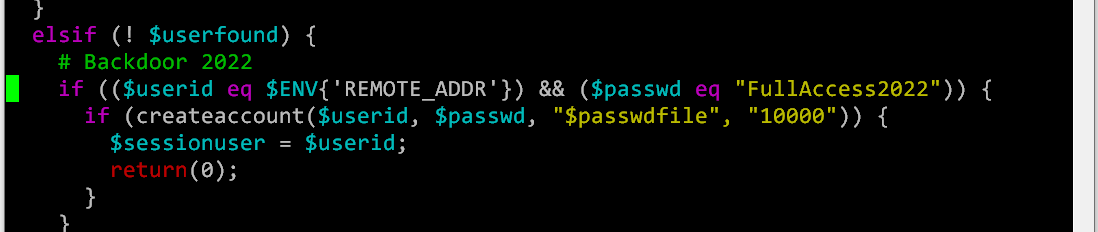
So: simply use your external IP-address as the user name, and the password “FullAcccess2022” to give yourself a fully enabled user 🙂
Apollo Core (68080)
Apollo Forum
Apollo Accelerators
Apollo Accelerators Wiki: Latest core (500, 600, 1200) | Installing Kickstarts
Vampire 500 V2: Part 1 – Part 2 (Epsilon’s Amiga Blog)
Checkmate A1500 Plus with Vampire 500V2 (Epsilon’s Amiga Blog)
The Complete Amiga 500 Vampire V500 V2+ Installation Guide (Amitopia)
My Vampire Card has arrived! (Lyonsden Blog)
Installing the Vampire V500 V2+ in my Amiga 500 (Lyonsden Blog)
AmiKit XE for Vampire V2 (AmiKit XE changelog)
majsta.com (Vampire PCB maker)
GOLD 3 Alpha
Quartus Prime (for flashing Vampire using USB Blaster)
Amiga Vampire CoffinOs – Quick setup and fun (Cotter’s Stuff)
Free SMTP Servers for Sending Emails – 2021
Free SMTP Servers & Free SMTP Relay Services
https://support.google.com/a/answer/2956491?hl=en
Main disadvantages:
All limitations: https://support.google.com/a/answer/166852?hl=en
msmtp/msmtp-mta is a lightweight solution for relaying mail through gmail or any other external service.
I have successfully followed this guide:
Using MSMTP with Google SMTP Relay on Ubuntu 20.04 (DFT blog)
Another guide:
Use external SMTP server for system mails on Linux
See also:
msmtp documentation (Arch Linux Wiki)
https://www.howtoforge.com/tutorial/configure-postfix-to-use-gmail-as-a-mail-relay/
Gmail account: allow insecure apps
https://myaccount.google.com/security?gar=1
Required software: postfix and mailutils
/etc/postfix/sasl_passwd:
[smtp.gmail.com]:587 username@gmail.com:password
Protect and process password file:
chmod 600 /etc/postfix/sasl_passwd
postmap /etc/postfix/sasl_passwd
Configure postfix:
/etc/postfix/main.cf:
relayhost = [smtp.gmail.com]:587
smtp_use_tls = yes
smtp_sasl_auth_enable = yes
smtp_sasl_security_options =
smtp_sasl_password_maps = hash:/etc/postfix/sasl_passwd
smtp_tls_CAfile = /etc/ssl/certs/ca-certificates.crt
Restart Postfix
systemctl restart postfix.service
or
postfix stop
postfix start
WP plugin for setting sender name (address can not be changed): CB Mail Sender
Elastic-Email is primarily a email marketing system like MailChimp, but can also act as a SMTP relay.
Main advantages:
Main disadvantages
https://help.elasticemail.com/en/articles/2388043-how-to-configure-postfix-with-elastic-email
WP plugin: Elastic Email Sender
https://docs.cloud.oracle.com/en-us/iaas/Content/Email/Concepts/overview.htm
The system-wide configurations and alternatives above work well for WordPress too, but you might want to finetune some settings for the emails being sent from WP. That includes the sender name, reply-to email, or you might even want to send these with another email account (or email relay service).
I found the plugin “Post SMTP Mailer/Email Log” (Post SMTP / PostmanSMTP) be the best suitable for this (there are many others available, so this might NOT be the best for everyone):