This post is a continuation of OpenWrt on Raspberry Pi 4 (and CM4)
It’s more about OpenWrt than related to Raspberry Pi hardware like the Pi4 and CM4.
Securing the WAN interface
In the first part, I gave instructions on how to open for SSH and LuCI web access on the WAN interface “the easy way”. This is in no way recommended when the router is moved over to an external WAN on the eth0 interface.
These ports (22 and 80) will be targets for network scanners on the outside, which will find your external IP on the router in a very short time.
Also, if you want to redirect traffic from the outside to these ports on the router, I suggest you use any other port numbers than well-known service ports as 22, 80, 8080, 8000, 443, 8443, 20-21 and 25. There are a lot more recommended to avoid redirecting to the router, as explained in Huawei’s tech note
High-Risk Ports: What Are the Common High-Risk Ports and How to Block Them
Make it safer
If you decide you want to be able to access and configure the router from the outside, your first step should be to set a secure password for the ‘root’ user. The next step is to use other ports than the default well-known ones for SSH (22) and HTTP (80).
This can be done both from LuCI and by editing the firewall configuration file (/etc/config/firewall) directly. I will show and explain how to do it directly in the file (by accessing the router through SSH), as it’s easier to explain, and finding out how to do it in LuCI can be done later (just check the tabs in the firewall configuration there to see how it was done).
Selected ports for my example:
SSH to OpenWRT router from outside, port 16322
HTTP to OpenWRT management page from outside, port 16380
Pretty self-explanatory in the configuration file:
config redirect
        option name 'OpenWRT LuCI'
        option target 'DNAT'
        list proto 'tcp'
        option family 'ipv4'
        option src 'wan'
        option src_dport '16380'
        option dest_port '80'

config redirect
        option name 'OpenWRT SSH'
        option target 'DNAT'
        list proto 'tcp'
        option family 'ipv4'
        option src 'wan'
        option src_dport '16322'
        option dest_port '22'
Reload the firewall configuration by using the command ‘/etc/init.d/firewall reload’
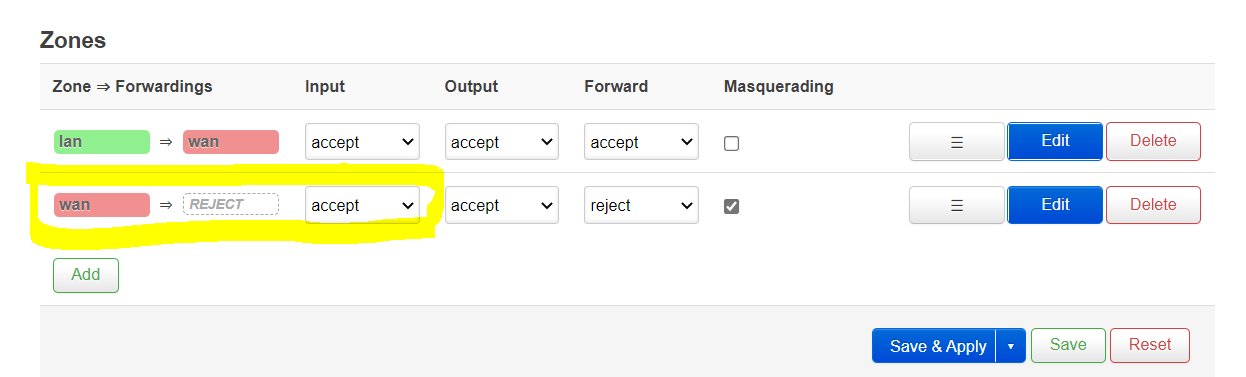
In LuCI, the above will look like this (I modified my config to match what was entered into the file, therefor the notice about unsaved changes)

This is much better than using the well-known ports, but still the ports could be scanned for on the WAN address.
To secure it a bit more, it’s possible to limit to allow access only from known IP-addresses or networks.
To limit to only one IP-address, it can be done by to the relevant redirect section inserting
option src_ip '8.8.8.8'
This will only allow access to the port from the specified IP (which in this case is one of Google’s DNS servers, which is very unlikely to happen).
In LuCI, the changes above will be visible under “Advanced settings” of the port forward rule.
Using IP sets for the rules
IP sets can be used to allow or deny traffic from multiple IP addresses without having to have a separate rule for each block/allow.
In case for a simple IP-address list, the configuration section would look like this in the /etc/config/firewall file:
config ipset
        option name 'Trusted'
        option comment 'Trusted networks'
        option family 'ipv4'
        list match 'src_ip'
        list entry '8.8.8.8'
        list entry '4.0.0.0/9'
Replace the ‘option src_ip’ in the redirect rule with
option ipset 'Trusted'
This is the way it will be done if configured using LuCI. A more effieient way is to use include files with hashed IP sets. This is half-explained in a post in the OpenWRT forum: Port forward using ipset
The solution here is to recreate the IP set every time it will be used, but it should be possible to store the IP set and include it in the configuration.
For more information about IP sets, see the excellent OpenWRT documentation: IP set examples
I will have to investigate that in more depth when blocking known bad-bahaving IP hosts or networks.
Redirecting traffic from WAN to a device on the LAN
This is done more or less in the same way as above, but also adding ‘option dest_ip’ to the redirect section:
config redirect
        option name 'SSH to linux server'
        option target 'DNAT'
        list proto 'tcp'
        option src 'wan'
        option src_dport '16222'
        option dest 'lan'
        option dest_ip '172.16.2.11'
        option dest_port '22'
        option ipset 'Trusted'
You can use whatever port you want on the outside (16422 in the example) and any IP on the inside which the router can reach (the example needs a larger netmask: my examples assumes that the router lives on 172.16.3.254, so for it to reach hosts at 172.16.2.x, the netmask have to be ‘255.255.254.0’ (/23) or wider).
If you want to redirect any of those well-known ports to anything inside the LAN, as the ‘Linux server’ above (‘ipset’ limitation removed here, but if you want to keep the server private, just leave it in):
config redirect
        option name 'SSH to linux server'
        option target 'DNAT'
        list proto 'tcp'
        option src 'wan'
        option src_dport '80'
        option dest 'lan'
        option dest_ip '172.16.2.11'
        option dest_port '80'
To be continued (in this post or in another). This is set to be published at the end of 3 Dec 2023 instead of keeping it secret until I decide to release it.
Notes on DHCP
DHCP scope on LAN
As I mentioned in the previous part, the start address of the LAN DHCP scope is configured as an offset from the router’s network address. So unless you have the LAN interface on a single C-subnet, you might have to adjust the start of the scope accordingly. I’m not going into exactly what to set the start value to, you either know it, or you can test and read the results in the logs.
Just a simple example: If you want to have the DHCP scope on a C-net upwards from the start of the LAN segment, just add 256 to the offset; router = 172.16.3.254, netmask = 255.255.254.0, network = 172.16.2.0. To set DHCP range to 192.16.3.100–250, you will have to set the ‘start’ to 356 and the ‘limit’ to 150.
Save and apply changes
It the changes are made from LuCI, ‘save & apply’ will do whatever is needed for the changes to take effect. If you do changes by editing the configuration file (/etc/config/dhcp) directly, you will need to reload the configuration for dnsmasq:
/etc/init.d/dnsmasq reload
Static leases
Static leses are configured in /etc/config/dhcp (which is the file changed by LuCI). A section like this (depending on what you configure through LuCI) is added to that file:
config host
        option name 'Chromecast'
        option mac '90:ca:fa:77:88:99'
        option ip '172.16.3.72'
        option leasetime 'infinite'
Simple enough that requires no explanation, except that the statically assigned IP address is allowed to be outside the configured DHCP range (the address is a bit below the scope here). Use static leases for stuff you want to know which IP addresses they get, without having to make a static configuration on the device itself.
Dropping an active DHCP lease
Active leases are stored in /tmp/dhcp.leases
Remove the corresponding line of the lease you want to drop, then restart udhcpc:
PID=`pidof udhcpc` && kill -SIGUSR1 $PID
Changing display name of known devices
Edit the file /etc/ethers to change display names of detected devices on DHCP. Restart dnsmasq afterwards to get the new names displayed in LuCI.
Online resources
IP subnet calculator
https://www.calculator.net/ip-subnet-calculator.html
MAC address vendor lookup
https://mac.lc/
https://hwaddress.com/