Installation and configuration notes
Stuff used
Raspberry Pi 4 Compute Module (CM4, 4GB)
Waveshare Dual Gigabit Ethernet Base Board (CM4-DUAL-ETH-BOX-A)
Resources
OpenWrt Wiki
OpenWrt Firmware for Raspberry Pi 4
CM4-DUAL-ETH-BASE Wiki
(Very thin documentation on the CM4 baseboard used, nothing about the USB3 network port, but some info on the RTC, fan control and display and camera interfaces)
Internet of Things – a techie’s viewpoint
(I used mainly the beginning of chapter 36 for the first good enough solution I found on how to switch the interfaces so that eth0 will be used for WAN and eth1 for LAN)
Installation
Get the latest (stable) version of OpenWrt (I use “Factory (EXT4)”), write it to a MicroSD-card the usual way, insert into slot on CM4 board and boot up.
Note: Before booting the SD-card, you might want to resize the Linux partition and file system on it. Do this with another Linux-based system:
Insert the SD-card into a reader/card slot and check end of ‘dmesg’ output which device was assigned the card:
root@DS1517:~# dmesg |tail
[13376.702534] sd 10:0:0:1: [sdr] 61849600 512-byte logical blocks: (31.6 GB/29.4 GiB)
[13376.714483]  sdr: sdr1 sdr2
In this case (on my Synology NAS), the card readers’ slot was assigned ‘sdr’.
Resize the partition with ‘parted’:
root@DS1517:~# parted /dev/sdr
GNU Parted 3.2
Using /dev/sdr
Welcome to GNU Parted! Type 'help' to view a list of commands.
(parted) p
p
Model: TS-RDF8 SD Transcend (scsi)
Disk /dev/sdr: 31.7GB
Sector size (logical/physical): 512B/512B
Partition Table: msdos
Disk Flags:

Number  Start   End     Size    Type     File system  Flags
 1      4194kB  71.3MB  67.1MB  primary               boot, lba
 2      75.5MB   173MB   104MB  primary

(parted) resizepart 2 -1
...
(parted) q
Resize the file system with ‘resize2fs /dev/sdr2’
The default is to use eth0 for LAN, which I didn’t like (with the possibility that the other USB3-based interface might be less stable, and is using kernel drivers for the incorrect model).
To fix this I used the guide mentioned above, the beginning of chapter 36, with some modifications to fit my network.
(section 36.4 in IoT guide)
The later distributions of OpenWrt starts up as logged in as root on the console, which makes it easier to do the initial adjustments to the network settings. As the guide mentions, if your home network is on the 192.168.1.0/24 (or a larger section, like /16) subnet, you can access the shell by SSH (root without password) to do the modifications.
Note: If you already have something (possibly a router) at 192.168.1.1, you have to connect a computer directly to the CM4 router’s eth0 interface and make the configuration changes that way. Once eth0 is set to DHCP, you can connect it to your LAN (which will give it a IP-address you have to find out). In this case your LAN is actually the WAN for the CM4 router.
Change the lan section of /etc/config/network to:
config interface 'lan'
    option ifname 'eth0'
    option proto 'dhcp'
While at it, if you not plan to use the Wifi on the Pi, disable it in /boot/config.txt:
dtoverlay=disable-wifi
Reboot the Pi, and you will get IP by DHCP (handed out by your old router). Either find that IP in the old router or just do a “ifconfig” command on the console.
Installing the kernel module for the USB3 network port
(section 36.5 in IoT guide)
To get the second network port working, you need to install the correct kernel module for the chipset it is using. In the case of the CM4 base board, the chip is rtl8153. Unfortenately there is no exact match or that chip (yet/ever ?), but rtl8152 will work fine. Use ‘opkg’ to install the module:
opkg update
opkg install usbutils
opkg install kmod-usb-net-rtl8152
For further configuration, I also add a more user-friendly text editor than ‘vi’:
opkg install nano
Verify by ‘ifconfig eth1’ that the second network adapter shows up.
Switching the eth0 / eth1 interfaces to have eth0 for WAN
Now that we have both interfaces visible, we can switch their usage as described in the IoT guide. For my network (LAN side) I use a network mask of /16, so I cannot be on that same IP range for the network on the inside of the CM4 router.
For the inside, I choose (from the private IP-series) 172.16.3.0/24, and will give my CM4 router the IP address 172.16.3.1.
Change the old ‘lan’ section to ‘wan’ and add a new “lan” section in /etc/config/network:
config interface 'wan'
	option ifname 'eth0'
	option proto 'dhcp'

config interface 'lan'
	option proto 'static'
	option ifname 'eth1'
	option ipaddr '172.16.3.254'
	option netmask '255.255.255.0'
        option type 'bridge'
Configure DHCP on the LAN interface
Add a “dhcp” section for eth1 in /etc/config/dhcp:
config dhcp 'eth1'
	option start '100'
	option leasetime '12h'
	option limit '150'
        option interface 'eth1'
Reboot the CM4 router, connect your uplink cable to eth0 and a computer to eth1. When the CM4 router has started, and if everything works well, and the computer should get an IP address on the 172.16.3 network (in the range from .100 to .250).
LuCI confusion by manual configuration
Access the web interface on http://172.16.3.254, set a password for the web interface.
The first time you access the network configuration for your manually configured CM4 router, LuCI will ask to update the configuration to the new format (for using ‘br-lan’ instead of “option type ‘bridge'”) and using the ‘br-lan’ device instead of the manually entered ‘ifname’ in the lan section. Allow these changes, and the GUI is ready for use.
Configuration
The first step is to go to System/Software in the menu and click the “Update lists” button to refresh/create the list of available plugins for OpenWrt. Then use the many OpenWrt guides online for additional configuration ideas.
If you during setup have your CM4 router behind another router on the local network, change the firewall setting for WAN to allow inbound access (unless you’re happy with accessing it from a computer on that routers’ LAN interface).
You find that setting under “Network/Firewall”:
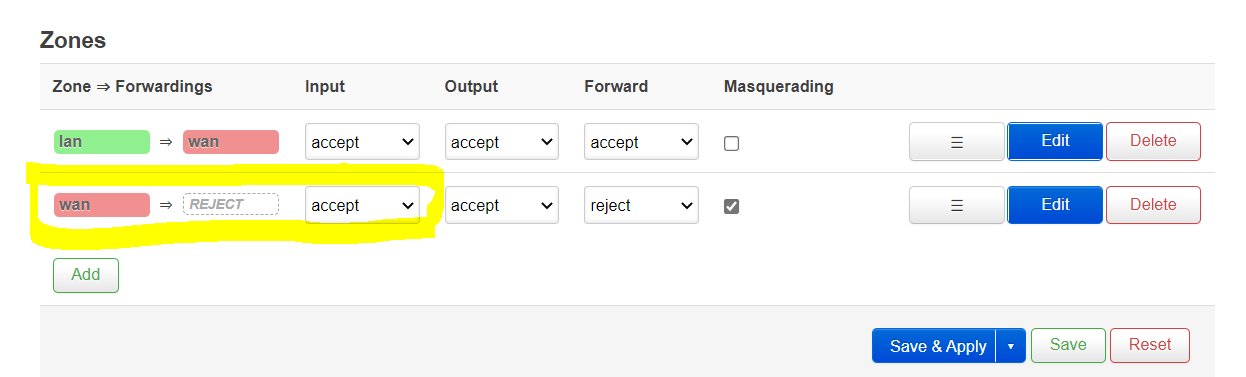
You can after this change access the web interface and SSH over the WAN side IP. Do not forget to change back if this router is put on a public network!
That’s it for the basics and getting started with OpenWrt on a Pi4 with dual ethernet interfaces (either with the used CM4 baseboard or a separate USB3 dongle). I have probably missed some of my steps as this guide was written some time after I completed the setup.
Statistics
Add and configure (accept default settings) the package named ‘luci-app-statistics’ to get graphs for CPU usage and network traffic.
Add the module ‘collectd-mod-thermal’ to get graph for CPU temperature. This needs to be enabled in “Statistics/Setup/General plugins”.
Other packages that might be useful
diffutils – if you want to be able to compare content of (configuration) files
bash – a better shell
bzip2, tar, unzip – archive utilities
Application servers
Stuff that are more than just a package, you might wish to run these on the CM4 router. I will write separate guides for these when I get them working.
AdGuard Home – to get rid of many annoying adverts and dangerous links
Unifi controller – if you have Unifi APs
Home Assistant (HA) – to control stuff
Adding more disk space to OpenWrt
It’s a good idea to keep the application servers separate from the OpenWrt MicroSD card or the limited size of the onboard eMMC on some Pi and CM4 models. As the applications can be write intensive, it’s recommended that these have their main activity on a external SSD.
For the preparation of the SSD (connected to one USB3 port), I used the directions (1-4) in https://openwrt.org/docs/guide-user/storage/usb-drives. The only different thing I did here was to drop the existing partition on my new disk (all USB storage devices comes preconfigured with a windows partition on them) and create a Linux partition, then format it as ext4 (also described in that guide).
For managing auto mount of the device, I followed another of the official guides: https://openwrt.org/docs/guide-user/storage/fstab
After the fstab has been created, the mount points can be administered through LuCI (System/Mount Points). Here it is safe to delete root (“/”) and “/boot” from the “Mount Points” list, then enable the mount for the USB drive.
Reboot the CM4 router to see if the external disk comes up and the partition gets mounted. If boot seems stuck, disconnect the USB-drive and see if it continues (this can be done without a monitor attached). If that is the case, the drive you are using are not UAS-compatible, and this has to be disabled in /boot/cmdline.txt
Add the following to the beginning of the line in the file (the file should always be only one line):
usb-storage.quirks=152d:0579:u
You get the values to put in the marked part by using the lsusb command:
root@OpenWrt:~# lsusb
Bus 001 Device 003: ID 413c:2005 DELL DELL USB Keyboard
Bus 002 Device 003: ID 0bda:8153 Realtek USB 10/100/1000 LAN
Bus 001 Device 002: ID 2109:3431  USB2.0 Hub
Bus 001 Device 001: ID 1d6b:0002 Linux 5.15.137 xhci-hcd xHCI Host Controller
Bus 002 Device 002: ID 152d:0579 Intenso Portable SSD
Bus 002 Device 001: ID 1d6b:0003 Linux 5.15.137 xhci-hcd xHCI Host Controller
root@OpenWrt:~#
This is described in greater detail on https://www.pragmaticlinux.com/2021/03/fix-for-getting-your-ssd-working-via-usb-3-on-your-raspberry-pi/
Ivacy VPN settings
Get the OpenVPN-Configs.zip file from here:
https://support.ivacy.com/setup_guide/how-to-setup-openvpn-on-pf-sense/
or (any of the non-Mac and non-Windows files) here:
https://support.ivacy.com/vpnusecases/openvpn-files-windows-routers-ios-linux-and-mac/
Follow the guide
https://support.ivacy.com/setup_guide/how-to-configure-and-install-openvpn-on-your-openwrt-router/
Ivacy-VPN related content in /etc/config/openvpn (as created by LuCI)
For easier configuration, skip the steps in the guide which explains how to configure the VPN connection using LuCI, just add the connection and then hit “Save & Apply” on the basic settings page, then edit the /etc/config/openvpn file directly:
config openvpn 'Ivacy'
        option dev 'tun'
        option nobind '1'
        option comp_lzo 'yes'
        option verb '1'
        option persist_tun '1'
        option client '1'
        option auth_user_pass '/etc/openvpn/userpass.txt'
        option resolv_retry 'infinite'
        option auth 'SHA1'
        option cipher 'AES-256-CBC'
        option mute_replay_warnings '1'
        option tls_client '1'
        option ca '/etc/openvpn/ca.crt'
        option tls_auth '/etc/openvpn/tls-auth.key'
        option auth_nocache '1'
        option remote_cert_tls 'server'
        option key_direction '1'
        option proto 'udp'
        option port '53'
        list remote 'usny2-ovpn-udp.dns2use.com'
        option enabled '1'
Server list
https://support.ivacy.com/servers-list/
Being away from using my OpenWrt CM4s for a while, lost root password
As I initially did this as an experiment to see if the CM4 is good enough to replace my Linksys 3200 router, and to see what more it could be used for, the Linksys were left there alongside the CM4s. When the fan failed in the Waweshare case (which didn’t take long, about a month or so), I disconnected it and have since then not used it.
Coming back to the CM4s now about two years later, I was not able to log in using SSH or LuCI with any of the passwords I use for testing stuff.
This actually happened (the first time) on the second CM4 device, the one with eMMC and no MicroSD card to easily mount in another Linux machine (including the NAS).
Suggestions to reset the root password ranges from pressing the ‘reset’ button at the right moment to go into failsafe mode (don’t know if that is possible with the reset button on the Seeed carrier board) and copying content from /etc/shadow on another computer (which didn’t work).
Usually when this happens it is easy enough to connect the drive to another Linux-running computer, mount it and chroot to its location, but not in case with OpenWrt since there is no ‘passwd’ command in the BusyBox binary for Linux on Raspberry Pi4. I was also not able to start BusyBox from the mounted eMMC storage.
The solution that I came up with, which finally gave me a known root password, was to use another Raspberry Pi 4, then change the password with passwd as follows:
1: install and start usbboot on that other Raspberry Pi4
2: change boot jumper on carrier board to storage mode (eMMC will be connected as a USB drive)
3: plug in the carrier board using the USB-C port
4: ‘usbboot’ should detect the device and load the driver
5: use ‘lsblk’ to see the device/partition name and then mount it
6: copy the PIs /etc/passwd and /etc/shadow to a safe place for restoring when done
7: make backup copies of /etc/passwd and /etc/shadow on the CM4 (even if you will never have any use of them)
8: copy (overwrite) /etc/passwd and /etc/shadow on the Pi4 with the ones on the CM4s eMMC drive
9: use passwd to set the new root password
10: copy back /etc/passwd and /etc/shadow to CM4 eMMC
11: restore /etc/passwd and /etc/shadow on the Pi4
12: unmount eMMC partition and eject the device (‘eject’ command)
13: put ‘boot’ jumper back to original position (on the Seeed Studio carrier board, it should just be removed – putting it on the two other pins will SHORT 5v and GND which could not do anything good)
14: CM4 should now have a working root password
Other carrier boards with dual ethernet ports
Seeed Studio Dual Gigabit Ethernet NICs Carrier Board
Product page
Getting Started with Dual Gigabit Ethernet Carrier Board for Raspberry Pi Compute Module 4 (hardware info)
The latest version of the pre-installed image (2022-07-18, as checked today, 8 Jan 2023) is linked from their Getting Started with OpenWrt guide.
I recently did the same installation on the carrier board from Seeed Studio, with a 8GB/8GB eMMC CM4 on it.
At the time I wrote this guide, the official CM4/Pi4 OpenWrt image did not contain the needed driver for the network adapter on the USB-bus, which lead me into using the bloated image from Seeed Studio.
For the new installation attempt, I found out which driver was used, and was prepared to install it manually.
The driver needed for this board is ‘kmod-usb-net-lan78xx’, but as it’s now included in the official image, no additional steps (except for configuring) eth1 is needed.
Resizing the OpenWrt root partition is done the same way as described above, except the extra steps needed if using a CM4 with eMMC (as described in the “Getting Started” above (follow the instructions for Mac/Linux for installing “usbboot”).
Seeed Studio CM4 Router Board
Another board from Seeed Studio. This one uses a real NIC controller chip (RTL8111E) for the second port to provide better stability and speed:
CM4 Router Board product page
Best tutorial I’ve found for setting up Pi behind a modem with OpenWRT. Thank you for taking the time to post. This was a huge help!