At about 30% into the reshaping phase (after the first disk swap), my NAS went unresponsive (disconnected both shell and GUI), and I had to wait all day until I came home and did a hard reset on it and hoped everything went well..
In the meantime, I logged a case to the Synology support. They were not of any direct help, and the hard reset did take the NAS back to continuing the reshaping process.
My case with Synology support
==
2020-12-01 13:51:37
==
Replaced one of the smallest drives in my NAS yesterday (SHR) as a first step for later expansion (I will replace all drives with larger ones before expanding – if possible to delay any automatic expansion until then).
About 80% finished with rebuilding yesterday, but for some reason it started over after the first round.
Today about 30% finished when I lost the connection to the NAS (over ssh and the web interface). It does not auto-reboot and does not respond to ping.
To lessen the risk of data loss, what should my first step be ? Can I just pull the plug and hard-reboot the NAS with the current disks mounted (14TB, 3TB, 3TB, 8TB, 8TB in a SHR config), or is it better to replace or remove the disk that I recently replaced (in slot 1: 14TB in place of the previous still untouched 3TB) ?
What are the steps to getting the volume back online if it does not mount automatically ?
As the NAS is down, I am not able to upload any logs, but attached is the rebuild status before the crash.
==
2020-12-01 15:28:58
Synology response (besides the auto response “send us logs”)
Not useful at all, exactly what I did, “Mark” who replied did not read anything..
==
Hello,
Thank you for contacting Synology.
If you wish to replace a drive in your unit, please perform these steps one by one allowing for the repair to complete before replacing any further drives.
1. Pull out the drive in question.
2. Insert a replacement drive.
3. Proceed to the Storage Manager > Storage Pool > select the volume in question and click “Manage/Action”
4. Run through the wizard to repair the volume in question with the replacement drive.
5. Once complete, proceed to the Storage Manager > Volume and Configure/Edit the volume to configure the volume to have additional size.
Please see the link below for more help.
https://www.synology.com/en-uk/knowledgebase/DSM/help/DSM/StorageManager/storage_pool_expand_replace_disk
Please bare in mind that you benefit from the additional space from the drives you will need to replace at least 2 drives for larger ones in RAID 5/SHR or 3 drives in RAID6/SHR2.
You can see the type of RAID used via – DSM > Storage Manager > Storage Pool.
If you have any further questions please do not hesitate to get in touch.
Best Regards,
Mark
==
2020-12-01 16:02:14
My reply
==
Ok, so I restart the problem description then:
I did (yesterday):
0. Power down Synology
1. Pull out the drive in question.
2. Insert a replacement drive.
3. Proceed to the Storage Manager > Storage Pool > select the volume in question and click “Manage/Action”
4. Run through the wizard to repair the volume in question with the replacement drive.
THEN, today:
4b. Today about 30% finished when I lost the connection to the NAS (over ssh and the web interface). It does not auto-reboot and does not respond to ping.
SO what now ?
As the NAS is unresponsive I will never reach step 5:
To lessen the risk of data loss, what should my first step be ? Can I just pull the plug and hard-reboot the NAS with the current disks mounted (14TB, 3TB, 3TB, 8TB, 8TB in a SHR config), or is it better to replace or remove the disk that I recently replaced (in slot 1: 14TB in place of the previous still untouched 3TB) ?
What are the steps to getting the volume back online if it does not mount automatically ?
Also, is there an option to DELAY the expansion until all drives have been replaces, as you replied changeing the first drive will not expand the volume, but I’m not there yet since I’m stuck in a crash (unresponsive system)
==
2020-12-02 23:25:46
My reply on Synologys’ suggestion to collect logs using the support centre
==
How do I launch “Support Center” on the device when it is unresponsive (which was my initial question – what to do when it hangs in the middle of repairing/reshaping) ?
I forced it off and restarted and hoped for the best – reshaping continued and the second disk is now in reshaping mode.
My other question has not yet been answered:
Is it possible to delay the time consuming step of reshaping until all disks have been replaced ?
Initial configuration: 3TB 3TB 3TB 8TB 8TB
After replacement of the first disk: 14TB 3TB 3TB 8TB 8TB, after reshaping the first disk got a partition to match the 8TB disks.
After replacement of the second disk: 14TB 14TB 3TB 8TB 8TB, while reshaping again, now disk 1 and 2 looks similar with one partition matching the largest of the remaining 3TB disk, one matching the largest on the 8TB disks and the remainder (roughly about 6TB) the same on both 14TB disks.
When replacing the third 3TB disk, I assume the following would happen:
(14TB 14TB 14TB 8TB 8TB)
On the first and second disk, the (about) 3TB partition will be replaced with a partition to match the 8TB disks. Then the remainder (3 disks with 6TB unallocated space) will be used for another raid5 (after yet another reshape)
So my question again; is it possible to delay reshaping until I have had all the disks replaced. I understand that the “rebuild” is needed in between every replacement, but “reshape” should be needed only once.
I’m afraid you cannot delay or prevent this process, once it starts it needs to run until fruition.
I would suggest to leave this running for now, if the volume does crash fully in the mean time I can take a look at what we can do to recover the volume, but there is not much I can do currently I’m afraid.
If you have any further question please do not hesitate to get in touch.
This article will probably repeat some points in the piStorm – basic configuration guide. It’s meant as a quickstart for those who not at this time want to explore all the possibilities the piStorm gives.
Be sure to put the files (kickstart and hdf) in the right location on the SD-card, whatever you want, or follow my directions and put them in /home/pi/amiga-files. The important thing is that the paths in the configuration is set to the same.
Installation of AmigaOS 3.1 on a small hard drive
For this installation, I have choosen AmigaOS 3.1 for several reasons. The main reason is its availability, in reach for everyone through Amiga Forever Plus edition, and also because its low amount of installation disks (6 disks needed, instead of 17 or similar for 3.2).
Conditions:
Configuration files are given a descriptive name and put into /home/pi/cfg. At start of the emulator, the actual config is copied as “default.cfg” and put into /home/pi. This is part of what I did to make it possible to switch config files using the keyboard attached to the Pi (Linux: how to run commands by keypress on the local console).
Amiga-related files (kickstart and hdf) are stored in /home/pi/amiga-files
With “floppy”/”disk” (or drive) in this guide, any Amiga compatible replacement, such as a GoTek drive with Flashfloppy, can be used.
For a basic AmigaOS 3.1 installation, have these disks (in this order) available.
amiga-os-310-install
amiga-os-310-workbench
amiga-os-310-locale
amiga-os-310-extras
amiga-os-310-fonts
amiga-os-310-storage
These disks are available from your legally acquired Amiga Forever Plus Edition (or above), any release from 2008 (my oldest one) and up is recent enough. Look for the adf files in the “Amiga files/System/adf” or “Amiga files/Shared/adf” folder.
You also need the kickstart ROM from the same base folder (“System” or “Shared”). The file you want is the “amiga-os-310-a1200.rom”. I have renamed the kickstart file to “kick-31-a1200-40.68.rom” and then put it in my “amiga-files” folder on the pi.
Start by setting up the piStorm configuration for using the correct ROM and for enabling hard drive support:
Copy the configuration template “pistorm/default.cfg” to “/home/pi/cfg/a1200_4068_os31.cfg”, then change/add:
It’s also important to use a the first available free SCSI id here (piscsi0), as there is a unique feature in piscsi that hides all drives configured following a gap in the SCSI id sequence, so that they won’t be seen in HDToolBox. piscsi0 must always be used by any disk, otherwise, you will get an empty list of drives in HDToolBox.
After saving the changes, go ahead and create an empty hdf for the installation:
504MB is enormous in Amiga-terms 🙂
The bs (block size) of 504k gives the piStorm the optimal number of heads (16) and blocks per track (63) on auto-detecting the hard drive geometry.
Insert the amiga-os-310-install floppy and start up the emulator:
(and start with stopping it if it’s running, “killall -9 emulator” or use systemctl if you have followed my instructions on setting it up as a service)
cd /home/pi/pistorm
sudo ./emulator --config ../cfg/a1200_4068_os31.cfg
Workbench will load from the installation disk. Copy HDToolBox from HDTools (put it on the RAM-disk). Change the tooltype SCSI_DEVICE_NAME (to pi-scsi.device).
Run HDToolBox from RAM:, and you will see a new unknown disk. Use “Change Drive Type”, “Define New…” and then “Read Configuration”. Return to the main window (click the “OK” buttons).
Partition the drive. Remove the second partition, and set the size of the first to something large enough for AmigaOS. 80MB is plenty of space (AmgiaOS 3.1 takes up 2.8MB fully installed). Create another partition of the rest of the space. Change the device names of the partitions if you wish.
Save changes and soft-reboot the Amiga (it will boot up from the install floppy again). You will see the two unformatted (PDH0 and PDH1:NDOS) drives. Format PDH0 (or whatever you set as device names), the smaller one, and name it “System”, uncheck “Put Trashcan”, check “Fast File System”, uncheck “International Mode”, then click “Quick Format” and accept all the warnings).
Start the installation from the Install-floppy (select “Intermediate user” to have some control of the options), use whatever language you wish for the installation process and select languages and keymaps as desired. Change floppy when the installer asks for it. Once done, remove the install floppy and let the installer reboot your Amiga.
It will boot up from the hard drive to your fresh installation of AmigaOS 3.1. Format the other partition and name it “Work” or whatever you want. Follow the instructions above (FFS, no trash, no intl, quick format).
That’s it.
a314: access to a folder on the pi as a drive on the Amiga
To make it a lot easier to transfer files over to the Amiga, a folder can be shared as a drive through a314 emulation.
On the pi-side:
To keep contents and configuration files safe when updating the piStorm software, I put the config files in /home/pi/cfg and content in /home/pi/amiga-files/a314-shared. If you do not, and keep the configuration unchanged, the shared files will be in the “data” folder inside the pistorm binary directory (/home/pi/pistorm/data/a314-shared).
Copy the files that needs to be changed for keeping the content safe:
cd
cp pistorm/a314/files_pi/a3*conf cfg
In a314d.conf, change the a314fs line (add the -conf-file part):
On the Amiga-side:
The needed files are on the pistorm utility hdf (pistorm.hdf, disk named “PiStorm”) pre-set in the default.cfg and you should have had it available since activation of piscsi above.
From the a314 folder on the utility hdf, copy “a314.device” to DEVS:, “a314fs” to L: and append the content of “a314fs-mountlist” to DEVS:mountlist:
copy pistorm:a314/a314.device DEVS:
copy pistorm:a314/a314fs L:
type pistorm:a314/a314fs-mountlist >> DEVS:Mountlist
Then after a restart of the emulator (with the newly modified configuration in place), you should be able to mount the shared folder using “execute command” or from a shell:
mount pi0:
RTG with Picasso96 (old version)
RTG is a standard feature of the piStorm since ‘long’ ago. It requires the Picasso96 (2.0 from Aminet, or the more recent one, renamed P96, from Individual Computer) software to be installed before adding the necessary drivers from the piStorm utility hdf.
On the Amiga-side:
Using Picasso96 2.0 from Aminet, go through the installation process and do not install application drivers or the printer patch, then from the piStorm utility hdf, the installation script for the needed drivers can be found in the “RTG” folder.
You need to have the extracted content of the Picasso96 installation files available during this step of the installation.
On the pi-side:
Activate rtg in the configuration:
...
setvar rtg
...
Restart the emulator. The Amiga will be rebooted at that point. After a reboot, you will have the RTG sceenmodes available in Prefs/Screenmode.
Be sure to test the screenmodes before saving. Some of the modes are less useable because of the way the scaling is handled. I recommend sticking to mainly two resulotions on a 1080p capable screen: 960×540 (and any color depth) and 1920×1080 (up to 16 bit).
a314: networking
How to set up the network using the a314 emulation is well described in the a314 documentation on Github, execpt from how to set it up on “any” Amiga TCP/IP stack.
On the pi-side:
Follow the directions in the documentation for the pi-side, mainly as below:
Enable the a314 emulation in your configuration (should already have been done if you followed this guide):
...
setvar a314
...
Then install pip3, pytun and copy the tap0 interface:
On the Amiga-side:
If not already done so, copy the a314.device from the piStorm utility hdf to DEVS:
copy pistorm:a314/a314.device DEVS:
Copy the a314 SANA-II driver to devs:
copy pistorm:a314/a314eth.device DEVS:
For the rest of the configuration on the Amiga, you need a TCP/IP stack such as Roadshow or AmiTCP as documented on Github. For any other stack you’re “on your own”. Here are the settings you have to enter in the correct places:
SANA-II driver: a314eth.device (in Miami, it’s the last option “other SANA-II driver”)
Unit: 0
Your IP address: 192.168.2.2
Netmask: 255.255.255.0
Gateway: 192.168.2.1
DNS: 8.8.8.8, 4.4.4.4, 1.1.1.1, 1.0.0.1 or similar (any public DNS will work, these are the Google public DNS servers)
Extract these files to RAM: (lha x [archive name] ram:), and start the Miami installer from there. The next step is the configuration. From the folder where Miami was installed, start MiamiInit and follow the guide, giving the values as listed above for IP address, netmask, gateway and DNS.
When you reach the end of MiamiInit, you should input “Name” and “user name”, then save the configuration (you can uncheck the “Save information sheet” and “Print information sheet”.
Start Miami and import the just saved settings.
Click the “Database” button and choose “hosts” from the pull-down menu.
Click on “Add” and fill in your IP-address (192.168.2.2) and name (for example “amiga”).
Click “Ok”, then choose “Save as default” from the Settings menu.
Click on “Online” whenever you want to be connected (auto-online is available only for registered users but I assume you could launch Miami and put it online from ARexx).
This quick guide explains the steps needed to be able to run different versions of PHP on the same server (different virtual hosts or even different folders within the same site).
Updated after the release of PHP 8.3 in November 2023 (8.3 is now the version installed from Ondrej’s repository)
Prepare
If the ‘add-apt-repository’ command is missing, you need to install the package “software-properties-common” first:
apt install -y software-properties-common
Add the ondrej/php repository to your system:
add-apt-repository ppa:ondrej/php
apt update, upgrade:
apt update
apt upgrade
apt autoremove
Note: after these steps you will have both PHP 8.1 and 8.3 installed, and most likely PHP 8.1 active for Apache. When you follow the hint on removing packages no longer needed (php 8.1 packages), PHP 8.1 Apache will also stop working. This will be remedied in the section below, or by changing Apache to use PHP 8.3 instead:
a2enmod php8.3
Install Apache fastCGI module:
apt install -y libapache2-mod-fcgid
For each version of PHP
As of 1 Jan 2024, PHP versions 8.2 (php8.2) and 8.3 (php8.3) are those with active support and updates. PHP version 8.1 (php8.1) will continue to receive critical updates until 25 Nov 2024. See Supported PHP Versions.
For each version, also any custom configuration in php.ini has to be duplicated. In Ubuntu the php.ini files are located in the subfolders of /etc/php/x.x/ (one subfolder for each run environment, “apache2”, “cgi”, “cli”, “fpm”).
With the understanding of the above, here are the needed commands for installing the required and extra packages for PHP 7.4, 8.0, 8.1, 8.2 and 8.3:
Install only the versions you need/want. My suggestion is to (re)install whatever version that is current for the OS release you are running (as for this time Ubuntu 22.04 LTS = php 8.1), the version by default installed when updating with Ondrej’s repository (for now 8.2), the current release of PHP (8.3) and if really necessary the last ‘legacy’ version (7.4).
Set new default PHP version used by Apache
To set the default PHP version to use when not overridden by SetHandler below, use the commands a2dismod and a2enmod. Set default to PHP 8.3
Configuring PHP version for virtual host or subfolder
Activate necessary Apache modules and restart Apache:
a2enmod actions fcgid alias proxy_fcgi
systemctl restart apache2
Use FilesMatch directive to set the PHP version:
FilesMatch is valid in both the virtualhost configuration and inside a Directory section.
To set PHP version globally for a virtual host, use it outside a Directory section.
The default PHP version can be set using ‘a2enmod php8.2’ (or any other version)
Check the configuration for errors:
apachectl configtest
If result is “Syntax OK”, restart Apache:
systemctl restart apache2
Overriding PHP version using .htaccess
For this to work, “AllowOverride FileInfo” must be present for the directory (or above) in which the .htaccess file will be used to set the PHP version.
For the default virtual host, the DocumentRoot is set to /var/www/html, so to allow PHP version to be set by .htaccess at that level or below, the following must be present in the vhost configuration:
When this has been set, FilesMatch and SetHandler (as described above) can be used within the .htaccess file. The .htaccess method have higher priority than what is set for the virtualhost, or the subfolder within the DocumentRoot of the virtual host.
Testing
Create a file named ‘i.php’ in the locations with the different PHP versions (can be different virtualhosts or folders)
<?php
phpversion();
?>
Access these locations on the virtualhosts or their directory locations to verify that they are using different PHP versions.
This is probably not the only way to do this, and just something I had to dig up to be able to control the piStorm from the console keyboard without being logged in.
After trying to find some built-in way of doing it, I ended up using ‘lirc’ (‘inputlircd’) to fetch the keystrokes and execute appropriate commands in the background. The guide is not intended to be complete, and it’s not even re-tested because of the trial-and-error attempt on getting this working the first time, and not taking any notes.
The marked lines in the partial content of “/etc/init.d/inputlirc” reveals that a file “/etc/default/inputlirc” is sourced.
Change startup parameters for inputlircd
“/etc/default/inputlirc” contains parameters for running inputlircd, including the input device to capture events from and the parameters to the service looking for keystrokes.
Read the inputlircd manpage (man 8 inputlircd) to find out which parameters you need/want to use. The below is what I had to put in the file:
# Options to be passed to inputlirc.
EVENTS="/dev/input/event0"
OPTIONS=-m 0 -c
-m 0 = -m sets the lowest keycode to pass to the daemon
I also use -c to allow to capture the modifier keys (CTRL, SHIFT, ALT) so they will be part of a keystroke instead of generating their own events. This will make it possible to use combinations like SHIFT + F1 for command execution.
After editing and saving the file, enable and (re)start the inputlirc service:
Snooping for keypress events
Unless you know all the keycodes you are going to use for running commands, now is a good time to check what lircd receives on specific keypresses. Run the command to snoop for keypresses in the shell, and press keys on the keyboard connected to the computer (this could be connected through USB, PS/2, Bluetooth, IR, whatever)
The irexec service
To make the irexec service restart when inputlirc is restarted (due to a key configuration change), the service startup file has to be slightly modified:
/lib/systemd/system/irexec.service:
[Unit]
Documentation=man:irexec(1)
Documentation=http://lirc.org/html/configure.html
Documentation=http://lirc.org/html/configure.html#lircrc_format
Description=Handle events from IR remotes decoded by lircd(8)
After=inputlirc.serviceRequires=inputlirc.service
...
Add the lines marked above, then rebuild the systemd service configuration file and enable and start the irexec service:
Configuring what to run on keypresses
The file “/etc/lirc/irexec.lircrc” contains the configuration for what commands to run when selected key(combinations) are used. Wipe out all the defaults in there and add something useful. Below is the updated, more generic configuration I use on my PiOS for the piStorm now, just mapping some keys to a script with a similar name:
begin
    prog   = irexec
    button = SHIFT_KEY_F1
    config = /home/pi/irexec/shift_f1.sh
end

begin
    prog   = irexec
    button = SHIFT_KEY_F2
    config = /home/pi/irexec/shift_f2.sh
end

begin
    prog   = irexec
    button = SHIFT_KEY_F3
    config = /home/pi/irexec/shift_f3.sh
end

begin
    prog   = irexec
    button = SHIFT_KEY_F4
    config = /home/pi/irexec/shift_f4.sh
end

begin
    prog   = irexec
    button = SHIFT_KEY_F5
    config = /home/pi/irexec/shift_f5.sh
end

begin
    prog   = irexec
    button = SHIFT_KEY_F6
    config = /home/pi/irexec/shift_f6.sh
end

begin
    prog   = irexec
    button = SHIFT_KEY_F7
    config = /home/pi/irexec/shift_f7.sh
end

begin
    prog   = irexec
    button = SHIFT_KEY_F8
    config = /home/pi/irexec/shift_f8.sh
end

begin
    prog   = irexec
    button = SHIFT_KEY_F9
    config = /home/pi/irexec/shift_f9.sh
end

begin
    prog   = irexec
    button = SHIFT_KEY_F10
    config = /home/pi/irexec/shift_f10.sh
end

begin
    prog   = irexec
    button = SHIFT_KEY_F11
    config = /home/pi/irexec/shift_f11.sh
end

begin
    prog   = irexec
    button = SHIFT_KEY_F12
    config = /home/pi/irexec/shift_f12.sh
end

begin
    prog   = irexec
    button = CTRL_SHIFT_KEY_F12
    config = /home/pi/irexec/ctrl_shift_f12.sh
end
Whenever you have made a change to /etc/lirc/irexec.lircrc, you need to restart inputlirc (which automatically restarts liexec):
systemctl restart inputlirc
Action scripts in /home/pi/irexec
These scripts can be updated without having to restart inputlirc. Be sure to set the execute flag on them (chmod 755 /home/pi/irexec/*.sh)
For the piOS installation for the piStorm, the content of my configuration-switching scripts are as follows:
/home/pi/irexec/shift_f1.sh (the F-keys 1-10 with the SHIFT key held down):
In a similar way, I have set up the other shift-f-key combinations as shown in the video.
I have used SHIFT+F12 for a safe reboot, and CTRL+SHIFT+F12 for a shutdown of the pi. If running piStorm in RTG mode there can be a delay of about 1 minute before something happens.
/home/pi/irexec/shift_f12.sh:
#!/bin/sh
sudo systemctl stop pistorm
sudo reboot
/home/pi/irexec/ctrl_shift_f12.sh:
#!/bin/sh
sudo systemctl stop pistorm
sudo halt -p
You can check the status of the piStorm service to see that it received the shutdown command:
Revised start-emulator.sh script
Because I want to run the wip-crap version of the emulator at some points, I have added a check for the mentioning of “wip-crap” in the configuration file that is going to be used, then depending on its existance or not, launching the emulator from the correct directory:
#!/bin/sh
if grep -q wip-crap "/home/pi/default.cfg"; then
  echo "wip-crap"
  cd /home/pi/pistorm-bnu/
else
  echo "main"
  cd /home/pi/pistorm/
fi
sudo ./emulator --config /home/pi/default.cfg
exit 0
To enable the wip-crap version, just add a comment in the beginning of the configuration such as:
After going through my Getting Started guide you have the piStorm starting up automatically (if followed the very last step) as a emulated 68020 CPU. If your onboard kickstart allows it, you might also have 128MB Z3 RAM. It will start up and display the “insert a disk” screen/animation depending on which Kickstart you have on the Amiga motherboard.
Configuration file
The default configuration file, named “default.cfg”, is located in the “pistorm” folder. It’s a good idea to keep this file untouched and make changes to a copy of it, then telling the emulator to use it by using the –config parameter.
In my installations, I have put the copy of “default.cfg” in /home/pi (“../” as a relative path from within the pistorm folder), and keep the rest of Amiga-related files (kickstart and hdf) in a folder named “amiga-files” in the ‘pi’ user’s home (/home/pi/amiga-files).
Here are the very initial steps to copy the default configuration to /home/pi, and to set up the amiga-files folder (after logging in as the ‘pi’ user):
cp -p pisotrm/default.cfg .
mkdir amiga-files
Stop the 68k-emulator if it is running (two methods, depending on how/if it is auto starting):
If started from rc.local:
sudo killall emulator
If set up as a service:
sudo systemctl stop pistorm
Now to autostart the 68k-emulator with a specified configuration file, edit rc.local (if it is started from there) and add –config ../default.cfg so the full command reads:
cd /home/pi/pistorm/ && sudo ./emulator --config ../default.cfg&
For the service method (using my instructions), change the file “start-emulator.sh” in /home/pi:
#!/bin/sh
cd /home/pi/pistorm/
sudo ./emulator --config ../default.cfg
exit 0
Start the 68k-emulator again by running the command from the rc.local file above (for non-service autostart), or by using systemctl if you have set it up as a service:
sudo systemctl start pistorm
For further restarts of the 68k-emulator, do as previously described with “killall” or “systemctl” depending on your choice of setup. With “systemctl” there is also the “restart” option:
sudo systemctl restart pistorm
A restart of the 68k-emulator will also reboot the Amiga.
Configuration options
The default.cfg contains some examples and descriptions of many of the options available. You can also read the current distributed configuration file on GitHub: default.cfg
Documentation for some the piStorm features for the Amiga is located within some subfolders on GitHub: piscsi (map hdf files as hard drives on the Amiga side) rtg (RTG using the Picasso96/P96 package) net (not fully implemented) a314 (includes shared folder on sd-card, networking and shell-access to the pi)
CPU type
The easiest one, leave this at “68020”. This is the most complete and compatible CPU for the emulator.
Kickstart mapping
To get better performance and enable Z3 RAM and get P96 2.4+ working, a Kickstart version 3.1 (40.68) for Amiga 1200 is highly recommended. To obtain the kickstart file the correct way, purchase the Plus edition of Amiga Forever. If you own an Amiga 1200, you can also use any of the tools available for saving the kickstart to a file.
You can name the file whatever you want, but mine is named (renamed from the Amiga Forever set) “kick-31-a1200-40.68.rom”, and I have the file in “/home/pi/amiga-files”.
Early in the config, there is this line:
# Map 512KB kickstart ROM to default offset.
map type=rom address=0xF80000 size=0x80000 file=kick.rom ovl=0
It makes the emulator look for the file “kick.rom” in the current directory (as cd:ed to /home/pi/pistorm before starting the emulator).
Change this to:
# Map 512KB kickstart ROM to default offset.
map type=rom address=0xF80000 size=0x80000 file=../amiga-files/kick-31-a1200-40.68.rom ovl=0
Then restart the emulator to see that it uses the kickstart file (easy to spot if you have a 2.x or 1.x KS on the motherboard).
Have the installation floppy for AmigaOS 3.1 ready (also available from Amiga Forever). If you boot the installation floppy, you would end up at the Workbench and be able to see that the FastRAM (128MB Z3) has been mapped.
Memory mapping
The default memory section in the config looks like this:
# Map 128MB of Fast RAM at 0x8000000, also known as 32-bit Fast RAM or CPU local Fast RAM.
# Only supported properly on select Kickstarts, such as 3.1+ for Amiga 1200, 3000 and 4000.
#map type=ram address=0x08000000 size=128M id=cpu_slot_ram
# Map 128MB of Z3 Fast. Note that the address here is not actually used, as it gets auto-assigned by Kickstart itself.
# Enabling Z3 fast requires at least Kickstart 2.0.
map type=ram address=0x10000000 size=128M id=z3_autoconf_fast
# Max 8MB of Z2 Fast can be mapped due to addressing space limitations, but for instance 2+4MB can be chained to leave 2MB for something else.
#map type=ram address=0x200000 size=8M id=z2_autoconf_fast
#map type=ram address=0x200000 size=2M id=z2_autoconf_fast
#map type=ram address=0x400000 size=4M id=z2_autoconf_fast
Pretty self-explanatory, but some of the RAM types are not supported on all Kickstarts. There is no speed difference in using “32-bit FastRAM” compared to “Z3 Fast”. The “Z2 FastRAM” is the equivalent of a RAM expansion plugged into the expansion port of Amiga 500 and Amiga 1000, or in a Zorro slot on the Amiga 2000. These expansions could be standalone or a part of a hard drive controller for those systems.
piscsi – hard drive emulation
The next section in the configuration is about piscsi, which allows you to assign up to 7 auto-mounted and auto-bootable virtual hard drives on the Amiga.
# Uncomment this line to enable the PiSCSI interface
#setvar piscsi
# Use setvar piscsi0 through piscsi6 to add up to seven mapped drives to the interface.
#setvar piscsi0 PI0.hdf
#setvar piscsi1 PI1.hdf
My virtual disk is 1GB in size and consists of several partitions (three smaller ones for different versions of AmigaOS, and a larger one for common content) and is named “amiga-1gb.hdf”. The location for my .hdf is as the Kickstart ROM, “/home/pi/amiga-files”.
To enable the pi-scsi.device, just uncomment the line “setvar piscsi”, then put the name of the .hdf as a parameter the “setvar piscsi0” (or 1-6):
# Uncomment this line to enable the PiSCSI interface
setvar piscsi
# Use setvar piscsi0 through piscsi6 to add up to seven mapped drives to the interface.
setvar piscsi0 ../amiga-files/amiga-1gb.hdf
This will make the Amiga recognize the harddrive with the correct DEVICE tooltype of HDToolbox (“DEVICE=scsi.device” should be changed to “DEVICE=pi-scsi.device”). Once set up using HDToolbox (detect/change disk type and create the partitions), it can be used to install AmigaOS on and boot from.
Also take a look at the current documentation at GitHUb: piscsi
RTG using Picasso96 or P96
See the documentation at GitHub: rtg (RTG using the Picasso96/P96 package)
You need two files from the GitHub repository transferred over to the Amiga after having installed Picasso96 or the more maintaned release of P96. I use my registered 2.4.6 from Individual Computers Google search for 'P96+2.4.6'
# Forward keyboard events to host system, defaults to off unless toggle key is pressed, toggled off using F12.
# Syntax: keyboard [grab key] [grab|nograb] [autoconnect|noautoconnect]
#   "grab" steals the keyboard from the Pi so Amiga/etc. input is not sent to the Pi
#   (also helps prevent sending any ctrl-alt-del to the Amiga from resetting the Pi)
#
#   "autoconnect" connects the keyboard to the Amiga/etc. on startup
keyboard k nograb noautoconnect
# Select a specific filename for the keyboard event source.
# This is typically /dev/input/event1 or event0, but it may be event3 with for instance a wireless keyboard.
# Use ls /dev/input/event* to check which event files are available and try until you find the one that works.
#kbfile /dev/input/event1
# Forward mouse events to host system, defaults to off unless toggle key is pressed on the Pi.
# Syntax is mouse [device] [toggle key] [autoconnect|noautoconnect]
# (see "keyboard" above for autoconnect description)
mouse /dev/input/mice m noautoconnect
Just enable the kbfile line and set the correct device there if it doesn’t work with the defaults.
Real Time Clock (RTC)
The RTC is enabled in the default configuration and transfers over the time and date on the Pi to the Amiga.
# Map RTC as a register range.
map type=register address=0xDC0000 size=0x30000
To get the correct time on the Pi, it must be connected to the Internet (as set up in my Getting Started guide).
Also, you must ensure the timezone is set correct on the Pi, otherwise your time will be off an hour or two. To set the correct time zone, hse the ‘timedatectl’ command:
List the available time zones:
timedatectl list-timezones
Set the time zone:
sudo timedatectl set-timezone Europe/Stockholm
Switching between multiple configurations
When you have one configuration you’re happy with, you might want to set up alternative configurations for compatibility or experimental reasons.
I wrote this guide on how to capture keypresses on a keyboard connected to the pi on the piStorm. Before setting up the commands to execute (the very last step), make a copy of your /home/pi/default.cfg, as this file is to be overwritten when changing configuration using the defined keypress events (in my example SHIFT in combination with the F-keys, SHIFT+F12 to reboot the pi, CTRL+SHIFT+F12 to shut down the pi).
Getting files over to the Amiga
Not really a configuration thing, but I’ll explain the possible methods to transfer files (as for example archives for installing, or unpacked archives of programs ready to launch the installer from) over to the Amiga.
Since networking is not yet implemented, and a shared folder from the Linux side is not available, files have to be transferred the ‘classic’ way.
The options as I see are:
* (real) floppy disks
* (adf) through either an externally connected GoTek drive, or as a replacement for the internal drive
* (hdf) a pre-prepared hdf (full RDSK image, not a partition) file containing archives of programs to install
* (adf) from a hdf, mounting using any of the available options like GoADF
* physical disk connected to the pi, then exported as a piscsi device on the Amiga (complicated and a bit risky, described in detail in the piscsi documentation at GitHub)
* since May or June 2021, a314 emulation can be used to access a folder on the SD-card and even transferring files over to the Amiga over the a314 SANA-II network device. You find my detailed instructions on setting up the shared folder and network in my “AmigaOS 3.1 installation guide“.
mkdir -p /home/pi/bnu
cd /home/pi/bnu
git clone https://github.com/beeanyew/pistorm.git
cd pistorm
git checkout wip-crap
make
cd ..
mv pistorm ../pistorm-bnu
Expected output:
Update CPLD bitstream
Build the program to test access to chip RAM
cd pistorm-bnu
chmod +x ./build_buptest.sh
./build_buptest.sh
For EPM240
chmod +x nprog_240.sh
sudo ./nprog_240.sh
For EPM570
chmod +x nprog.sh
sudo ./nprog.sh
wip-crap-only feature configuration
By the merge of July 11 2021, main is up to date with wip-crap.
In this guide, I explain how I set up the piStorm, beginning from a fresh board (with just the pins and pi header soldered onto it) until it starts up the Kickstart “insert disk” screen. This is not the only way to do things, and necessarily not the best way, it’s my way 🙂
Pi setup
Use the official Raspberry Pi Imager or a third party tool like BalenaEtcher to write the Lite version of Raspberry Pi OS to a SD-card and start up the pi
Using raspi-config, set wifi-credentials (System Options) and activate SSH (Interface Options).
(everything except the basic installation can be done without network connectivity, but it is easier to do it over SSH than at the terminal)
sudo su -
apt -y update
apt -y upgrade
Updating will take about 10 minutes. Usually a reboot is recommended here, but in this case not necessary, so continue with the section below and install some packages and test the GPIOs.
Testing your Pi’s GPIO pins. This MUST be run disconnected from the PiStorm, just power up the Pi with USB and do it outside the Amiga entirely.
Info from https://www.raspberrypi.org/forums/viewtopic.php?t=180505
git clone https://github.com/captain-amygdala/pistorm.git
cd pistorm
make
Expected output:
Optional step, get and build wip-crap development version
Only build the emulator for use/test later on – skip the CPLD update for now and do that when the wip-crap build is going to be used. piStorm – experimental stuff wip-crap
Shut down the pi
This is as far as you get without the piStorm connected, so it’s time to shut down the pi and then stuff it away until you get your piStorm (- shutdown and continue as below if you already have it).
‘pigpiod’ (for testing the GPIOs) above keeps the pi waiting for 90 sec if not killed before shutdown.
sudo killall -9 pigpiod
sudo halt -p
Update CPLD bitstream
Shut down the pi, take a look 20 pixels above :), disconnect power and connect the piStorm adapter to the GPIO
Connect power and let the pi start, check network connectivity or re-setup if necessary.
Build the program to test access to chip RAM
cd pistorm
chmod +x ./build_buptest.sh
./build_buptest.sh
For EPM240
chmod +x nprog_240.sh
./nprog_240.sh
For EPM570
chmod +x nprog.sh
./nprog.sh
Expected output (nprog.sh for EPM240):
Installing the piStorm in the Amiga
Shut down the pi, disconnect everything and separate the adapter from it.
Replace the CPU in the Amiga with the adapter board (the Pi connector should be on the left side). Align both rows of pins with the CPU socket, then, without any pressure on the board, move the adapter up and down (front and back) on the socket to feel the point in which the pins are centered in the socket.
Check that all pins go into the socket an press it down until it bottoms.
Mount the pi on the adapter with the USB port facing towards you, and the HDMI connector on the right side.
Connect the HDMI output and a keyboard.
Starting the emulator
Power on the Amiga, the pi will be powered and boot up (the output from the Amiga will be just a black screen (or any other single-colored screen, I usually get a red one before the emulator starts) until the CPU emulator is started).
Login as ‘pi’ and change directory to ‘pistorm’.
Initial check – can the piStorm read and write to the CHIP RAM ?
sudo ./buptest
Expected output:
In case of any error, check that the piStorm adapter is pressed down firmly in the CPU-socket. It should be pressed down so it bottoms (plastic on the pins touching the socket). Once fixed, re-run buptest. Repeat until zero errors are reported.
Start the emulator
sudo ./emulator
Expected output (untouched default.cfg in pistorm directory). If the kickstart file (kick.rom) for softkicking is not found it defaults to using the KS on the mainboard.
On my test computer (A500 r6) it falls back to the 3.1.4 ROM:
From here on, you can use the Amiga as any other floppy-only Amiga. I will document the features (kickstart switch, RAM, hard drive, RTG) in another post to keep these at readable length.
Autostart the emulator on system boot – the simple method
In /etc/rc.local, add before the “exit 0” line:
cd /home/pi/pistorm/ && sudo ./emulator&
Autostart the emulator on system boot – advanced method
The CPU-emulator will be started a lot earlier if adding it as a systemd service.
Become root (the ugly way):
sudo su -
Create the file “pistorm.service” in /lib/systemd/system:
Claude Schwartz was interviewed by Bob1969 for the French Amiga fan website “Amiga Impact”.
<Bob1969> let’s start <Claude> ok
<Bob1969> Q1: Who are you ? engineer, hobbist, selfmademan .. <Claude> I’m a hobbist but also work as electronic engineer since 20 years now
<Bob1969> What is your relationship with Amiga community ? <Bob1969> How does this idea of Pi storm comes to you ? <Claude> Hmm difficult question 🙂 I was using Amiga when I was around 12 years or so. My first Amiga was an A500 which i got from my father because he bought himself a A2000 and he gave me his A500. I used the Amiga mostly for games . But at one point all my friends turned to PC , so I had of course to buy also a PC 🙂 Then i took a break from Amiga for a long time, around 2018 I saw the Vampire V600 and immediatly tought i need to have that too <Claude> I bought an A600 from Ebay and placed an order for a V600. While waiting for the V600 to arrive I started to buy more Amigas and Accelerators (Yes I was addicted again lol) . Then shortly after I recived the V600 i was invited by the Vampire Team to join in. So I did and I had a fun time there of about 2 Years, helping testing and some vhdl coding. Around 2020 I decided that I want something different
So I started with Pistorm , it was a idea i had for longer. Using an small CPU board to emulate an 68000 in place of a real 68000
<Bob1969> What are the main technical issue to connect GPIO to 68000 socket ? <Claude> Its the timing, the 68000 is not a fast processor. but the pins of a 68000 needs to follow a very strict timing. Because of that Pistorm has a small CPLD/FPGA which does the timing in hardware and recives commands from the Raspberry over the GPIO pins. This relax the timing for the Raspberry <Bob1969> U4 ? <Claude> yes the big chip . Thats a Altera MAX2 CPLD
<Bob1969> Which ressouces from Pi will be available under Amiga system (Ram,Gfx,Sound,storage )? <Claude> First is the CPU Emulation , this is currently using Mushashi, Musashi is a very popular CPU also used by MAME. Then some ammount of RAM from the PI is also directly usable by the CPU Emulator . This RAM can be up to 256MB (limited by the Raspberry Pi RAM size) <Claude> Then there is a RTG system. The RTG Memory is also directly accessible by the CPU emulation. As the RAM on the Raspberry is very fast , the RTG system is very fast compared to regular Zorro Based RTG cards <Claude> Then there are two storage systems. One is by emulation of Amiga Gayle IDE , this makes it possible to boot directly from a emulated HDD with a Kickstart ROM >2.x . Lately a full SCSI emulation was added , the SCSI emulation bypasses most of the bottlenecks the Gayle IDE emulation brings. To make it possible to boot from that emulated SCSI thre is also a bootrom and driver written for it. This makes it possible to use a standard kickstart and still use the SCSI emulation <Claude> Further Kickstart ROMs can be used on the Mainboard, but also used as File from the Raspberry SD Card
<Bob1969> What Performance Do you expect ? <Claude> Most of these advanced features were programmed by Bnu ( Famous for his NES works and also for working on mntmn’s great ZZ9000 RTG card) <Claude> Currently the performance is at 15 to 18 MIPS , which is roughly equalivent to a 68030 at 60MHz
<Claude> There are plans to extend this further 🙂 <Bob1969> It will depend which Pi you use …zero , 3+,4 <Claude> Yes the current version of PiStorm is very optimized using a Raspberry Pi3 . Future versions of PiStorm will be optimized for Pi4 / CM4
<Bob1969> How many time do you estimate that the project will be in stage 1.0 ? <Claude> It has some bugs were we working on currently . Mostly its about timing and irqs . The Amiga is sometimes demaning when it comes to this 🙂 Version 1.0 , good question … I would say the journey to 1.0 is the interesting part , so i might take some time to reach 1.0 .
<Claude> Bob1969: was this the question ? <Claude> i understand it how far/stable it is currently <Bob1969> it’s an introduction to the next question 😉 <Claude> ok 🙂
<Bob1969> after validate a prototype, Do you plan to start a mass production (industry production) ? <Claude> No 🙂 The fundamental idea of PiStorm is to make it free and open. The Hardware itself is not very complicated. So advanced hobbiest can build them by themself. For not so advanced hobbiest (or people who are lazy like me 🙂 ) All the design files are published. These desgin files are readymade for a Chinese PCB manufacturer who also does PCB assembly. So the idea is to upload the desgin files to these PCB service in China and get back a mostly readymade PiStorm for roughly 15€ 🙂 I don’t know if it okay for amigaimpact , it’s not meant as free advertisment for them, but the company is called JLCPCB <Claude> Only the pins for the CPU Socket and the Raspberry PI needs to be soldered manually. But I think most Amiga users have already touched a soldering iron <Bob1969> Why can’t Chinese factory do the soldering ? <Bob1969> PCB makers are linked with assembling factories <Claude> Yes the company is a PCB maker with assembly factory. They do the soldering of all SMD components, they would probably also do the soldering of the Pins . But I have not tried it yet there to let them solder also the pins.
<Bob1969> last question , How do you think this kind of project ( if the graft live ) can involve in the future ? <Claude> The next step is to add a little extra hardware (also opensource of course) to make it possible to output the Amiga Video and Audio over the same HDMI Plug which outputs RTG. Then there is PiStorm2 in planing, PiStorm2 targets “32 Bit” Amigas like A1200,CD32,A3K,A4k and will be using the new Rasperry Compute Module 4. In parallel there are works on using PiStorm on other 68000 Computers like Atari. Also MAC and Sharp X68000 are very interesting Platforms for PiStorm 🙂
<ShK> Here’s some random bringup pictures. if they are ok for Claude to use
https://usercontent.irccloud-cdn.com/file/tJRggCLf/BringUp.7z <Claude> thanks ShK 🙂 i have no idea whats inside but i (almost) fully trust you 🙂 <ShK> ok <ShK> …. but you will be fine 🙂 <Claude> looks good 🙂 <Bob1969> Amazing pictures !!!
<Bob1969> It’s the End of this interview, i will say : Claude you’re a gentleman <Claude> thank you Bob1969 , but can i say something? <Bob1969> You have been very kind. <Bob1969> of course ! <Claude> The whole PiStorm project is only possible trough all the people who help on it. Without the great contributions and help I got with it , it would still only have 2 MIPS and boot only from Floppy 🙂 So I like to thank very much Bnu,Niklas,Shanshe,ShK,Flype… and all the people at the PiStorm Discord 🙂
<Bob1969> Do you allow me to publish this interview in a web site ? <Claude> yes of course 🙂 <Bob1969> it will be translated for your future French fans
peo — Today at 9:07 PM
@Claude you did not get any question about currently supported systems (and also the work in progress with the A600 version) , can you toss that in for @Bob
<Claude> Peo , oh yes . Sorry if i forgot some things! Yes people working currently on other Versions of PiStorm. There is a A2000 CPU slot version in the works and a A600 Version <Claude> Also the Spanish Retrowiki.es did a own version of PiStorm for themself
[HAJ] — Today at 9:16 PM
Thank you for doing the whole interview in this channel, very interesting and superb work @Claude !!
Claude — Today at 9:17 PM
if i forgot something then please speak up i have a very short memory and often forget things to mention
peo — Today at 9:17 PM
in which models is piStorm currently working ? All 68000, except for some flaws with the A600 ?
(A1000 possibly needs relocator as the CPU is on the opposite side)
Claude — Today at 9:18 PM
personally i tested in A500, A2000 Rev4 . I have seen it running in CDTV too
peo — Today at 9:20 PM
are there any (longer) videos of it running (I know, but hidden here in the chats) ?
<Claude> hmm on my twitter maybe
peo — Today at 9:24 PM
(asking for my short info page), is it ok to use videos and pictures you have shared here and on Twitter ? Ofcourse mentioning the source, but I might have to download and share them through other channels to use them on the page ?
@_Bnu is it ok with your photos and videos too ?
<Claude> yes of course
<ShK> i find one bringup video
<Claude> haha ShK that was the first boot of pinball dreams <ShK> yes! 🙂
_Bnu — Today at 9:26 PM
All my videos are top secret classified by NASA and the Martian Government.
<Bob1969> Time of expansive accelerator is over..:) <Claude> Hmm I don’t see it that way 🙂 Warp,Vampire,ACA all these are great products. PiStorm is just different , but it can’t replace the feel of a real 68060 or the features of a Apollo Core or the pureness of a ACA on a A500
peo — Today at 9:30 PM
not when retrorewind starts selling piStorm at $150-$250 …
<Bob1969> Thank you Claude & all your team for time !
mark sealey — Today at 9:34 PM
@peo I have a few videos on my YouTube…. mobile phone camera videos tho
<Claude> thank you Bob1969 <Bob1969> New competitors are goods and create dynamic <Claude> yes , but I love peace . better life together friendly than in stupid Amiga wars 🙂 <ShK> pistorm opens a lots of possibilities
peo — Today at 9:35 PM
@mark sealey yes, I have seen some of those (some abit shaky), I guess ok to use/reupload these too ?
mark sealey — Today at 9:37 PM
@peo lol yeh sorry about that….now my PiStorm is quite stable I hope to get a HDMI capture device..,..I’m left handed too that doesn’t help
peo — Today at 9:38 PM
@mark sealey I do not want to make the viewers sea-sick 🙂
mark sealey — Today at 9:38 PM
I uploaded a doom video today
@peo lol I understand
piStorm is an opensource project started by Claude Schwartz. The board fits inside the Amiga 500, Amiga 2000 and CDTV models and boosts their performance close to a 25MHz 68040 equipped Amiga 4000 (60-70MHz 68030).
Native boards for the A600 and A2000 (CPU slot) are under development.
Besides a fast CPU, which is provided by the Pi through the Musashi 680×0 emulator, piStorm with the recommended Raspberry Pi 3A+ gives you:
* FastRAM configurations up to and above 256MB without starving the Pi of RAM (3A+ has 512MB)
* piSCSI – allows you to mount up to 7 hard disk devices; supports hard drive images and even physical drives
* autoboot from hard drive image or physical drive
* RTG – gives you together with the P96 software 16 and 24 bit graphics in high resolution
* kickstart switch – specify which kickstart to use (but not really switch it other than changing from configuration file)
* keyboard and mouse passthrough – use the keyboard and mouse connected to the pi as Amiga devices
* real time clock (RTC) – passes the date and time over to the Amiga from the Pi
* networking (new) – allows connecting to internet or local network with the SANA-II driver and a TCP/IP stack
* folder sharing (new) – share a folder on the sd-card with the Amiga for simple file transfers
* remapping of DF0: to DF1/DF2/DF3 (new)
* remapping of slow-fast ($00C00000) as chip-RAM (new) – no more JP2/JP7A modification needed for 1MB chip-RAM
What do I need ?
* The piStorm 68000 replacement adapter
* A Raspberry Pi 3A+ or similar (Pi 3A+ is recommended because of its low profile)
* A microSD card for the piStorm software
It differs depending on how countries add expenses on imported PCBs and components and what the shipping rates for these are at the time, but you should not accept to pay (unless you really WANT to) more than 25-30 EUR for the assembled adapter board. I have (in the Discord channel) seen prices as low as about 13 EUR + shipping. Because of the ongoing semiconductor shortage, components are getting harder and more expensive to source, which drives the prices up a bit, still not anything near $149.99 or such (more close to the double mentioned above, which I have left in). List prices at retrorewind.ca should NOT be accepted (as for example, the RGBtoHDMI A500 adapter at $40, and the A2000 video slot version at $70!).
To that you have to add the cost of the recommended Pi 3A+ (about 30-35 EUR), and a suitable microSD card (up to 32GB is reasonable).
My Getting Started Guide, updated as I discover the piStorm for myself. Refer the official documentation (in the GitHub Readme.md files spread across some the repository folders) for most up-to-date information.
My Basic Configuration Guide, which also links to some advanced topics like configuration switching using ‘irexec’.
piStorm tests and reviews
The very first video-review of piStorm was published by Chris Edwards on 25 April 2021 25 April 2021: PiStorm 68K CPU replacement and more (Chris Edwards)
1 May 2021: Amiga PiStorm P2 – ROMS, Hard drives, RTG and more (Chris Edwards)
2 May 2021: PiStorm: Turbo Boost Amiga 500 With Raspberry Pi (Dan Wood)
4 May 2021: Mounting the PiStorm in the Amiga 1000 (Chris Edwards)
9-10 May 2021: Introducing the piStorm & livestream (Mikes Retro Tech)
16 May 2021: Lets build a PISTORM (CRG / Casual Retro Gamer)
18 May 2021: Amiga PiStorm – Retro Power on a Budget – Tech Nibble (RMC / Retro Man Cave)
This is a cloned article from quora (which I usually avoid visiting whenever they appear in search results).
— The reply was written by Dave Haynie, “Electrical engineer and part-time mad scientist”
—
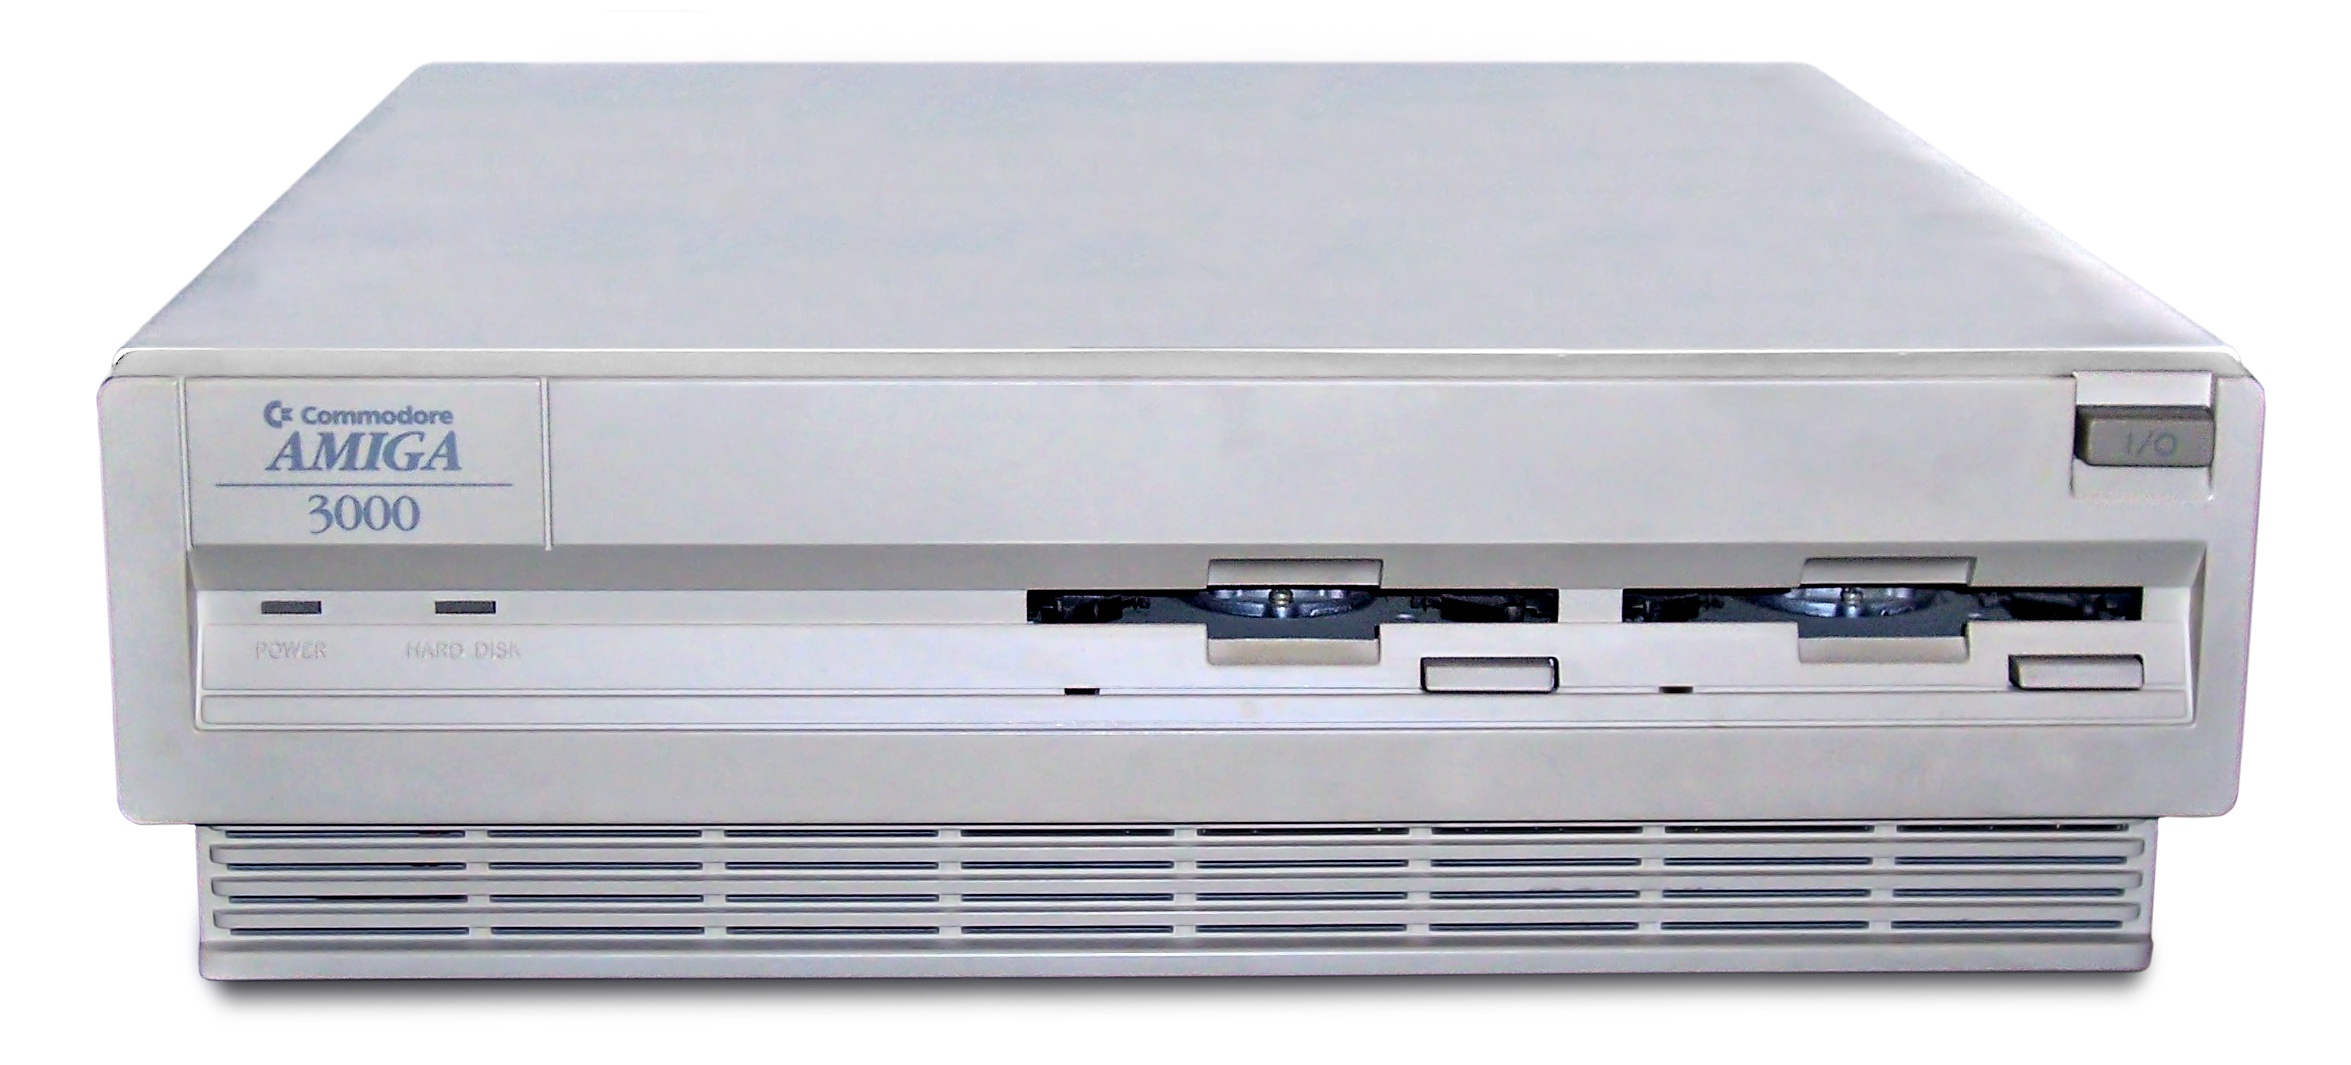
The original Amiga Computers were a series of advanced personal computers manufactured by Commodore, Inc. Commodore went into Chapter 7 bankruptcy in late April of 1994. I was one of the hardware engineers working on this computer, the Amiga 3000.
And you would think, since this starts out with a bankruptcy, the answer would be “no,” but in fact, that’s not quite the case. In fact, strangely enough, the deader the Amiga seems to get, the more options you have available. This will take a little explanation.
About a year later, Commodore’s assets were purchased by ESCOM Ltd., a company based in Germany. Over the course of 1995, they managed to put both the Amiga 1200 and the Amiga 4000T, the most recent Amiga models, back into production.
Unfortunately, ESCOM had been on a buying spree, and basically “guess wrong” about PC technology for the 1995 Christmas season. They were in bad financial shape going into 1996, just as their new Amiga Technologies group was collecting the resources needed to move the Amiga forward (I was a consultant on that project). ESCOM went into bankruptcy in 1996.
So, does anyone remember that PC company that put cow spots on their boxes — and apparently, their offices? Gateway 2000 ultimately bought the Amiga assets from ESCOM. For a short time, they were planning to build a new Amiga computer system and a new AmigaOS, but that never materialized. They eventually wound up doing a bunch of weird maneuvers. They licensed all things AmigaOS to a tiny company in Washington State with no reasonable ability to do much of anything with the operating system. Those guys subcontracted an operating system port of AmigaOS from the aging 680×0 ISA to PowerPC… to a video game company, Hyperion in the UK.
And it just got fuzzier after that for awhile. As Hyperion got close to delivering their version of the OS, they were pretty controlling of which computers could run AmigaOS 4.x (the PowerPC version). This was actually happening in 2000–2001, by the time that desktop-class PowerPC chips had basically become Apple proprietary. The whole idea of the AIM alliance, the idea that PowerPC based personal computer hardware could become a commodity similar to that of the IBM PC, had already failed. And so there was nothing mass produced that the Amiga/Hyperion folks allowed to run AmigaOS 4.x. Pretty frustrating.
It wasn’t until 2006 that AmigaOS 4.0, the first PowerPC version of AmigaOS, was actually released. It’s a bit telling about the whole mess of the project that it took less time to actually develop AmigaOS 1.0 from scratch than to port AmigaOS 3.x to AmigaOS 4.x. The targeted systems for this OS were single-board computers, such as the SAM440EP from A-Cube Systems, based on the PowerPC 440EP SOC from IBM. This was intended for various embedded devices, not really comparable to 2006 desktop systems. But it was certainly more than enough to run AmigaOS, which had not gained much computational weight in the move to PPC.
A-Cube systems in Italy, currently sells the upgraded SAM460EX and SAM460CR boards. These are sold as single-board computers, though the SAM460EX is available as an integrated system called AmigaOne 500.
I’d have to say the first serious effort at building a whole PowerPC Amiga came from a new company based in New Zealand, A-Eon. This company was started by Trevor Dickinson, an entrepreneur and rabid Amiga fan who had the means to create a new Amiga computer company. I was skeptical when these came out — they were very expensive. But as I grew to understand what Trevor was doing, and as an engineer myself, started to appreciate that he had managed to get anything out the door at essentially hobby-computer volumes, I started to appreciate this work. And Trevor became a very close friend, despite the miles.
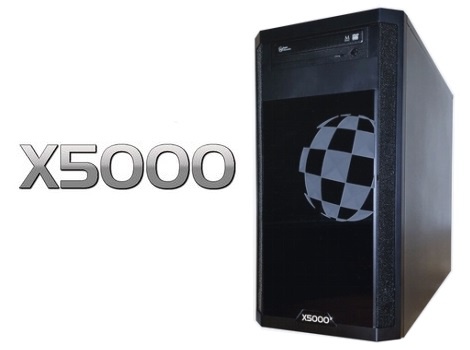
Their current machine is the A-Eon X5000, based on one of the Freescale/NXP QorIQ processors. This is a line of high-end SOCs designed for high performance networking switches and servers. That’s maybe not as weird as it sounds. Much of the MacOS years of PowerPC were bolstered by the fact that Cisco was using PowerPC in all their routers. So for awhile, IBM and Motorola (later Freescale) were happy to develop desktop-class PPC chips for IBM, Motorola, Apple, and others, knowing that, once the development was paid and the prices could drop, Cisco would take as many as they could make.
This actually stopped working because chips got big enough for high performance CPU cores to go on-chip with high speed networking and interfacing (RapidIO, then PCI Express). The desktop CPUs were going in another direction, and while Motorola and IBM might potentially see some reuse in the CPU cores, once they had all the hardware oriented toward optimizing networks, Cisco and the other networking companies didn’t need CPUs that could match AMD and Intel. Apple did… so Apple starting having to pay for a big chunk of PPC development, and as a result, those chips became exclusive for a few years. Everyone else started looking at other CPUs at the high end. But for lower-end stuff, you had a bunch of choices. And I digress…
So there are quite a number of small operations working on “Classic” Amiga systems, meaning, at the least, some kind of 680×0 processor, rather than a PowerPC chip. This one is called the Amy ITX board — I was given one of these. It’s a modern system design, using the industry standard ITX form factor, but accepting all of the original Amiga chips. One of the problems Amiga users have had is that their 30-something-year-old computers are starting to die of old age. Hey, we tried! But if you have an Amiga 500 or Amiga 2000, your old chips will work in this new board.
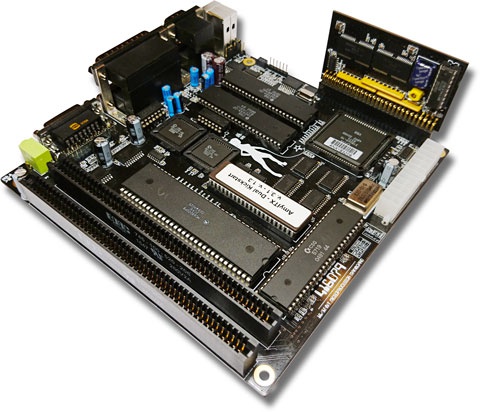
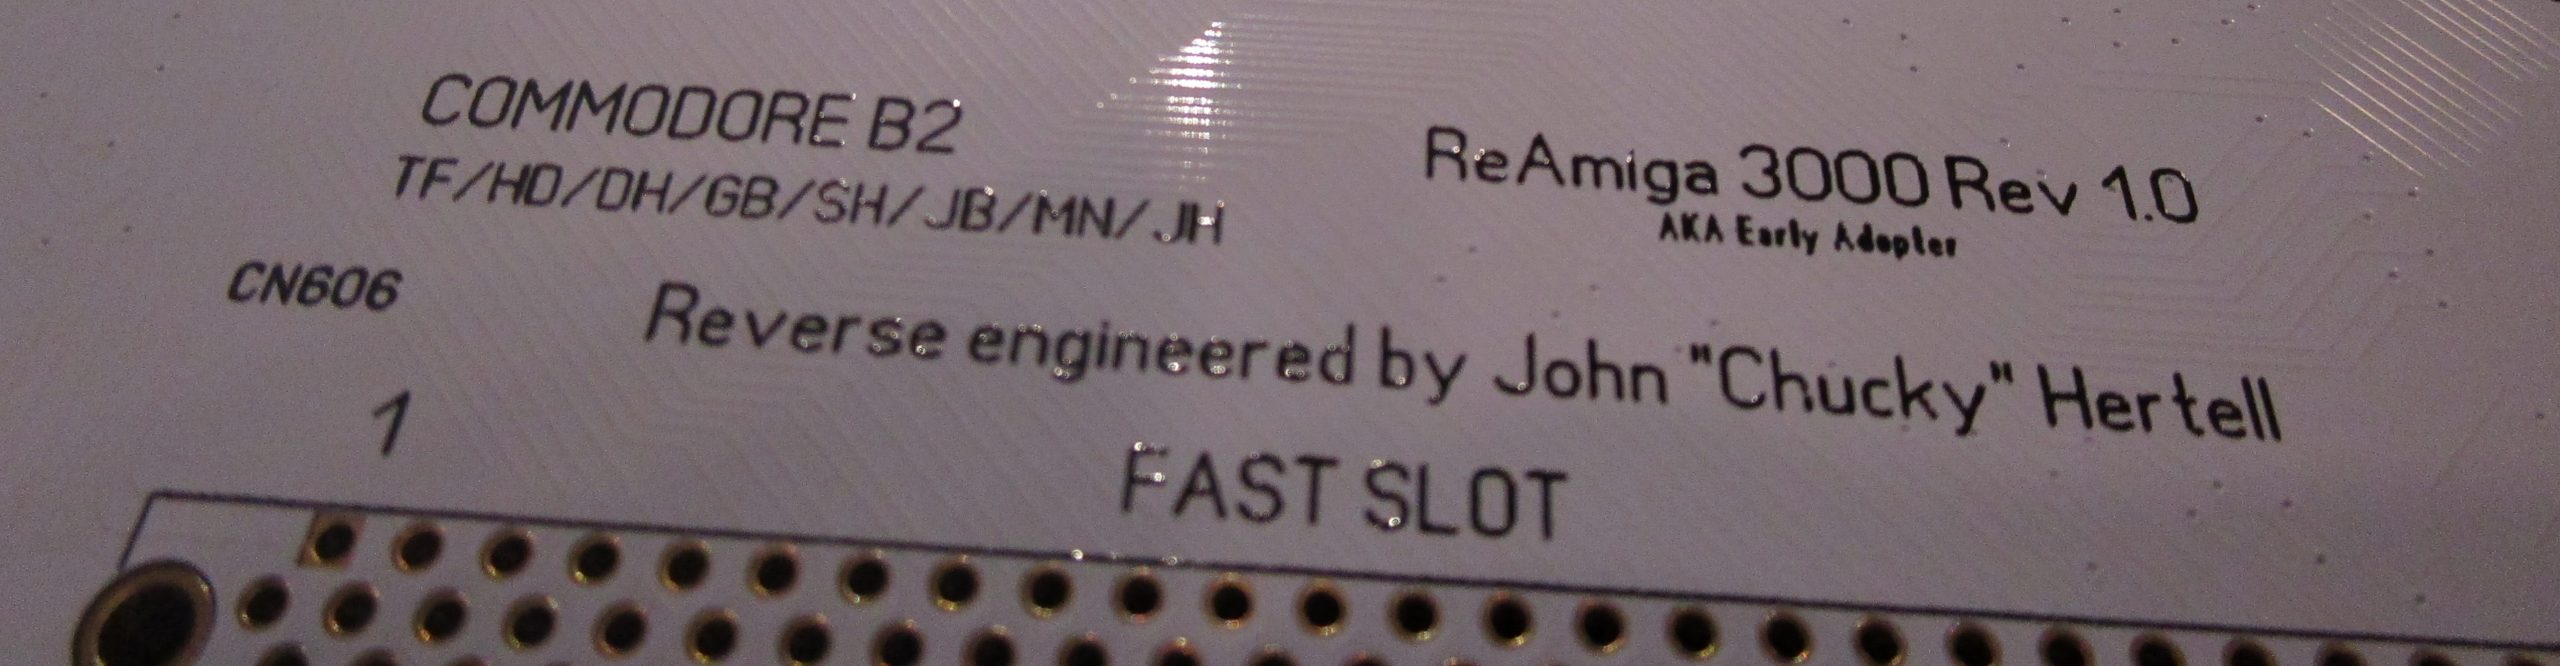
Another very, very hobbyist option is the Re-Amiga series of boards. The master of Amiga Reverse Engineering, John “Chucky” Hertell, has created a whole series of re-inventions of classic Amiga boards. They support all your corresponding chips — the ReAmiga 3000 board John gave me will take all my critical Amiga chips. But it can use more recent RAM — on SIMM modules — and it’s using standard parts you can actually get today. The trick here — you have to build it yourself, at the component level. I have not built mine yet, but I probably will…. I think I even have the SIMMs for it here! My original A3000 board is dead. He does this as a service to Amiga fans… you can see he kept all our initials on the A3000 board (Terry Fisher/Hedley Davis/Dave Haynie/Greg Berlin/Scott Hood/Jeff Boyer/Mike Nines.. and he’s welcome on that list, far as I’m concerned!) He gave Jeff Porter, the man who made the Amiga 500 possible, his A500 version at an Amiga show in Germany a few years back… Jeff was blown away!
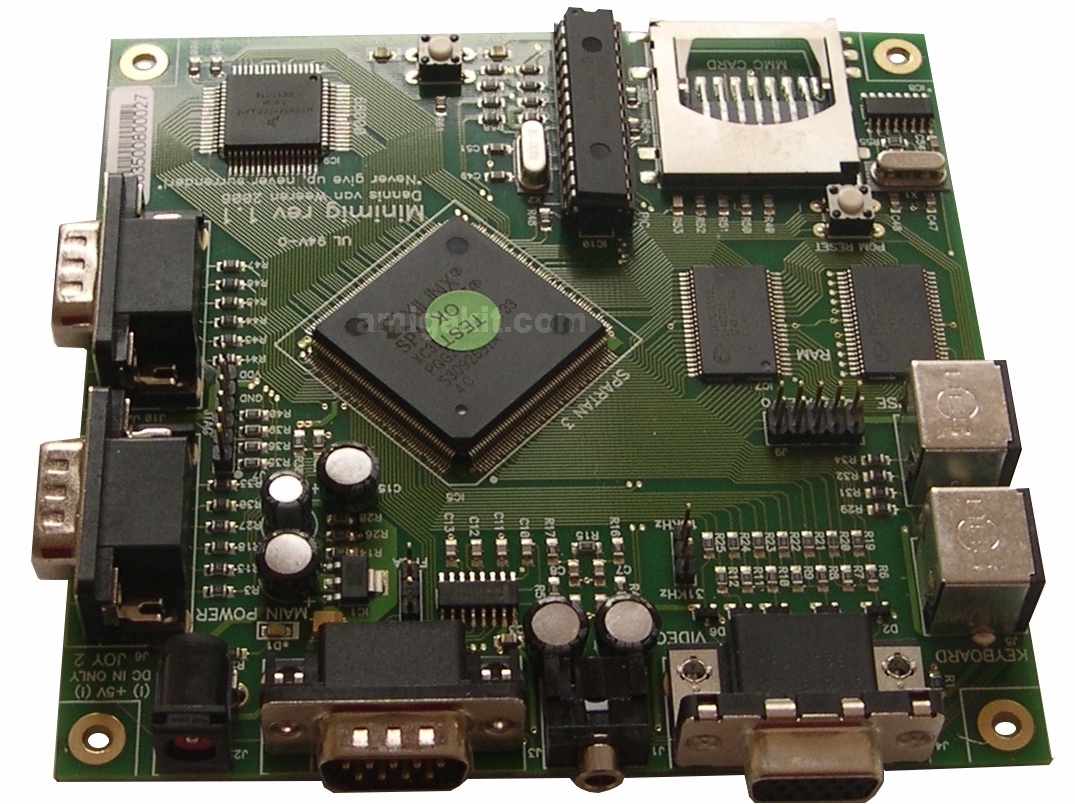
But what if you can’t get Amiga chips? This was addressed by several projects, but the most successful early on was the Minimig project in 2005 by Dennis van Weeren. This is a re-implementation of an Amiga 500 class system, done in a Field-Programmable Gate Array (FPGA) — a programmable chip. The Amiga chips are in the FPGA, while the CPU is a real 68000 processor. This was released as an open source project, so there are a number of variations and spinoffs. Work is still being done on the Minimig design. A-Cube Systems sells a version of the Minimig V1.1 board.
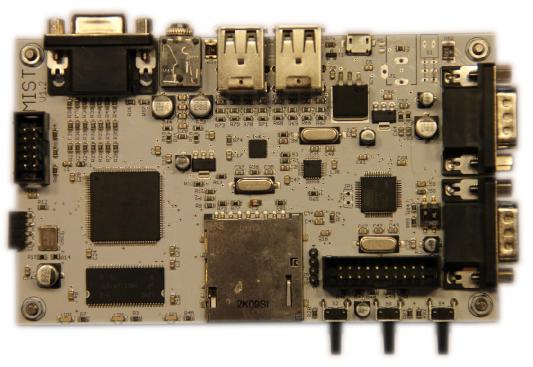
Inspired by the Minimig, Till Harbaum created the MiST board, with the intent of re-implemented the Atari ST. Unlike the Minimig, though, the MiST implemented the CPU as well as graphics chips in its FPGA. And it can load up a new FPGA “core” from its SD card! This lead to Dennis van Weeren developing an Amiga core for MiST. And by now, there are MiST cores for around thirty systems, including Apple, Macintosh, Amstrad, BBC, Sinclair; gaming consoles, and some arcade machines as well.
Inspired by the MiST board, Alexey Melnikov (Sorgelig) decided to see if there was an easier, more open way to do the same things, and found the Terasic DE-10 board, a board pushed by Intel for development on the Altera Cyclone V SE FPGA. This is a more substantial FPGA than used on the MiST board, and it also contains a dual “hard core” ARM Cortex A9 processor.
Since the DE-10 is a development board, it lacks general purpose on-board I/O, but it’s got a large number of signals going off-board for add-on hardware. So MiSTer systems are built of a stack of add-on boards. There are about 40 computer system cores for the MiSTer on its GIT page, 15 game consoles, hardware for I/O boards, 3D printed cases, all open source.
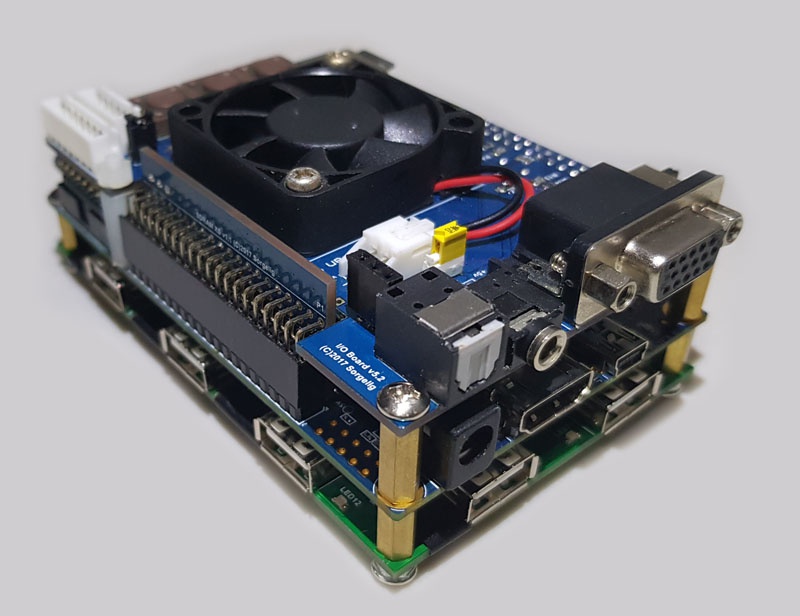
Edu Arana has created several versions of the UnAmiga board, based on the Minimig… he sent me this one (sorry for photo, it’s just a smartphone snapshot).
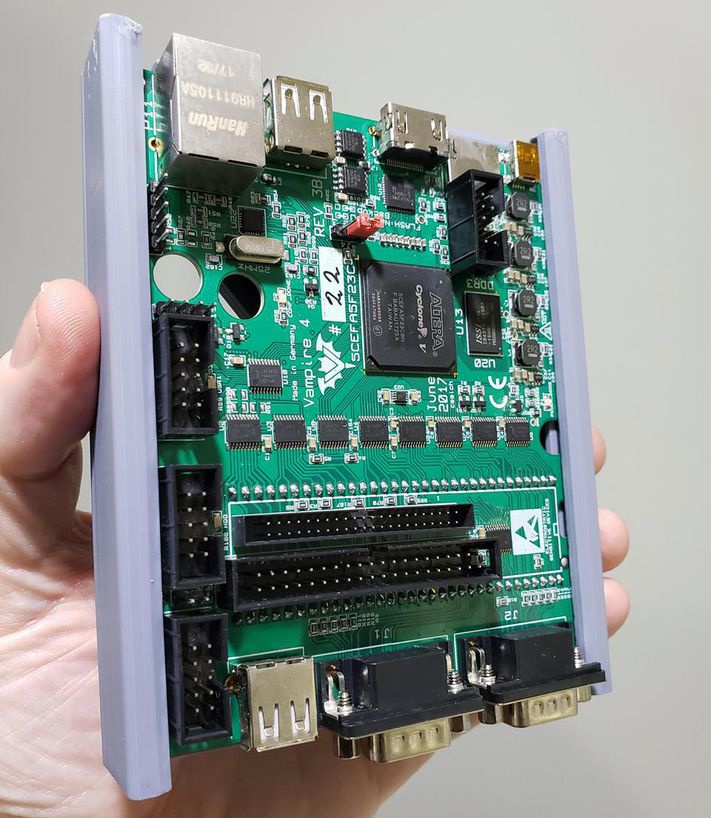
Yet another new Amiga board is the Vampire 4 Stand-alone. For some years now, Apollo Accelerators has made CPU accelerator boards for classic Amigas. The trick there is that, rather than use a faster 680×0 processor, they used their own “soft-core” 68K-compatible processor, dubbed the Apollo 68080, which is typically 3x-4x faster than an MC68060 processor.
The V4SA is their first complete computer. The fastest Amiga I have used to date, and it’s powered from a USB power brick. In fact, they even added SIMD “multimedia” instructions to the 68K instruction set, allowing this processor to play back MPEG-4 video, something no hard-core 68K ever dreamt of.
There are also professionally made cases for most of these single boards, if the makers don’t supply their own. In late 2019, Stephen Jones sent me one of his “Checkmate 1500” cases. I didn’t have immediate use for it, but it was a clone of the Amiga 3000, my absolute favorite Amiga! So when it came time to build a work PC for our shore house, I put it in the Checkmate 1500 case.
It will directly take MicroATX and ITX cases, which covers some of the Amiga boards around. But it’s actually a very clever, modular design. My system has a Blu-ray drive, a USB and memory card reader in place of a floppy, etc. There are fitting kits for Commodore Amiga boards, etc.
Now Stephen has the Checkmate 1500 Mini, which is houses a mini-ITX board and a bunch of other variations of Amiga compatible hardware today.
And of course, as well as the original 68K-based AmigaOS 3.x, and the PowerPC AmigaOS 4.x, there’s an open source version, known as the Amiga Research Operating System. You can run AROS in a virtual machine on any old PC these days, if you’re interested.
Paolo Besser has built a really nice distro of AROS, called Icaros Desktop, which, as with Linux distros, collects a bunch of components from different open source projects and gets them all working nicely together. Links below.
You can also dump the hardware altogether — well, the Amiga-specific hardware — and run classic AmigaOS on your PC via numerous Amiga emulators. Some of these will work on tablets and smartphones, too. A popular “distro” for Amiga emulation is Cloanto’s “Amiga Forever” commercial product.
Welcome to the world of retrocomputing! One of the reasons that all of these new Amiga projects exist is the fact that interest in the Amiga systems never entirely died — but the original machines themselves do. But in fact, demand for older computer systems, at least the more popular ones, has grown in recent years, to the point that older machines are often fetching pretty crazy prices. So there’s a small market, oriented to serious hobbyists, for new hardware that runs the old operating systems.
Now, I know what you’re thinking: I’m typing this on my 16-core “Big PC” with 64GiB DRAM, 2TB PCIe SSD, dual GPUs, looking at three large screens (a total of over 8,000 pixels across), etc. I could probably fit every program ever written for Amigas… in RAM! Well, pretty close anyway.
I think part of the allure of these machines is, of course, nostalgia. But in part, it’s a better level of understanding and a different kind of computing. When I’m running a the Big PC, I’m writing, working in CAD, working on photos, working on music, etc. It’s all about the applications… and sure seems like “work” is involved quite a bit. But even for hobbies, the computer is a tool to enable those hobbies. Any computer will do as long as it runs my apps. I of course integrate my own — I’ve never bought a commercially made off-the-shelf desktop PC for myself. But even then, I just see them as tools. If one dies, the only pain I feel is in the wallet!
When folks bought personal computers in the 1970s and 1980s, they didn’t necessarily think about applications. Those did happen, but for many people, the hobby WAS the computer. May user completely mastered those computers, knowing every little bit about them. That was possible with the 8-bit generation, perhaps a bit less possible with more complex systems like the Amigas. But you could learn as much as you liked about any aspect of the system, in software, in hardware. In a modern PC, well, just how much do you understand about what’s going on in that nVidia RTX2070 GPU card?
I made a film that explains some of the reasons Commodore went under. Best watched with a few bottles of your favorite adult drink, a box of tissues, and your choice of Commodore management villain photos up on a handy cork-board. And darts, knives, or possibly hatchets.
— This also relevant reply was written by Björn David Paulsen
—
Thanks for the A2A.
Today, when we speak of an Amiga, we usually mean one of three variants.
The first is the classic Amiga. This is the OCS, ECS and AGA systems manufactured from 1985 to 1996. It includes the Amiga (later named the Amiga 1000), the A500, the A2000, the A600, the A3000, the A500+, the A3000 and the A4000.
The second variant is the modern iteration. This is the AmigaOne series of PowerPC-based computers produced by Hyperion. Some purists refuse to call them proper Amiga computers, but they are part of the lineage, and they are still produced today. In embracing the PowerPC instruction set, however, these Amigas have abandoned binary compatibility with the classic systems, opting instead to run legacy apps via built-in OS emulation.
The third Amiga type is the Vampire series of Amiga accelerator boards. These are FPGA implemented boards that effectively integrate Amiga functionality, obviating the need for custom chipsets. The last one, the Vampire 4, is a standalone machine, and it is currently in production. It runs its own nonstandard (though largely binary compatible) implementation of the 68000 instruction set, meaning programs written for the classic machines largely can be made to work on the Vampire.
The classic models are, alas, no longer in factory production. However, there is significant refurbishment of old components into fresh machines. The most well-known of these is the ReAmiga project by John “Chucky” Hertell. ReAmiga produces refurbished, fully working Amiga machines from discarded boards. If you’re a purist when it comes to the Amiga lineage, this is probably your best bet for truly authentic hardware.