Fakenology DS918 – replacing hard drives

Summary

This post describes how to shorten the time and lessen the wear on the drives of a Synology NAS when replacing all the disks. My method delays the “reshaping” phase until the last drive has been inserted (from where you can let the NAS do its thing) by manually removing the newly created partitions for SHR expansion that is created when each new disk is inserted.

Disk replacement in DS918

Time to fix this device, since there has been a long time since one of the drives in this unit failed (all backed up, I could simply just replace all disks and start over with it).

This unit used the surviving 3TB drives from my DS1517 after two of them had failed, and I later replaced all the disks in that unit to 14TB ones to get more storage space. This is documented in Inner secrets of Synology Hybrid RAID (SHR) – Part 1

I have written a short summary as a reply in this thread on Reddit: Replacing all drives with larger drives, should I expect it to progressively take longer for repairs with each new larger drive that is swapped in?

Another post on this topic in the Synology community forum: Replacing all Disks: Hot Swap & Rebuild or Recreate

Replacing the first drive (the failed one)

To make sure I correctly identified the drive that had to be replaced, I checked logs, raid status and disk status before pulling the drive. As I already knew, /dev/sdd was the one that had failed, so I needed to find out in which slot (as expected, the fourth slot, but this should always be checked) it was fitted in:

dmesg output (filtered)
This confirms the problems with /dev/sdd:

[    5.797428] sd 3:0:0:0: [sdd] 5860533168 512-byte logical blocks: (3.00 TB/2.73 TiB)
[    5.797439] sd 3:0:0:0: [sdd] 4096-byte physical blocks
[    5.797656] sd 3:0:0:0: [sdd] Write Protect is off
[    5.797666] sd 3:0:0:0: [sdd] Mode Sense: 00 3a 00 00
[    5.797767] sd 3:0:0:0: [sdd] Write cache: enabled, read cache: enabled, doesn't support DPO or FUA
[    5.869271]  sdd: sdd1 sdd2 sdd5
[    5.870466] sd 3:0:0:0: [sdd] Attached SCSI disk
[    7.851964] md: invalid raid superblock magic on sdd5
[    7.857051] md: sdd5 does not have a valid v0.90 superblock, not importing!
[    7.857169] md:  adding sdd1 ...
[    7.857175] md: sdd2 has different UUID to sda1
[    7.857205] md: bind
[    7.857336] md: running: 
[    7.857368] md: kicking non-fresh sdd1 from array!
[    7.857376] md: unbind
[    7.862026] md: export_rdev(sdd1)
[    7.890854] md:  adding sdd2 ...
[    7.893244] md: bind
[    7.893365] md: running: 
[   33.692736] md: bind
[   33.693189] md: kicking non-fresh sdd5 from array!
[   33.693209] md: unbind
[   33.696096] md: export_rdev(sdd5)

/proc/mdstat
The content of /proc/mdstat also confirms that /dev/sdd is not used for the main storage (md2) and md0 (DSM):

Personalities : [linear] [raid0] [raid1] [raid10] [raid6] [raid5] [raid4]
md2 : active raid5 sda5[0] sdc5[2] sdb5[1]
      8776306368 blocks super 1.2 level 5, 64k chunk, algorithm 2 [4/3] [UUU_]

md1 : active raid1 sda2[0] sdb2[1] sdc2[2] sdd2[3]
      2097088 blocks [16/4] [UUUU____________]

md0 : active raid1 sda1[0] sdb1[1] sdc1[3]
      2490176 blocks [16/3] [UU_U____________]

As seen above, for md2 the last device is indicated as missing, and reading on the line above “md2 : active raid5 sda5[0] sdc5[2] sdb5[1]” list the order of the drives in “[UUU_]”, so this translates to [sda5 sdb5 sdc5 -]
The same goes for the md0 status where the order is different “md0 : active raid1 sda1[0] sdb1[1] sdc1[3]”, which translates to [sda1 sdb1 – sdc1]

smartctl output
I used smartctl to find out the drives mapped to /dev/sda[b-d]

root@DS918:~# smartctl --all /dev/sda
smartctl 6.5 (build date May  7 2020) [x86_64-linux-4.4.59+] (local build)
Copyright (C) 2002-16, Bruce Allen, Christian Franke, www.smartmontools.org

=== START OF INFORMATION SECTION ===
Vendor:               HGST
Product:              HDN724030ALE640
...
Serial number:        PK2238P3G3B8VJ
root@DS918:~# smartctl --all /dev/sdb
smartctl 6.5 (build date May  7 2020) [x86_64-linux-4.4.59+] (local build)
Copyright (C) 2002-16, Bruce Allen, Christian Franke, www.smartmontools.org

=== START OF INFORMATION SECTION ===
Vendor:               HGST
Product:              HDN724030ALE640
...
Serial number:        PK2234P9JGDEXY
root@DS918:~# smartctl --all /dev/sdc
smartctl 6.5 (build date May  7 2020) [x86_64-linux-4.4.59+] (local build)
Copyright (C) 2002-16, Bruce Allen, Christian Franke, www.smartmontools.org

=== START OF INFORMATION SECTION ===
Vendor:               HGST
Product:              HDN724030ALE640
...
Serial number:        PK2238P3G343GJ
root@DS918:~# smartctl --all /dev/sdd
smartctl 6.5 (build date May  7 2020) [x86_64-linux-4.4.59+] (local build)
Copyright (C) 2002-16, Bruce Allen, Christian Franke, www.smartmontools.org

=== START OF INFORMATION SECTION ===
Model Family:     Seagate Barracuda 7200.14 (AF)
Device Model:     ST3000DM001-1ER166
Serial Number:    W50090JM

As the fourth drive was a Seagate, it was easy to shut down the unit and check which drive it was, but with smartctl, you will be able to identify the drives by reading the serial number on its label.

The full smartctl output for the failed drive:

root@DS918:~# smartctl --all /dev/sdd
smartctl 6.5 (build date May  7 2020) [x86_64-linux-4.4.59+] (local build)
Copyright (C) 2002-16, Bruce Allen, Christian Franke, www.smartmontools.org

=== START OF INFORMATION SECTION ===
Model Family:     Seagate Barracuda 7200.14 (AF)
Device Model:     ST3000DM001-1ER166
Serial Number:    W50090JM
LU WWN Device Id: 5 000c50 07c46d0aa
Firmware Version: CC43
User Capacity:    3,000,592,982,016 bytes [3.00 TB]
Sector Sizes:     512 bytes logical, 4096 bytes physical
Rotation Rate:    7200 rpm
Form Factor:      3.5 inches
Device is:        In smartctl database [for details use: -P show]
ATA Version is:   ACS-2, ACS-3 T13/2161-D revision 3b
SATA Version is:  SATA 3.1, 6.0 Gb/s (current: 3.0 Gb/s)
Local Time is:    Fri May  2 15:45:31 2025 CEST
SMART support is: Available - device has SMART capability.
SMART support is: Enabled

=== START OF READ SMART DATA SECTION ===
SMART overall-health self-assessment test result: PASSED

General SMART Values:
Offline data collection status:  (0x82) Offline data collection activity
                                        was completed without error.
                                        Auto Offline Data Collection: Enabled.
Self-test execution status:      ( 113) The previous self-test completed having
                                        the read element of the test failed.
Total time to complete Offline
data collection:                (  122) seconds.
Offline data collection
capabilities:                    (0x7b) SMART execute Offline immediate.
                                        Auto Offline data collection on/off support.
                                        Suspend Offline collection upon new
                                        command.
                                        Offline surface scan supported.
                                        Self-test supported.
                                        Conveyance Self-test supported.
                                        Selective Self-test supported.
SMART capabilities:            (0x0003) Saves SMART data before entering
                                        power-saving mode.
                                        Supports SMART auto save timer.
Error logging capability:        (0x01) Error logging supported.
                                        General Purpose Logging supported.
Short self-test routine
recommended polling time:        (   1) minutes.
Extended self-test routine
recommended polling time:        ( 332) minutes.
Conveyance self-test routine
recommended polling time:        (   2) minutes.
SCT capabilities:              (0x1085) SCT Status supported.

SMART Attributes Data Structure revision number: 10
Vendor Specific SMART Attributes with Thresholds:
ID# ATTRIBUTE_NAME                                                   FLAG     VALUE WORST THRESH TYPE      UPDATED  WHEN_FAILED RAW_VALUE
  1 Raw_Read_Error_Rate                                              0x000f   086   084   006    Pre-fail  Always       -       221839714
  3 Spin_Up_Time                                                     0x0003   092   092   000    Pre-fail  Always       -       0
  4 Start_Stop_Count                                                 0x0032   100   100   020    Old_age   Always       -       84
  5 Reallocated_Sector_Ct                                            0x0033   098   098   010    Pre-fail  Always       -       1968
  7 Seek_Error_Rate                                                  0x000f   090   060   030    Pre-fail  Always       -       998592914
  9 Power_On_Hours                                                   0x0032   051   051   000    Old_age   Always       -       43677
 10 Spin_Retry_Count                                                 0x0013   100   100   097    Pre-fail  Always       -       0
 12 Power_Cycle_Count                                                0x0032   100   100   020    Old_age   Always       -       34
183 Runtime_Bad_Block                                                0x0032   099   099   000    Old_age   Always       -       1
184 End-to-End_Error                                                 0x0032   100   100   099    Old_age   Always       -       0
187 Reported_Uncorrect                                               0x0032   001   001   000    Old_age   Always       -       2714
188 Command_Timeout                                                  0x0032   100   097   000    Old_age   Always       -       4 7 8
189 High_Fly_Writes                                                  0x003a   099   099   000    Old_age   Always       -       1
190 Airflow_Temperature_Cel                                          0x0022   070   062   045    Old_age   Always       -       30 (Min/Max 27/38)
191 G-Sense_Error_Rate                                               0x0032   100   100   000    Old_age   Always       -       0
192 Power-Off_Retract_Count                                          0x0032   100   100   000    Old_age   Always       -       8
193 Load_Cycle_Count                                                 0x0032   065   065   000    Old_age   Always       -       70652
194 Temperature_Celsius                                              0x0022   030   040   000    Old_age   Always       -       30 (0 16 0 0 0)
197 Current_Pending_Sector                                           0x0012   001   001   000    Old_age   Always       -       49760
198 Offline_Uncorrectable                                            0x0010   001   001   000    Old_age   Offline      -       49760
199 UDMA_CRC_Error_Count                                             0x003e   200   200   000    Old_age   Always       -       0
240 Head_Flying_Hours                                                0x0000   100   253   000    Old_age   Offline      -       38460h+46m+12.675s
241 Total_LBAs_Written                                               0x0000   100   253   000    Old_age   Offline      -       15195564747
242 Total_LBAs_Read                                                  0x0000   100   253   000    Old_age   Offline      -       1092464909408

SMART Error Log Version: 1
ATA Error Count: 2713 (device log contains only the most recent five errors)
        CR = Command Register [HEX]
        FR = Features Register [HEX]
        SC = Sector Count Register [HEX]
        SN = Sector Number Register [HEX]
        CL = Cylinder Low Register [HEX]
        CH = Cylinder High Register [HEX]
        DH = Device/Head Register [HEX]
        DC = Device Command Register [HEX]
        ER = Error register [HEX]
        ST = Status register [HEX]
Powered_Up_Time is measured from power on, and printed as
DDd+hh:mm:SS.sss where DD=days, hh=hours, mm=minutes,
SS=sec, and sss=millisec. It "wraps" after 49.710 days.

Error 2713 occurred at disk power-on lifetime: 32907 hours (1371 days + 3 hours)
  When the command that caused the error occurred, the device was active or idle.

  After command completion occurred, registers were:
  ER ST SC SN CL CH DH
  -- -- -- -- -- -- --
  40 53 00 ff ff ff 0f  Error: UNC at LBA = 0x0fffffff = 268435455

  Commands leading to the command that caused the error were:
  CR FR SC SN CL CH DH DC   Powered_Up_Time  Command/Feature_Name
  -- -- -- -- -- -- -- --  ----------------  --------------------
  60 00 08 ff ff ff 4f 00  33d+13:49:54.056  READ FPDMA QUEUED
  ef 10 02 00 00 00 a0 00  33d+13:49:54.048  SET FEATURES [Enable SATA feature]
  27 00 00 00 00 00 e0 00  33d+13:49:54.048  READ NATIVE MAX ADDRESS EXT [OBS-ACS-3]
  ec 00 00 00 00 00 a0 00  33d+13:49:54.047  IDENTIFY DEVICE
  ef 03 46 00 00 00 a0 00  33d+13:49:54.047  SET FEATURES [Set transfer mode]

Error 2712 occurred at disk power-on lifetime: 32907 hours (1371 days + 3 hours)
  When the command that caused the error occurred, the device was active or idle.

  After command completion occurred, registers were:
  ER ST SC SN CL CH DH
  -- -- -- -- -- -- --
  40 53 00 ff ff ff 0f  Error: UNC at LBA = 0x0fffffff = 268435455

  Commands leading to the command that caused the error were:
  CR FR SC SN CL CH DH DC   Powered_Up_Time  Command/Feature_Name
  -- -- -- -- -- -- -- --  ----------------  --------------------
  60 00 08 ff ff ff 4f 00  33d+13:49:49.959  READ FPDMA QUEUED
  60 00 08 ff ff ff 4f 00  33d+13:49:49.958  READ FPDMA QUEUED
  ef 10 02 00 00 00 a0 00  33d+13:49:49.949  SET FEATURES [Enable SATA feature]
  27 00 00 00 00 00 e0 00  33d+13:49:49.949  READ NATIVE MAX ADDRESS EXT [OBS-ACS-3]
  ec 00 00 00 00 00 a0 00  33d+13:49:49.949  IDENTIFY DEVICE

Error 2711 occurred at disk power-on lifetime: 32907 hours (1371 days + 3 hours)
  When the command that caused the error occurred, the device was active or idle.

  After command completion occurred, registers were:
  ER ST SC SN CL CH DH
  -- -- -- -- -- -- --
  40 53 00 ff ff ff 0f  Error: UNC at LBA = 0x0fffffff = 268435455

  Commands leading to the command that caused the error were:
  CR FR SC SN CL CH DH DC   Powered_Up_Time  Command/Feature_Name
  -- -- -- -- -- -- -- --  ----------------  --------------------
  60 00 08 ff ff ff 4f 00  33d+13:49:46.267  READ FPDMA QUEUED
  60 00 08 ff ff ff 4f 00  33d+13:49:46.267  READ FPDMA QUEUED
  60 00 08 ff ff ff 4f 00  33d+13:49:46.267  READ FPDMA QUEUED
  60 00 08 ff ff ff 4f 00  33d+13:49:46.266  READ FPDMA QUEUED
  ef 10 02 00 00 00 a0 00  33d+13:49:46.258  SET FEATURES [Enable SATA feature]

Error 2710 occurred at disk power-on lifetime: 32907 hours (1371 days + 3 hours)
  When the command that caused the error occurred, the device was active or idle.

  After command completion occurred, registers were:
  ER ST SC SN CL CH DH
  -- -- -- -- -- -- --
  40 53 00 ff ff ff 0f  Error: UNC at LBA = 0x0fffffff = 268435455

  Commands leading to the command that caused the error were:
  CR FR SC SN CL CH DH DC   Powered_Up_Time  Command/Feature_Name
  -- -- -- -- -- -- -- --  ----------------  --------------------
  60 00 08 ff ff ff 4f 00  33d+13:49:41.370  READ FPDMA QUEUED
  60 00 08 ff ff ff 4f 00  33d+13:49:41.370  READ FPDMA QUEUED
  60 00 08 ff ff ff 4f 00  33d+13:49:41.370  READ FPDMA QUEUED
  60 00 08 ff ff ff 4f 00  33d+13:49:41.370  READ FPDMA QUEUED
  60 00 08 ff ff ff 4f 00  33d+13:49:41.369  READ FPDMA QUEUED

Error 2709 occurred at disk power-on lifetime: 32907 hours (1371 days + 3 hours)
  When the command that caused the error occurred, the device was active or idle.

  After command completion occurred, registers were:
  ER ST SC SN CL CH DH
  -- -- -- -- -- -- --
  40 53 00 ff ff ff 0f  Error: UNC at LBA = 0x0fffffff = 268435455

  Commands leading to the command that caused the error were:
  CR FR SC SN CL CH DH DC   Powered_Up_Time  Command/Feature_Name
  -- -- -- -- -- -- -- --  ----------------  --------------------
  60 00 08 ff ff ff 4f 00  33d+13:49:36.656  READ FPDMA QUEUED
  60 00 08 ff ff ff 4f 00  33d+13:49:36.656  READ FPDMA QUEUED
  60 00 08 ff ff ff 4f 00  33d+13:49:36.656  READ FPDMA QUEUED
  60 00 08 ff ff ff 4f 00  33d+13:49:36.656  READ FPDMA QUEUED
  60 00 08 ff ff ff 4f 00  33d+13:49:36.656  READ FPDMA QUEUED

SMART Self-test log structure revision number 1
Num  Test_Description    Status                  Remaining  LifeTime(hours)  LBA_of_first_error
# 1  Short offline       Completed: read failure       10%     43133         4084368632
# 2  Short offline       Completed: read failure       10%     42391         4084368632
# 3  Short offline       Completed: read failure       40%     41719         4084368632
# 4  Short offline       Completed: read failure       10%     40975         4084368632
# 5  Short offline       Completed: read failure       80%     40231         4084368632
# 6  Short offline       Completed: read failure       10%     39511         4084368632
# 7  Short offline       Completed: read failure       10%     38766         4084368632
# 8  Short offline       Completed: read failure       10%     32938         4084368632
# 9  Short offline       Completed without error       00%     32193         -
#10  Short offline       Completed without error       00%     31449         -
#11  Short offline       Completed without error       00%     30743         -
#12  Short offline       Completed without error       00%     29998         -
#13  Short offline       Completed without error       00%     29278         -
#14  Short offline       Completed without error       00%     28534         -
#15  Short offline       Completed without error       00%     27790         -
#16  Short offline       Completed without error       00%     27070         -
#17  Short offline       Completed without error       00%     26328         -
#18  Short offline       Completed without error       00%     25608         -
#19  Short offline       Completed without error       00%     24865         -
#20  Short offline       Completed without error       00%     24196         -
#21  Short offline       Completed without error       00%     23452         -

SMART Selective self-test log data structure revision number 1
 SPAN  MIN_LBA  MAX_LBA  CURRENT_TEST_STATUS
    1        0        0  Not_testing
    2        0        0  Not_testing
    3        0        0  Not_testing
    4        0        0  Not_testing
    5        0        0  Not_testing
Selective self-test flags (0x0):
  After scanning selected spans, do NOT read-scan remainder of disk.
If Selective self-test is pending on power-up, resume after 0 minute delay.

I powered down the unit (using DSM ui) and identified and removed the broken drive. Then I started it up again (the replacement drive was not inserted). When the replacement drive was inserted DSM didn’t immediately see it, so I just did a reboot of the unit to make it appear as an unused drive, then selecting “Repair” from “Storage Manager/Storage Pool”.

The rebuilding process – first drive

I monitored the rebuilding process a few times, but did not take any notes of when (how long it took). Just let it finish during the night:

root@DS918:~# cat /proc/mdstat
Personalities : [linear] [raid0] [raid1] [raid10] [raid6] [raid5] [raid4]
md2 : active raid5 sdd5[4] sda5[0] sdc5[2] sdb5[1]
      8776306368 blocks super 1.2 level 5, 64k chunk, algorithm 2 [4/3] [UUU_]
      [>....................]  recovery =  0.5% (15458048/2925435456) finish=534.6min speed=90708K/sec

md1 : active raid1 sdd2[3] sdc2[2] sdb2[1] sda2[0]
      2097088 blocks [16/4] [UUUU____________]

md0 : active raid1 sdd1[2] sda1[0] sdb1[1] sdc1[3]
      2490176 blocks [16/4] [UUUU____________]

unused devices: 
root@DS918:~# cat /proc/mdstat
Personalities : [linear] [raid0] [raid1] [raid10] [raid6] [raid5] [raid4]
md2 : active raid5 sdd5[4] sda5[0] sdc5[2] sdb5[1]
      8776306368 blocks super 1.2 level 5, 64k chunk, algorithm 2 [4/3] [UUU_]
      [=>...................]  recovery =  9.6% (282353128/2925435456) finish=434.7min speed=101335K/sec

md1 : active raid1 sdd2[3] sdc2[2] sdb2[1] sda2[0]
      2097088 blocks [16/4] [UUUU____________]

md0 : active raid1 sdd1[2] sda1[0] sdb1[1] sdc1[3]
      2490176 blocks [16/4] [UUUU____________]

unused devices: 
root@DS918:~# cat /proc/mdstat
Personalities : [linear] [raid0] [raid1] [raid10] [raid6] [raid5] [raid4]
md2 : active raid5 sdd5[4] sda5[0] sdc5[2] sdb5[1]
      8776306368 blocks super 1.2 level 5, 64k chunk, algorithm 2 [4/3] [UUU_]
      [=======>.............]  recovery = 38.2% (1118697376/2925435456) finish=525.1min speed=57343K/sec

md1 : active raid1 sdd2[3] sdc2[2] sdb2[1] sda2[0]
      2097088 blocks [16/4] [UUUU____________]

md0 : active raid1 sdd1[2] sda1[0] sdb1[1] sdc1[3]
      2490176 blocks [16/4] [UUUU____________]

unused devices: 
root@DS918:~# cat /proc/mdstat
Personalities : [linear] [raid0] [raid1] [raid10] [raid6] [raid5] [raid4]
md2 : active raid5 sdd5[4] sda5[0] sdc5[2] sdb5[1]
      8776306368 blocks super 1.2 level 5, 64k chunk, algorithm 2 [4/3] [UUU_]
      [=======>.............]  recovery = 39.4% (1152686672/2925435456) finish=402.3min speed=73435K/sec

md1 : active raid1 sdd2[3] sdc2[2] sdb2[1] sda2[0]
      2097088 blocks [16/4] [UUUU____________]

md0 : active raid1 sdd1[2] sda1[0] sdb1[1] sdc1[3]
      2490176 blocks [16/4] [UUUU____________]

unused devices: 
root@DS918:~# cat /proc/mdstat
Personalities : [linear] [raid0] [raid1] [raid10] [raid6] [raid5] [raid4]
md2 : active raid5 sdd5[4] sda5[0] sdc5[2] sdb5[1]
      8776306368 blocks super 1.2 level 5, 64k chunk, algorithm 2 [4/3] [UUU_]
      [=========>...........]  recovery = 49.3% (1443636996/2925435456) finish=297.2min speed=83074K/sec

md1 : active raid1 sdd2[3] sdc2[2] sdb2[1] sda2[0]
      2097088 blocks [16/4] [UUUU____________]

md0 : active raid1 sdd1[2] sda1[0] sdb1[1] sdc1[3]
      2490176 blocks [16/4] [UUUU____________]

unused devices: 
root@DS918:~# cat /proc/mdstat
Personalities : [linear] [raid0] [raid1] [raid10] [raid6] [raid5] [raid4]
md2 : active raid5 sdd5[4] sda5[0] sdc5[2] sdb5[1]
      8776306368 blocks super 1.2 level 5, 64k chunk, algorithm 2 [4/4] [UUUU]

md1 : active raid1 sdd2[3] sdc2[2] sdb2[1] sda2[0]
      2097088 blocks [16/4] [UUUU____________]

md0 : active raid1 sdd1[2] sda1[0] sdb1[1] sdc1[3]
      2490176 blocks [16/4] [UUUU____________]

unused devices: 

Partition layout before and after first disk swap

With the broken disk removed, the partition layout of the remaining disks looked like this:

root@DS918:~# sfdisk -l
/dev/sda1                  2048         4982527         4980480  fd
/dev/sda2               4982528         9176831         4194304  fd
/dev/sda5               9453280      5860326239      5850872960  fd

/dev/sdb1                  2048         4982527         4980480  fd
/dev/sdb2               4982528         9176831         4194304  fd
/dev/sdb5               9453280      5860326239      5850872960  fd

/dev/sdc1                  2048         4982527         4980480  fd
/dev/sdc2               4982528         9176831         4194304  fd
/dev/sdc5               9453280      5860326239      5850872960  fd

When the rebuild process had started, the new disk (/dev/sdd) got the same partition layout as the others, but also a partition for the remaining space (for now unused/unusable)

root@DS918:~# sfdisk -l
/dev/sda1                  2048         4982527         4980480  fd
/dev/sda2               4982528         9176831         4194304  fd
/dev/sda5               9453280      5860326239      5850872960  fd

/dev/sdb1                  2048         4982527         4980480  fd
/dev/sdb2               4982528         9176831         4194304  fd
/dev/sdb5               9453280      5860326239      5850872960  fd

/dev/sdc1                  2048         4982527         4980480  fd
/dev/sdc2               4982528         9176831         4194304  fd
/dev/sdc5               9453280      5860326239      5850872960  fd

/dev/sdd1                  2048         4982527         4980480  fd
/dev/sdd2               4982528         9176831         4194304  fd
/dev/sdd5               9453280      5860326239      5850872960  fd
/dev/sdd6            5860342336     15627846239      9767503904  fd

Second disk pulled out

Now that the first disk had been replaced and the raid was rebuild, I just pulled out the second one to replace.

root@DS918:~# cat /proc/mdstat
Personalities : [linear] [raid0] [raid1] [raid10] [raid6] [raid5] [raid4]
md2 : active raid5 sdd5[4] sda5[0] sdb5[1]
      8776306368 blocks super 1.2 level 5, 64k chunk, algorithm 2 [4/3] [UU_U]

md1 : active raid1 sdd2[3] sdb2[1] sda2[0]
      2097088 blocks [16/3] [UU_U____________]

md0 : active raid1 sdd1[2] sda1[0] sdb1[1]
      2490176 blocks [16/3] [UUU_____________]

unused devices: 

When I inserted the replacement disk, it was (this time) detected by the unit (since the drive was already known before pulling it).

[53977.141054] ata3: link reset sucessfully clear error flags
[53977.157449] ata3.00: ATA-9: ST8000AS0002-1NA17Z, AR17, max UDMA/133
[53977.157458] ata3.00: 15628053168 sectors, multi 0: LBA48 NCQ (depth 31/32), AA
[53977.157462] ata3.00: SN:            Z841474Z
[53977.158764] ata3.00: configured for UDMA/133
[53977.158779] ata3.00: Write Cache is enabled
[53977.163030] ata3: EH complete
[53977.164533] scsi 2:0:0:0: Direct-Access     ATA      ST8000AS0002-1NA17Z      AR17 PQ: 0 ANSI: 5
[53977.165256] sd 2:0:0:0: [sdc] 15628053168 512-byte logical blocks: (8.00 TB/7.28 TiB)
[53977.165273] sd 2:0:0:0: [sdc] 4096-byte physical blocks
[53977.165298] sd 2:0:0:0: Attached scsi generic sg2 type 0
[53977.165534] sd 2:0:0:0: [sdc] Write Protect is off
[53977.165547] sd 2:0:0:0: [sdc] Mode Sense: 00 3a 00 00
[53977.165662] sd 2:0:0:0: [sdc] Write cache: enabled, read cache: enabled, doesn't support DPO or FUA
[53977.217123]  sdc: sdc1 sdc2
[53977.218062] sd 2:0:0:0: [sdc] Attached SCSI disk

Full content from dmesg output since starting the unit. This shows that the rebuild time of md2 was about 10 hours, more or less as expected when it was started (early output of /proc/mdstat).

[  323.429093] perf interrupt took too long (5018 > 5000), lowering kernel.perf_event_max_sample_rate to 25000
[36561.042407] md: md2: recovery done.
[36561.200565] md: md2: set sdd5 to auto_remap [0]
[36561.200576] md: md2: set sda5 to auto_remap [0]
[36561.200581] md: md2: set sdc5 to auto_remap [0]
[36561.200585] md: md2: set sdb5 to auto_remap [0]
[36561.405942] RAID conf printout:
[36561.405954]  --- level:5 rd:4 wd:4
[36561.405959]  disk 0, o:1, dev:sda5
[36561.405963]  disk 1, o:1, dev:sdb5
[36561.405967]  disk 2, o:1, dev:sdc5
[36561.405971]  disk 3, o:1, dev:sdd5
[53370.783902] ata3: device unplugged sstatus 0x0
[53370.783962] ata3: exception Emask 0x10 SAct 0x0 SErr 0x4010000 action 0xe frozen
[53370.791503] ata3: irq_stat 0x00400040, connection status changed
[53370.797628] ata3: SError: { PHYRdyChg DevExch }
[53370.802258] ata3: hard resetting link
[53371.525046] ata3: SATA link down (SStatus 0 SControl 300)
[53371.525054] ata3: No present pin info for SATA link down event
[53373.531047] ata3: hard resetting link
[53373.836045] ata3: SATA link down (SStatus 0 SControl 300)
[53373.836054] ata3: No present pin info for SATA link down event
[53373.841917] ata3: limiting SATA link speed to 1.5 Gbps
[53375.841041] ata3: hard resetting link
[53376.146048] ata3: SATA link down (SStatus 0 SControl 310)
[53376.146056] ata3: No present pin info for SATA link down event
[53376.151920] ata3.00: disabled
[53376.151928] ata3.00: already disabled (class=0x2)
[53376.151933] ata3.00: already disabled (class=0x2)
[53376.151958] ata3: EH complete
[53376.151980] ata3.00: detaching (SCSI 2:0:0:0)
[53376.152704] sd 2:0:0:0: [sdc] tag#21 UNKNOWN(0x2003) Result: hostbyte=0x04 driverbyte=0x00
[53376.152717] sd 2:0:0:0: [sdc] tag#21 CDB: opcode=0x35 35 00 00 00 00 00 00 00 00 00
[53376.152730] blk_update_request: I/O error, dev sdc, sector in range 4980736 + 0-2(12)
[53376.153061] md: super_written gets error=-5
[53376.153061] syno_md_error: sdc1 has been removed
[53376.153061] raid1: Disk failure on sdc1, disabling device.
                Operation continuing on 3 devices
[53376.177112] sd 2:0:0:0: [sdc] Synchronizing SCSI cache
[53376.177232] sd 2:0:0:0: [sdc] Synchronize Cache(10) failed: Result: hostbyte=0x04 driverbyte=0x00
[53376.177238] sd 2:0:0:0: [sdc] Stopping disk
[53376.177269] sd 2:0:0:0: [sdc] Start/Stop Unit failed: Result: hostbyte=0x04 driverbyte=0x00
[53376.183106] RAID1 conf printout:
[53376.183118]  --- wd:3 rd:16
[53376.183125]  disk 0, wo:0, o:1, dev:sda1
[53376.183130]  disk 1, wo:0, o:1, dev:sdb1
[53376.183135]  disk 2, wo:0, o:1, dev:sdd1
[53376.183140]  disk 3, wo:1, o:0, dev:sdc1
[53376.184338] SynoCheckRdevIsWorking (11054): remove active disk sdc5 from md2 raid_disks 4 mddev->degraded 0 mddev->level 5
[53376.184376] syno_md_error: sdc5 has been removed
[53376.184387] md/raid:md2: Disk failure on sdc5, disabling device.
               md/raid:md2: Operation continuing on 3 devices.
[53376.196472] SynoCheckRdevIsWorking (11054): remove active disk sdc2 from md1 raid_disks 16 mddev->degraded 12 mddev->level 1
[53376.196491] syno_md_error: sdc2 has been removed
[53376.196497] raid1: Disk failure on sdc2, disabling device.
                Operation continuing on 3 devices
[53376.198033] RAID1 conf printout:
[53376.198035]  --- wd:3 rd:16
[53376.198038]  disk 0, wo:0, o:1, dev:sda1
[53376.198040]  disk 1, wo:0, o:1, dev:sdb1
[53376.198042]  disk 2, wo:0, o:1, dev:sdd1
[53376.206669] syno_hot_remove_disk (10954): cannot remove active disk sdc2 from md1 ... rdev->raid_disk 2 pending 0
[53376.330347] md: ioctl lock interrupted, reason -4, cmd -2145908384
[53376.446860] RAID conf printout:
[53376.446869]  --- level:5 rd:4 wd:3
[53376.446874]  disk 0, o:1, dev:sda5
[53376.446879]  disk 1, o:1, dev:sdb5
[53376.446883]  disk 2, o:0, dev:sdc5
[53376.446886]  disk 3, o:1, dev:sdd5
[53376.454062] RAID conf printout:
[53376.454072]  --- level:5 rd:4 wd:3
[53376.454077]  disk 0, o:1, dev:sda5
[53376.454082]  disk 1, o:1, dev:sdb5
[53376.454086]  disk 3, o:1, dev:sdd5
[53376.460958] SynoCheckRdevIsWorking (11054): remove active disk sdc1 from md0 raid_disks 16 mddev->degraded 13 mddev->level 1
[53376.460968] RAID1 conf printout:
[53376.460972]  --- wd:3 rd:16
[53376.460978]  disk 0, wo:0, o:1, dev:sda2
[53376.460984]  disk 1, wo:0, o:1, dev:sdb2
[53376.460987] md: unbind
[53376.460992]  disk 2, wo:1, o:0, dev:sdc2
[53376.460998]  disk 3, wo:0, o:1, dev:sdd2
[53376.467047] RAID1 conf printout:
[53376.467056]  --- wd:3 rd:16
[53376.467062]  disk 0, wo:0, o:1, dev:sda2
[53376.467066]  disk 1, wo:0, o:1, dev:sdb2
[53376.467070]  disk 3, wo:0, o:1, dev:sdd2
[53376.470067] md: export_rdev(sdc1)
[53376.475613] md: unbind
[53376.480044] md: export_rdev(sdc5)
[53377.207047] SynoCheckRdevIsWorking (11054): remove active disk sdc2 from md1 raid_disks 16 mddev->degraded 13 mddev->level 1
[53377.207072] md: unbind
[53377.212034] md: export_rdev(sdc2)
[53958.581765] ata3: device plugged sstatus 0x1
[53958.581811] ata3: exception Emask 0x10 SAct 0x0 SErr 0x4000000 action 0xe frozen
[53958.589278] ata3: irq_stat 0x00000040, connection status changed
[53958.595322] ata3: SError: { DevExch }
[53958.599069] ata3: hard resetting link
[53964.371031] ata3: link is slow to respond, please be patient (ready=0)
[53968.757039] ata3: softreset failed (device not ready)
[53968.762111] ata3: SRST fail, set srst fail flag
[53968.766667] ata3: hard resetting link
[53974.538032] ata3: link is slow to respond, please be patient (ready=0)
[53977.141041] ata3: SATA link up 3.0 Gbps (SStatus 123 SControl 300)
[53977.141054] ata3: link reset sucessfully clear error flags
[53977.157449] ata3.00: ATA-9: ST8000AS0002-1NA17Z, AR17, max UDMA/133
[53977.157458] ata3.00: 15628053168 sectors, multi 0: LBA48 NCQ (depth 31/32), AA
[53977.157462] ata3.00: SN:            Z841474Z
[53977.158764] ata3.00: configured for UDMA/133
[53977.158779] ata3.00: Write Cache is enabled
[53977.163030] ata3: EH complete
[53977.164533] scsi 2:0:0:0: Direct-Access     ATA      ST8000AS0002-1NA17Z      AR17 PQ: 0 ANSI: 5
[53977.165256] sd 2:0:0:0: [sdc] 15628053168 512-byte logical blocks: (8.00 TB/7.28 TiB)
[53977.165273] sd 2:0:0:0: [sdc] 4096-byte physical blocks
[53977.165298] sd 2:0:0:0: Attached scsi generic sg2 type 0
[53977.165534] sd 2:0:0:0: [sdc] Write Protect is off
[53977.165547] sd 2:0:0:0: [sdc] Mode Sense: 00 3a 00 00
[53977.165662] sd 2:0:0:0: [sdc] Write cache: enabled, read cache: enabled, doesn't support DPO or FUA
[53977.217123]  sdc: sdc1 sdc2
[53977.218062] sd 2:0:0:0: [sdc] Attached SCSI disk

Even when the new drive had been detected, I rebooted the unit “just to be sure”, then I initiated the repair process from DSM again. After letting it run for a while, I checked the status:

root@DS918:~# cat /proc/mdstat
Personalities : [linear] [raid0] [raid1] [raid10] [raid6] [raid5] [raid4]
md2 : active raid5 sdc5[5] sda5[0] sdd5[4] sdb5[1]
      8776306368 blocks super 1.2 level 5, 64k chunk, algorithm 2 [4/3] [UU_U]
      [=>...................]  recovery =  9.1% (266365608/2925435456) finish=564.1min speed=78549K/sec

md1 : active raid1 sdc2[3] sdd2[2] sdb2[1] sda2[0]
      2097088 blocks [16/4] [UUUU____________]

md0 : active raid1 sdc1[3] sda1[0] sdb1[1] sdd1[2]
      2490176 blocks [16/4] [UUUU____________]

unused devices: 

Partition layout after the second disk swap

After changing the second drive (/dev/sdc) and starting the rebuild process, the new disk got the same partition layout as the first replaced one (/dev/sdd):

root@DS918:~# sfdisk -l
/dev/sda1                  2048         4982527         4980480  fd
/dev/sda2               4982528         9176831         4194304  fd
/dev/sda5               9453280      5860326239      5850872960  fd

/dev/sdb1                  2048         4982527         4980480  fd
/dev/sdb2               4982528         9176831         4194304  fd
/dev/sdb5               9453280      5860326239      5850872960  fd

/dev/sdc1                  2048         4982527         4980480  fd
/dev/sdc2               4982528         9176831         4194304  fd
/dev/sdc5               9453280      5860326239      5850872960  fd
/dev/sdc6            5860342336     15627846239      9767503904  fd

/dev/sdd1                  2048         4982527         4980480  fd
/dev/sdd2               4982528         9176831         4194304  fd
/dev/sdd5               9453280      5860326239      5850872960  fd
/dev/sdd6            5860342336     15627846239      9767503904  fd

The rebuild will again take about 10 hours to finish.

What’s expected to happen next

Because there are now two partitions with unused space on the new drives, the md2 volume will be rebuilt as RAID5 on sd[a-d]5 + the additional space of RAID1 on sdc6 and sdd6. There seems no way of stopping this stupidity, since it will have to be redone again after swapping the next disk. Just sit back and wait for the expansion of the mdraid volume.

Unless…
It might be a time saver to delete the unused partition on the first disk, so that the storage cannot be expanded (what happens will depend on if DSM notices the non-partitioned space and still makes that mirror of sdd6 + sdc6)
There’s only one way to find out:

root@DS918:~# parted /dev/sdd
GNU Parted 3.2
Using /dev/sdd
Welcome to GNU Parted! Type 'help' to view a list of commands.
(parted) rm 6
rm 6
(parted) print
print
Model: ATA ST8000AS0002-1NA (scsi)
Disk /dev/sdd: 8002GB
Sector size (logical/physical): 512B/512B
Partition Table: gpt
Disk Flags:

Number  Start   End     Size    File system     Name  Flags
 1      1049kB  2551MB  2550MB  ext4                  raid
 2      2551MB  4699MB  2147MB  linux-swap(v1)        raid
 5      4840MB  3000GB  2996GB                        raid

(parted) quit

10 hours later…
At right about 10 hours later, md2 was almost rebuilt. No problems so far, but what follows will be interesting as I removed that extra partition (which would have been a part of the LV used for storage). I really hope that the NAS would be ready to accept the next disk in the replacemend procedure right after the sync is finished.

root@DS918:~# cat /proc/mdstat
Personalities : [linear] [raid0] [raid1] [raid10] [raid6] [raid5] [raid4]
md2 : active raid5 sdc5[5] sda5[0] sdd5[4] sdb5[1]
      8776306368 blocks super 1.2 level 5, 64k chunk, algorithm 2 [4/3] [UU_U]
      [==================>..]  recovery = 94.4% (2763366352/2925435456) finish=35.3min speed=76346K/sec

md1 : active raid1 sdc2[3] sdd2[2] sdb2[1] sda2[0]
      2097088 blocks [16/4] [UUUU____________]

md0 : active raid1 sdc1[3] sda1[0] sdb1[1] sdd1[2]
      2490176 blocks [16/4] [UUUU____________]

unused devices: 

Results after the second disk swap

As hoped for, no automatic LV change was initiated, saving me a lot of hours (at least, for now) skipping the reshape operation which would then have to be done at least one time after swapping out the remaining disks.

root@DS918:~# cat /proc/mdstat
Personalities : [linear] [raid0] [raid1] [raid10] [raid6] [raid5] [raid4]
md2 : active raid5 sdc5[5] sda5[0] sdd5[4] sdb5[1]
      8776306368 blocks super 1.2 level 5, 64k chunk, algorithm 2 [4/4] [UUUU]

md1 : active raid1 sdc2[3] sdd2[2] sdb2[1] sda2[0]
      2097088 blocks [16/4] [UUUU____________]

md0 : active raid1 sdc1[3] sda1[0] sdb1[1] sdd1[2]
      2490176 blocks [16/4] [UUUU____________]

unused devices: 

Partitions on /dev/sdc at this stage:

root@DS918:~# sfdisk -l
/dev/sda1                  2048         4982527         4980480  fd
/dev/sda2               4982528         9176831         4194304  fd
/dev/sda5               9453280      5860326239      5850872960  fd

/dev/sdb1                  2048         4982527         4980480  fd
/dev/sdb2               4982528         9176831         4194304  fd
/dev/sdb5               9453280      5860326239      5850872960  fd

/dev/sdc1                  2048         4982527         4980480  fd
/dev/sdc2               4982528         9176831         4194304  fd
/dev/sdc5               9453280      5860326239      5850872960  fd
/dev/sdc6            5860342336     15627846239      9767503904  fd

/dev/sdd1                  2048         4982527         4980480  fd
/dev/sdd2               4982528         9176831         4194304  fd
/dev/sdd5               9453280      5860326239      5850872960  fd

Replacing the third disk

I’m doing it exactly the same way as when I replaced the second disk:
Pull out the drive
Replace and check
Reboot just to be sure
Rebuild
Remove the extra partition on sdc to prevent reshaping after rebuild

After the 3rd disk change had been accepted (to be resynced), I got some unexpected things happening. Even with the removed partition on sdc, DSM decided that it could make partition changes to make the most use of the disks available:

root@DS918:~# sfdisk -l
/dev/sda1                  2048         4982527         4980480  fd
/dev/sda2               4982528         9176831         4194304  fd
/dev/sda5               9453280      5860326239      5850872960  fd

/dev/sdb1                  2048         4982527         4980480  fd
/dev/sdb2               4982528         9176831         4194304  fd
/dev/sdb5               9453280      5860326239      5850872960  fd
/dev/sdb6            5860342336     15627846239      9767503904  fd

/dev/sdc1                  2048         4982527         4980480  fd
/dev/sdc2               4982528         9176831         4194304  fd
/dev/sdc5               9453280      5860326239      5850872960  fd
/dev/sdc6            5860342336     15627846239      9767503904  fd

/dev/sdd1                  2048         4982527         4980480  fd
/dev/sdd2               4982528         9176831         4194304  fd
/dev/sdd5               9453280      5860326239      5850872960  fd
/dev/sdd6            5860342336     15627846239      9767503904  fd

The removed partition from sdd was recreated, and now sdb6, sdc6 and sdd6 will be a RAID5 which will be striped onto the storage LV. Not what I hoped for, but probably nothing that could have been done to prevent it from happening (I think all three extra partitions would have been created even if I removed the one from sdc).

Checking the mdraid status, I noticed that there might be some hope (again, by removing the extra partition on each of the disks that have been completely replaced):

root@DS918:~# cat /proc/mdstat
Personalities : [linear] [raid0] [raid1] [raid10] [raid6] [raid5] [raid4]
md2 : active raid5 sdb5[6] sda5[0] sdd5[4] sdc5[5]
      8776306368 blocks super 1.2 level 5, 64k chunk, algorithm 2 [4/3] [U_UU]
      [=>...................]  recovery =  8.5% (249970824/2925435456) finish=696.8min speed=63988K/sec

md1 : active raid1 sdb2[3] sdd2[2] sdc2[1] sda2[0]
      2097088 blocks [16/4] [UUUU____________]

md0 : active raid1 sdb1[1] sda1[0] sdc1[3] sdd1[2]
      2490176 blocks [16/4] [UUUU____________]

unused devices: 

As the new partitions are not in use yet, I just remove them from the disks (sdc and sdd) using parted.
After removing these partitions, the disks looks like I want them for now:

root@DS918:~# sfdisk -l
/dev/sda1                  2048         4982527         4980480  fd
/dev/sda2               4982528         9176831         4194304  fd
/dev/sda5               9453280      5860326239      5850872960  fd

/dev/sdb1                  2048         4982527         4980480  fd
/dev/sdb2               4982528         9176831         4194304  fd
/dev/sdb5               9453280      5860326239      5850872960  fd
/dev/sdb6            5860342336     15627846239      9767503904  fd

/dev/sdc1                  2048         4982527         4980480  fd
/dev/sdc2               4982528         9176831         4194304  fd
/dev/sdc5               9453280      5860326239      5850872960  fd

/dev/sdd1                  2048         4982527         4980480  fd
/dev/sdd2               4982528         9176831         4194304  fd
/dev/sdd5               9453280      5860326239      5850872960  fd

On the next disk replacement (the last), I will let it expand the storage pool to use the free space from the new disks (as they are 8TB each and the old ones were 3TB, this will add 15TB to the volume).

Snapshots from DSM web UI

The first snapshot of the UI was done after replacing the third disk when something unexpected happened, but I include the story up to that point for those few interested in reading my stuff 🙂

These snapshots (taken while disk 3 is being rebuilt) are still a vaild representation for how the unit was configured before changing (disk 4, 3 and 2, as I began from the bottom with the broken one).

I began with a total volume of 8TB, which I replaced the failing drive with a new 8TB. This made the volume size unchangeable (because redundancy cannot be done with the help of only that 5TB unused space on the new drive).

When changing the second drive, DSM told me the new size of the would be about 12TB, which is the old 8TB (RAID5 across the four disks) + the 5GB free space from the new drives (partition 6 mirrored). This was not what I wanted, so I deleted partition 6 from one of the drives, and that worked, preventing the storage pool from being expanded.

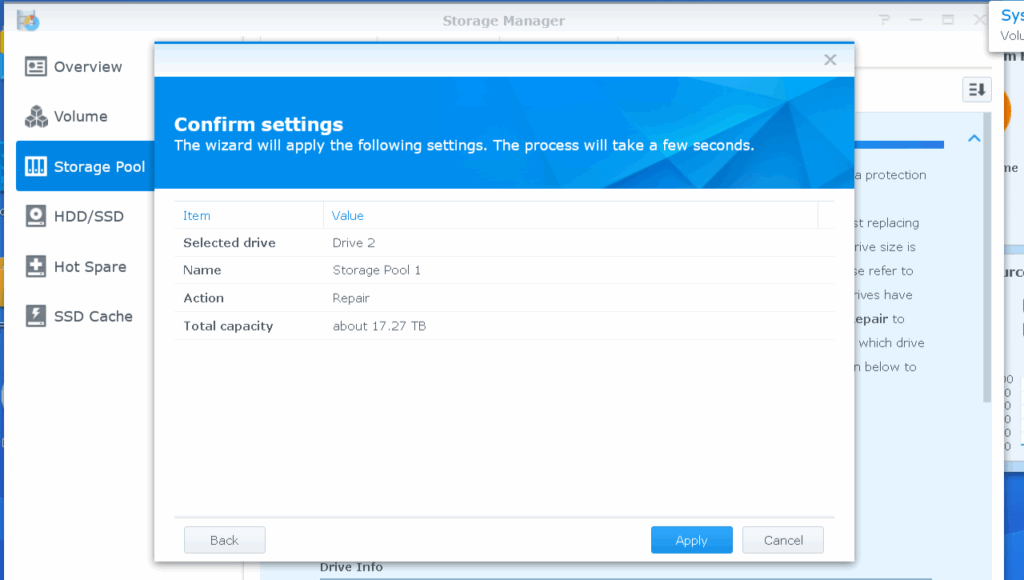
Replacing the third disk (as I have detailed just above) made the assumption that I really wanted to use the free space from the two other drives + the third of the same kind (even with the extra partition removed from sdc). This time I got noticed that the storage pool will grow to about 17TB. Still not what I wanted, and after checking that nothing had been changed, I went on removing the 5TB partitions from sdc and sdd.

11,7 hours later…
Storage pool untouched.

root@DS918:~# cat /etc/lvm/backup/vg1
# Generated by LVM2 version 2.02.132(2)-git (2015-09-22): Sat May  3 05:20:41 2025

contents = "Text Format Volume Group"
version = 1

description = "Created *after* executing '/sbin/pvresize /dev/md2'"

creation_host = "DS918" # Linux DS918 4.4.59+ #25426 SMP PREEMPT Mon Dec 14 18:48:50 CST 2020 x86_64
creation_time = 1746242441      # Sat May  3 05:20:41 2025

vg1 {
        id = "jkiRc4-0zwx-ye9v-1eFm-OL0u-7oSS-x51FA8"
        seqno = 4
        format = "lvm2"                 # informational
        status = ["RESIZEABLE", "READ", "WRITE"]
        flags = []
        extent_size = 8192              # 4 Megabytes
        max_lv = 0
        max_pv = 0
        metadata_copies = 0

        physical_volumes {

                pv0 {
                        id = "yu1P7E-7o1a-8CsP-mbaR-mye5-N4pk-1fAk8O"
                        device = "/dev/md2"     # Hint only

                        status = ["ALLOCATABLE"]
                        flags = []
                        dev_size = 17552611584  # 8.17357 Terabytes
                        pe_start = 1152
                        pe_count = 2142652      # 8.17357 Terabytes
                }
        }

        logical_volumes {

                syno_vg_reserved_area {
                        id = "3YdjJW-zkx6-DoKs-jEz0-kTXo-rpke-eYIw8P"
                        status = ["READ", "WRITE", "VISIBLE"]
                        flags = []
                        segment_count = 1

                        segment1 {
                                start_extent = 0
                                extent_count = 3        # 12 Megabytes

                                type = "striped"
                                stripe_count = 1        # linear

                                stripes = [
                                        "pv0", 0
                                ]
                        }
                }

                volume_1 {
                        id = "BFxwgA-3pr2-3BHr-AXo3-rJ6r-F7tP-vC7Te7"
                        status = ["READ", "WRITE", "VISIBLE"]
                        flags = []
                        segment_count = 1

                        segment1 {
                                start_extent = 0
                                extent_count = 2142649  # 8.17356 Terabytes

                                type = "striped"
                                stripe_count = 1        # linear

                                stripes = [
                                        "pv0", 3
                                ]
                        }
                }
        }
}

mdraid volumes untouched:

root@DS918:~# cat /proc/mdstat
Personalities : [linear] [raid0] [raid1] [raid10] [raid6] [raid5] [raid4]
md2 : active raid5 sdb5[6] sda5[0] sdd5[4] sdc5[5]
      8776306368 blocks super 1.2 level 5, 64k chunk, algorithm 2 [4/4] [UUUU]

md1 : active raid1 sdb2[3] sdd2[2] sdc2[1] sda2[0]
      2097088 blocks [16/4] [UUUU____________]

md0 : active raid1 sdb1[1] sda1[0] sdc1[3] sdd1[2]
      2490176 blocks [16/4] [UUUU____________]

unused devices: 

LV also untouched, just as I wanted.

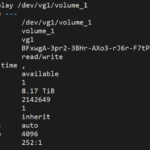
root@DS918:~# lvdisplay
  --- Logical volume ---
  LV Path                /dev/vg1/syno_vg_reserved_area
  LV Name                syno_vg_reserved_area
  VG Name                vg1
  LV UUID                3YdjJW-zkx6-DoKs-jEz0-kTXo-rpke-eYIw8P
  LV Write Access        read/write
  LV Creation host, time ,
  LV Status              available
  # open                 0
  LV Size                12.00 MiB
  Current LE             3
  Segments               1
  Allocation             inherit
  Read ahead sectors     auto
  - currently set to     768
  Block device           252:0

  --- Logical volume ---
  LV Path                /dev/vg1/volume_1
  LV Name                volume_1
  VG Name                vg1
  LV UUID                BFxwgA-3pr2-3BHr-AXo3-rJ6r-F7tP-vC7Te7
  LV Write Access        read/write
  LV Creation host, time ,
  LV Status              available
  # open                 1
  LV Size                8.17 TiB
  Current LE             2142649
  Segments               1
  Allocation             inherit
  Read ahead sectors     auto
  - currently set to     4096
  Block device           252:1

Replacing the last drive

I follow the same procedure as with the other ones, with one exception: I let the Synology do its magic and expand the storage pool by leaving the 5GB partitions on the drives.
Pull out the drive
Replace and check
Reboot just to be sure
Rebuild
Let the Synology expand the storage pool

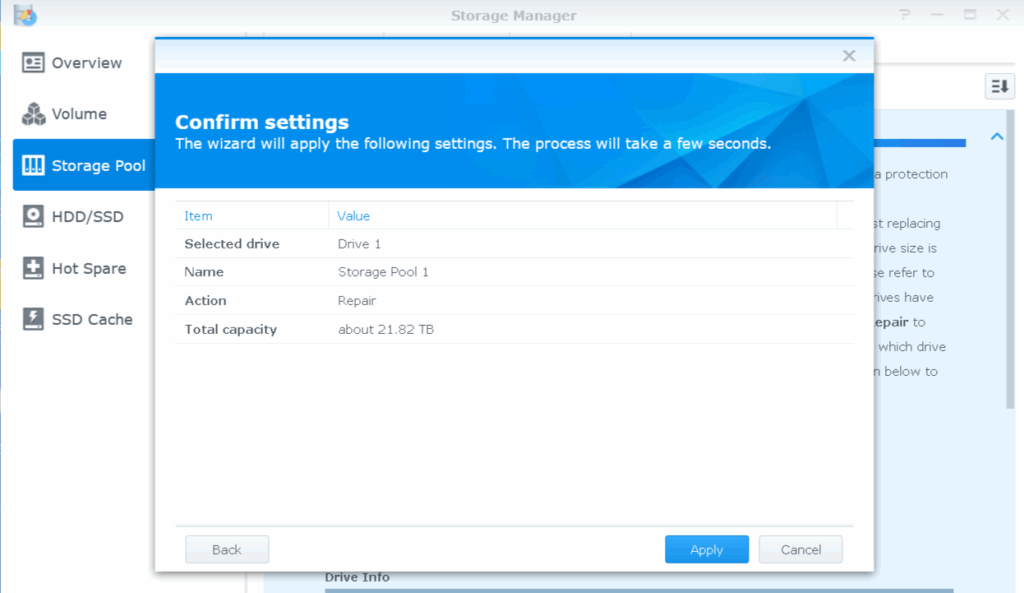
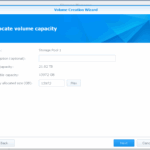
After the reboot, I just did a “Repair” on the pool again, and confirmed that the new size will be about 21TB (old size of 8TB + RAID5 on four 5TB partitions giving the 15TB extra space):

Partition layout on the disks after starting the rebuild:

root@DS918:~# sfdisk -l
/dev/sda1                  2048         4982527         4980480  fd
/dev/sda2               4982528         9176831         4194304  fd
/dev/sda5               9453280      5860326239      5850872960  fd
/dev/sda6            5860342336     15627846239      9767503904  fd

/dev/sdb1                  2048         4982527         4980480  fd
/dev/sdb2               4982528         9176831         4194304  fd
/dev/sdb5               9453280      5860326239      5850872960  fd
/dev/sdb6            5860342336     15627846239      9767503904  fd

/dev/sdc1                  2048         4982527         4980480  fd
/dev/sdc2               4982528         9176831         4194304  fd
/dev/sdc5               9453280      5860326239      5850872960  fd
/dev/sdc6            5860342336     15627846239      9767503904  fd

/dev/sdd1                  2048         4982527         4980480  fd
/dev/sdd2               4982528         9176831         4194304  fd
/dev/sdd5               9453280      5860326239      5850872960  fd
/dev/sdd6            5860342336     15627846239      9767503904  fd

Now I just have to wait…

Something unexpected happened
After that reboot (before initiating rebuild), “md2” for some reason changed to “md4”. The reason for this could be that “md2” and “md3” were unavailable because the last disk came from a FreeBSD:ed older Buffalo, so mdraid detected this and reassigned “md2” as “md4”.

For reference only, the partition tables just after inserting the disk that now should be the new and last replacement:

root@DS918:~# sfdisk -l
/dev/sda1                  2048         2002943         2000896  83
/dev/sda2               2002944        12003327        10000384  83
/dev/sda3              12003328        12005375            2048  83
/dev/sda4              12005376        12007423            2048  83
/dev/sda5              12007424        14008319         2000896  83
/dev/sda6              14008320      7814008319      7800000000  83
/dev/sda7            7814008832     15614008831      7800000000  83

/dev/sdb1                  2048         4982527         4980480  fd
/dev/sdb2               4982528         9176831         4194304  fd
/dev/sdb5               9453280      5860326239      5850872960  fd
/dev/sdb6            5860342336     15627846239      9767503904  fd

/dev/sdc1                  2048         4982527         4980480  fd
/dev/sdc2               4982528         9176831         4194304  fd
/dev/sdc5               9453280      5860326239      5850872960  fd

/dev/sdd1                  2048         4982527         4980480  fd
/dev/sdd2               4982528         9176831         4194304  fd
/dev/sdd5               9453280      5860326239      5850872960  fd

So at least until the next reboot, the output from /proc/mdstat would look like this:

root@DS918:~# cat /proc/mdstat
Personalities : [linear] [raid0] [raid1] [raid10] [raid6] [raid5] [raid4]
md4 : active raid5 sda5[7] sdb5[6] sdd5[4] sdc5[5]
      8776306368 blocks super 1.2 level 5, 64k chunk, algorithm 2 [4/3] [_UUU]
      [==============>......]  recovery = 73.4% (2148539264/2925435456) finish=112.3min speed=115278K/sec

md1 : active raid1 sda2[3] sdd2[2] sdc2[1] sdb2[0]
      2097088 blocks [16/4] [UUUU____________]

md0 : active raid1 sda1[0] sdb1[1] sdc1[3] sdd1[2]
      2490176 blocks [16/4] [UUUU____________]

unused devices: 

Thinking…
The expasion of the storage should not take a long time using my method for preventing expansion in between every disk swap.
The manual method of doing this expansion would be to create a mdraid5 of the four drives, adding these to the LVM configuration as pv, then adding that pv to the “volume_1” stripe. Unless the Synology decides to merge md2 and md3 (which I assume will be created using the 4x5TB partitions)…

Expanding the storage volume

When resyncing md4 (previously named md2) finished, a new mdraid using the four 5TB partitions was created, and a resync was initiated (as it’s not ZFS, this might be necessary even when there is “no data” to sync). As it looks like now, this step will take about 52 hours (going much slower than previous resyncs, so it might be a temporary low speed).

root@DS918:~# cat /proc/mdstat
Personalities : [linear] [raid0] [raid1] [raid10] [raid6] [raid5] [raid4]
md2 : active raid5 sda6[3] sdd6[2] sdc6[1] sdb6[0]
      14651252736 blocks super 1.2 level 5, 64k chunk, algorithm 2 [4/4] [UUUU]
      [=>...................]  resync =  5.1% (249940160/4883750912) finish=3159.2min speed=24445K/sec

md4 : active raid5 sda5[7] sdb5[6] sdd5[4] sdc5[5]
      8776306368 blocks super 1.2 level 5, 64k chunk, algorithm 2 [4/4] [UUUU]

md1 : active raid1 sda2[3] sdd2[2] sdc2[1] sdb2[0]
      2097088 blocks [16/4] [UUUU____________]

md0 : active raid1 sda1[0] sdb1[1] sdc1[3] sdd1[2]
      2490176 blocks [16/4] [UUUU____________]

unused devices: 

mdadm –detail /dev/md2 gives some more information:

root@DS918:~# mdadm --detail /dev/md2
/dev/md2:
        Version : 1.2
  Creation Time : Sun May  4 20:17:34 2025
     Raid Level : raid5
     Array Size : 14651252736 (13972.52 GiB 15002.88 GB)
  Used Dev Size : 4883750912 (4657.51 GiB 5000.96 GB)
   Raid Devices : 4
  Total Devices : 4
    Persistence : Superblock is persistent

    Update Time : Sun May  4 23:45:30 2025
          State : active, resyncing
 Active Devices : 4
Working Devices : 4
 Failed Devices : 0
  Spare Devices : 0

         Layout : left-symmetric
     Chunk Size : 64K

  Resync Status : 5% complete

           Name : DS918:2  (local to host DS918)
           UUID : cc2a3e88:4f844ebd:2fbf5461:f29bbaf0
         Events : 43

    Number   Major   Minor   RaidDevice State
       0       8       22        0      active sync   /dev/sdb6
       1       8       38        1      active sync   /dev/sdc6
       2       8       54        2      active sync   /dev/sdd6
       3       8        6        3      active sync   /dev/sda6

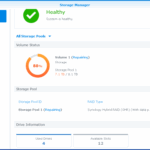
I also found out that the storage pool (but not the volume) has now been expanded to its final size of 21.7TB:

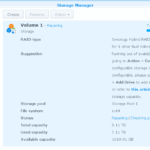
On the “Volume” page, I can go on creating a new volume,which is not what I want. I suppose expanding the current volume will be possible after the resync of the newly added space is done.

I cancelled on the last step where the volume was going to be created, as I want to expand the main storage volume instead.

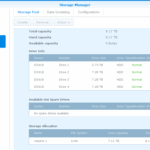
On the “Linux” side (mdraid and LVM), I found out that the “Physical Volume” had been created and that volume had been added to the “Volume Group” vg1:

When md2 was fully synced

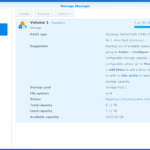
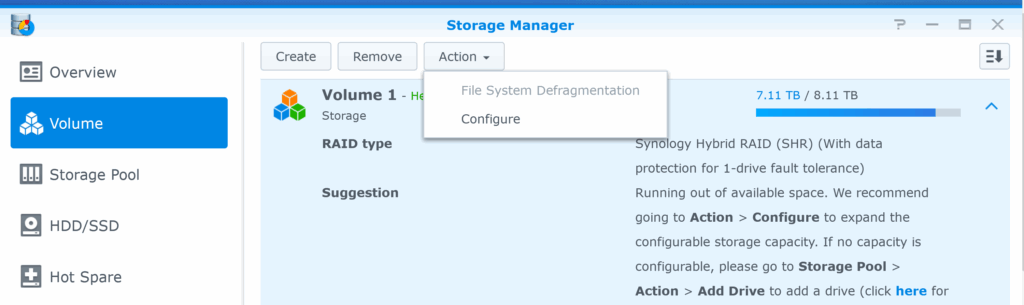
At the end of the the resync of md2, which took about 79 hours (estimated time was 52 hours, but the speed dropped during the resync, and the estimated time increased over the two following days), I was still not able to extend the storage volume from the location I expected it to be in (the “Action” drop-down button under “Volume” in “Storage Manager”). My mistake here was to not check “Configure” under that same drop-down button.

I added new drives to my Synology NAS, but the available capacity didn’t increase. What can I do?

So for DSM 6.2 (for the Fakenology), this is where it’s done:

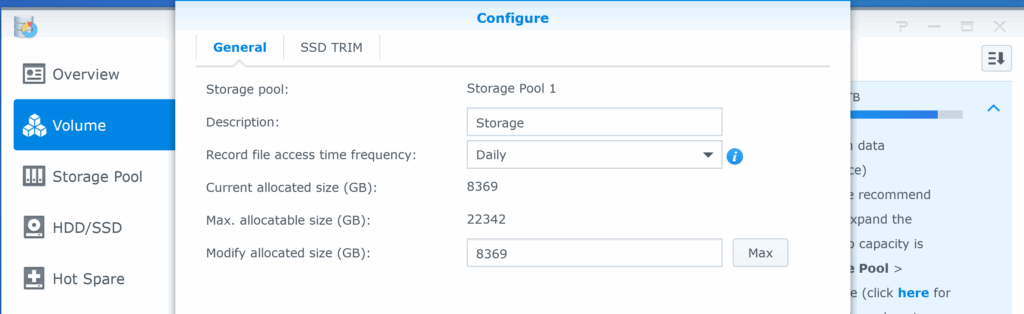
From the “Configuration” page, the volume size can be changed to any size greater than the current size, or to “max” which will add the newly created storage to the volume.

This option to change the size of the volume might have been there all the time (during synchronization), but in any case, it would probably had been better to leave it alone until first sync finalized anyway.

Now the mdraid volumes look like this:

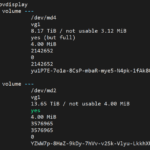
root@DS918:/volume1# cat /proc/mdstat
Personalities : [linear] [raid0] [raid1] [raid10] [raid6] [raid5] [raid4]
md2 : active raid5 sda6[3] sdd6[2] sdc6[1] sdb6[0]
      14651252736 blocks super 1.2 level 5, 64k chunk, algorithm 2 [4/4] [UUUU]

md4 : active raid5 sda5[7] sdb5[6] sdd5[4] sdc5[5]
      8776306368 blocks super 1.2 level 5, 64k chunk, algorithm 2 [4/4] [UUUU]

md1 : active raid1 sda2[3] sdd2[2] sdc2[1] sdb2[0]
      2097088 blocks [16/4] [UUUU____________]

md0 : active raid1 sda1[0] sdb1[1] sdc1[3] sdd1[2]
      2490176 blocks [16/4] [UUUU____________]

unused devices: 

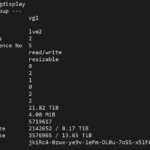
At this stage, the storage pool is still untouched, but as shown in the images above, another pv has been added:

root@DS918:/volume1# cat /etc/lvm/backup/vg1
# Generated by LVM2 version 2.02.132(2)-git (2015-09-22): Thu May  8 03:03:03 2025

contents = "Text Format Volume Group"
version = 1

description = "Created *after* executing '/sbin/pvresize /dev/md2'"

creation_host = "DS918" # Linux DS918 4.4.59+ #25426 SMP PREEMPT Mon Dec 14 18:48:50 CST 2020 x86_64
creation_time = 1746666183      # Thu May  8 03:03:03 2025

vg1 {
        id = "jkiRc4-0zwx-ye9v-1eFm-OL0u-7oSS-x51FA8"
        seqno = 7
        format = "lvm2"                 # informational
        status = ["RESIZEABLE", "READ", "WRITE"]
        flags = []
        extent_size = 8192              # 4 Megabytes
        max_lv = 0
        max_pv = 0
        metadata_copies = 0

        physical_volumes {

                pv0 {
                        id = "yu1P7E-7o1a-8CsP-mbaR-mye5-N4pk-1fAk8O"
                        device = "/dev/md4"     # Hint only

                        status = ["ALLOCATABLE"]
                        flags = []
                        dev_size = 17552611584  # 8.17357 Terabytes
                        pe_start = 1152
                        pe_count = 2142652      # 8.17357 Terabytes
                }

                pv1 {
                        id = "YZWW7p-8HaZ-9kDy-7hVv-v2Sk-Vlyu-LkkhXU"
                        device = "/dev/md2"     # Hint only

                        status = ["ALLOCATABLE"]
                        flags = []
                        dev_size = 29302504320  # 13.645 Terabytes
                        pe_start = 1152
                        pe_count = 3576965      # 13.645 Terabytes
                }
        }

        logical_volumes {

                syno_vg_reserved_area {
                        id = "3YdjJW-zkx6-DoKs-jEz0-kTXo-rpke-eYIw8P"
                        status = ["READ", "WRITE", "VISIBLE"]
                        flags = []
                        segment_count = 1

                        segment1 {
                                start_extent = 0
                                extent_count = 3        # 12 Megabytes

                                type = "striped"
                                stripe_count = 1        # linear

                                stripes = [
                                        "pv0", 0
                                ]
                        }
                }

                volume_1 {
                        id = "BFxwgA-3pr2-3BHr-AXo3-rJ6r-F7tP-vC7Te7"
                        status = ["READ", "WRITE", "VISIBLE"]
                        flags = []
                        segment_count = 1

                        segment1 {
                                start_extent = 0
                                extent_count = 2142649  # 8.17356 Terabytes

                                type = "striped"
                                stripe_count = 1        # linear

                                stripes = [
                                        "pv0", 3
                                ]
                        }
                }
        }
}

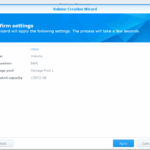
The next (and last step) is to add the new space to the storage volume (Volume 1). This is being done by adding a second segment to “volume_1”, which contains pv1 in the stripe list. of “volume_1”. When the segment has been added, the file system on “volume_1” is resized using the resize2fs command (this took a couple of minutes to finish).

root@DS918:/volume1# cat /etc/lvm/backup/vg1
# Generated by LVM2 version 2.02.132(2)-git (2015-09-22): Sun May 11 21:15:43 2025

contents = "Text Format Volume Group"
version = 1

description = "Created *after* executing '/sbin/lvextend --alloc inherit /dev/vg1/volume_1 --size 22878208M'"

creation_host = "DS918" # Linux DS918 4.4.59+ #25426 SMP PREEMPT Mon Dec 14 18:48:50 CST 2020 x86_64
creation_time = 1746990943      # Sun May 11 21:15:43 2025

vg1 {
        id = "jkiRc4-0zwx-ye9v-1eFm-OL0u-7oSS-x51FA8"
        seqno = 8
        format = "lvm2"                 # informational
        status = ["RESIZEABLE", "READ", "WRITE"]
        flags = []
        extent_size = 8192              # 4 Megabytes
        max_lv = 0
        max_pv = 0
        metadata_copies = 0

        physical_volumes {

                pv0 {
                        id = "yu1P7E-7o1a-8CsP-mbaR-mye5-N4pk-1fAk8O"
                        device = "/dev/md4"     # Hint only

                        status = ["ALLOCATABLE"]
                        flags = []
                        dev_size = 17552611584  # 8.17357 Terabytes
                        pe_start = 1152
                        pe_count = 2142652      # 8.17357 Terabytes
                }

                pv1 {
                        id = "YZWW7p-8HaZ-9kDy-7hVv-v2Sk-Vlyu-LkkhXU"
                        device = "/dev/md2"     # Hint only

                        status = ["ALLOCATABLE"]
                        flags = []
                        dev_size = 29302504320  # 13.645 Terabytes
                        pe_start = 1152
                        pe_count = 3576965      # 13.645 Terabytes
                }
        }

        logical_volumes {

                syno_vg_reserved_area {
                        id = "3YdjJW-zkx6-DoKs-jEz0-kTXo-rpke-eYIw8P"
                        status = ["READ", "WRITE", "VISIBLE"]
                        flags = []
                        segment_count = 1

                        segment1 {
                                start_extent = 0
                                extent_count = 3        # 12 Megabytes

                                type = "striped"
                                stripe_count = 1        # linear

                                stripes = [
                                        "pv0", 0
                                ]
                        }
                }

                volume_1 {
                        id = "BFxwgA-3pr2-3BHr-AXo3-rJ6r-F7tP-vC7Te7"
                        status = ["READ", "WRITE", "VISIBLE"]
                        flags = []
                        segment_count = 2

                        segment1 {
                                start_extent = 0
                                extent_count = 2142649  # 8.17356 Terabytes

                                type = "striped"
                                stripe_count = 1        # linear

                                stripes = [
                                        "pv0", 3
                                ]
                        }
                        segment2 {
                                start_extent = 2142649
                                extent_count = 3576903  # 13.6448 Terabytes

                                type = "striped"
                                stripe_count = 1        # linear

                                stripes = [
                                        "pv1", 0
                                ]
                        }
                }
        }
}

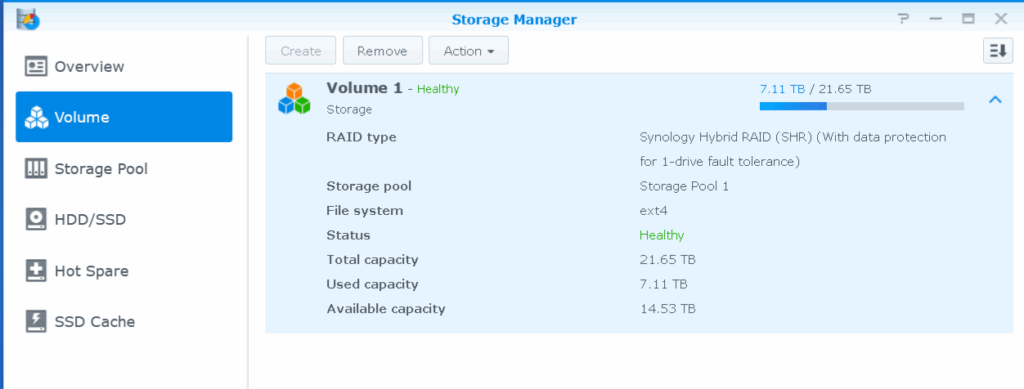
root@DS918:/volume1# df -h
Filesystem         Size  Used Avail Use% Mounted on
/dev/md0           2.3G  987M  1.2G  45% /
none               983M     0  983M   0% /dev
/tmp               996M  944K  995M   1% /tmp
/run               996M  8.2M  988M   1% /run
/dev/shm           996M  4.0K  996M   1% /dev/shm
none               4.0K     0  4.0K   0% /sys/fs/cgroup
cgmfs              100K     0  100K   0% /run/cgmanager/fs
/dev/vg1/volume_1   22T  7.2T   15T  33% /volume1
root@DS918:/volume1#

Buffalo LS220D – borked again

Another Seagate drive failed

Yesterday, when I had the JotteCloud client started to backup the content of the shares on one of my LS220s, I noticed a slowdown in reading files from that device.

Checking the dmesg output I found a repeating pattern of IO errors

end_request: I/O error, dev sda, sector 1231207416
ata1: EH complete
ata1.00: exception Emask 0x0 SAct 0x0 SErr 0x0 action 0x6
ata1.00: edma_err_cause=00000084 pp_flags=00000001, dev error, EDMA self-disable
ata1.00: failed command: READ DMA EXT
ata1.00: cmd 25/00:08:f8:bb:62/00:00:49:00:00/e0 tag 0 dma 4096 in
         res 51/40:00:f8:bb:62/40:00:49:00:00/00 Emask 0x9 (media error)
ata1.00: status: { DRDY ERR }
ata1.00: error: { UNC }
ata1: hard resetting link
ata1: SATA link up 3.0 Gbps (SStatus 123 SControl F300)
ata1.00: configured for UDMA/133
sd 0:0:0:0: [sda] Unhandled sense code
sd 0:0:0:0: [sda]  Result: hostbyte=0x00 driverbyte=0x08
sd 0:0:0:0: [sda]  Sense Key : 0x3 [current] [descriptor]
Descriptor sense data with sense descriptors (in hex):
        72 03 11 04 00 00 00 0c 00 0a 80 00 00 00 00 00
        49 62 bb f8
sd 0:0:0:0: [sda]  ASC=0x11 ASCQ=0x4
sd 0:0:0:0: [sda] CDB: cdb[0]=0x28: 28 00 49 62 bb f8 00 00 08 00
end_request: I/O error, dev sda, sector 1231207416
ata1: EH complete

So, this time sda (the first of the two drives) were failing (sdb had been replaced earlier), and as with the other LS220s I run these in RAID0 (stripe) mode, so both drives are needed for proper operation. I do probably have most of the content backed up since the last failure and since the last regular backups to JottaCloud)

As usual, I fired up my computer used for data-rescuing, and as usual it complained that it hadn’t been used for a too-long time, so the BIOS settings had been forgotten. Had to change that back to booting from CD (Trinity Rescue Kit), but probably missed to enable the internal SATA connectors this time.

Running both the source and destination drives on the same controller makes the rescuing a bit slow, but I’ll just let it run.

I stumbled upon errors early on (during copying the system partitions), so I stopped here and investigated what’s going on:

dmesg output on my rescue-system

sd 7:0:0:0: [sdb] CDB: Read(10): 28 00 00 72 b5 e7 00 00 80 00
end_request: I/O error, dev sdb, sector 7517744

This is the layout of the partitions from another LS220s

Number  Start      End          Size         File system  Name     Flags
 1      34s        2000000s     1999967s     ext3         primary
 2      2000896s   11999231s    9998336s                  primary
 3      11999232s  12000000s    769s                      primary  bios_grub
 4      12000001s  12000001s    1s                        primary
 5      12000002s  14000000s    1999999s                  primary
 6      14000128s  7796875263s  7782875136s               primary

As seen in the dmesg output, the problem was within the second partition, so I restarted ddrescue with the -i parameter to set the start position at start of partition 3 (dealing with 2 later, which is a part of the root filesystem (md1, which consists of sda2 and sdb2) that should be mirrored on the other drive (I have had problems with broken mirrors before, so it might even be that I have no valid copy of this partition).

ddrescue -i 11999232b -d /dev/sdb /dev/sdc /sda1/ddrescue/buff6-1.log

About 12 hours later, I’m almost halfway through the data partition (partition 6) for the mdraid volume. A few errors so far, but ddrescue will get back to those bad parts and try splitting them into smaller pieces later on.

Initial status (read from logfile)
rescued:         0 B,  errsize:       0 B,  errors:       0
Current status
rescued:     1577 GB,  errsize:    394 kB,  current rate:   36765 kB/s
   ipos:     1583 GB,   errors:       3,    average rate:   38855 kB/s
   opos:     1583 GB

I will eventually loose some files here, but the primary goal is to get the drive recognized as a direct replacement for the failed one.

Getting closer…

About 30 hours later, the most of the drive had been copied over to the replacement disk. I saved the errors on the root partition to the last step (which of the final, but most time consuming part is taking place now), where I first copied as much as possible from around where the early errors occured, then getting closer to the problematic section on each additional run.

Initial status (read from logfile)
rescued:     4000 GB,  errsize:   4008 kB,  errors:      83
Current status
rescued:     4000 GB,  errsize:    518 kB,  current rate:        0 B/s
   ipos:     3828 MB,   errors:      86,    average rate:      254 B/s
   opos:     3828 MB
Splitting error areas...

I gave it another couple of hours and was ready to abort and test if it would boot.. Then it just finished.

Current status
rescued:     4000 GB,  errsize:    493 kB,  current rate:        0 B/s
   ipos:     6035 MB,   errors:      94,    average rate:        2 B/s
   opos:     6035 MB
Finished

Options from here

As I have many backup copies of the content from the NAS this disk is a part of the storage volume on, only a few files (if any at all) will be missing if I restore what I have (have to check and remove duplicates from the backups, but that’s another story), so doing this rescue has already from the beginning only been for educational purposes.

Ignore the 518kB (finished at 493kB) of errors and test if it boots
Before going on, I will create a partial backup image from the drive I recovered the data to, which will be all partitions up to the gap between the system partitions and the beginning of the data partition. The size of the non-data partitions is only about 7GB (14 million blocks) as seen in the partition table:

Number  Start      End          Size         File system
 1      34s        2000000s     1999967s     ext3
 2      2000896s   11999231s    9998336s     
 3      11999232s  12000000s    769s         
 4      12000001s  12000001s    1s           
 5      12000002s  14000000s    1999999s     
 6      14000128s  7796875263s  7782875136s  

It’s probably a good idea to not include the start block of the data partition (14000128s), but also safe to skip halfway through the gap between the partitions.
dd if=/dev/sdc of=/sda1/ddrescue/buffa6-1-p1-5 bs=512 count=14000064
This way, I can easily restore the system partitions whenever something goes wrong.

Trying to boot the NAS with the recreated disk and the working one
This is the easiest thing I can try. After running ddrescue from the third partition onwards and until the end, there were only about 40kB unrecoverable data (with or without content). This means that I at least can connect the disks to a Linux machine and mount the mdraid volume there for recovery.
But booting it up in the NAS is the “better” solution in this case.

If booting the disks in the NAS fails
If the NAS won’t boot, my next step will be to try to recover more of the missing content from the root partition (I actually ended up doing this before trying to boot, and was able to recover 25kB more).

Use root partitions from another Buffalo
This would have been my next idea to try out. I have a few more of these 2-disk devices, so I can shut one down and clone the system partitions of both the disks, then dd them back to the disks for “Buffalo 6”. This will give it the same IP as the cloned one, but that’s easy to change if this will make it boot again.
I didn’t have to try this. Can save this for the next crash 🙂

The boot attempt..

Mounted the “new” disk 1 in the caddy, then started up the NAS.. Responds to ping on its IP..
And I was also able to log in to it as “root” (previous modifications to allow SSH root access).. Looking good..

[root@BUFFALO-6 ~]# df -h
Filesystem                Size      Used Available Use% Mounted on
udev                     10.0M         0     10.0M   0% /dev
/dev/md1                  4.7G    784.9M      3.7G  17% /
tmpfs                   121.1M     84.0K    121.0M   0% /tmp
/dev/ram1                15.0M    108.0K     14.9M   1% /mnt/ram
/dev/md0                968.7M    216.4M    752.2M  22% /boot
/dev/md10                 7.2T    707.2G      6.6T  10% /mnt/array1
[root@BUFFALO-6 ~]#

mdraid looks OK, except (what I already suspected) that the mirrors for the system partitions were broken (I forgot to fix that the last time I replaced a disk (the other one) in it)..

[root@BUFFALO-6 ~]# cat /proc/mdstat
Personalities : [linear] [raid0] [raid1] [raid10] [raid6] [raid5] [raid4]
md10 : active raid0 sda6[0] sdb6[1]
      7782874112 blocks super 1.2 512k chunks

md0 : active raid1 sda1[0]
      999872 blocks [2/1] [U_]

md1 : active raid1 sda2[0]
      4995008 blocks super 1.2 [2/1] [U_]

md2 : active raid1 sda5[0]
      999424 blocks super 1.2 [2/1] [U_]

Another easy fix..

mdadm --manage /dev/md0 --add /dev/sdb1
mdadm --manage /dev/md1 --add /dev/sdb2
mdadm --manage /dev/md2 --add /dev/sdb5

All mirrored partitions OK now:

[root@BUFFALO-6 ~]# cat /proc/mdstat
Personalities : [linear] [raid0] [raid1] [raid10] [raid6] [raid5] [raid4]
md10 : active raid0 sda6[0] sdb6[1]
      7782874112 blocks super 1.2 512k chunks

md0 : active raid1 sdb1[1] sda1[0]
      999872 blocks [2/2] [UU]
      bitmap: 0/1 pages [0KB], 65536KB chunk

md1 : active raid1 sdb2[2] sda2[0]
      4995008 blocks super 1.2 [2/2] [UU]
      bitmap: 1/1 pages [4KB], 65536KB chunk

md2 : active raid1 sdb5[2] sda5[0]
      999424 blocks super 1.2 [2/2] [UU]
      bitmap: 1/1 pages [4KB], 65536KB chunk

Denise

Denise is the Amiga video chip, but that wasn’t what I was looking for…

Denise, the compact Amiga 500+ replacement

Amiga 500+ clone using original ICs from the Amiga 500+ crammed together on a compact MiniITX PCB. It also adds two Zorro-II slots for expansion.
Amy was another Amiga PCB earlier released by “Mr A”.
https://amitopia.com/denise-amiga-500-plus-from-sweden-with-love


https://www.enterlogic.se/?page_id=180

Denise, the Amiga and C64 emulator

When searching for the PCB above, I stumbled across this software Amiga and C64 emulator with the odd name of “Denise”
https://sourceforge.net/projects/deniseemu/
As it seems from the files that are available for download, this emulator is still under development (2024-02-21, latest update besides the nightly: 2024-10-24)

How to use Jottacloud as S3 storage

After some trial and (mostly) error (using NFS), I got the backups from xcp-ng working against my Jottacloud storage. So for documentation purposes, I’ll start over (and also fix some of the mistakes I made with the settings, which stored the files in the wrong place).

Requirements

This is written for the use of:
* xcp-ng (Xen Orchestra) for my virtual servers that needs to be backed up
* Jottacloud account (or another one that uses the Jotta backend) for storage
* local server acting as the client for Jottacloud and as the S3 server which Xen Orchestra/xcp-ng will connect to. This can be a virtual one or a separate machine, and it can be used for anything else (I use the virtual server which is also my Xen Orchestra host).
* rclone on the local server as both a client and server, to handle what’s coming in through S3 and push it to Jotta

It should be no problem adopting it to other configurations, but this is what I have to test on.

The local server

As I decided to use the host for Xen Orchestra, it was to begin with a little underpowered (even disk space was low, because I went cheap on it in the beginning), I had to increase disk space and extend the root file system first (I will not describe how, but doing it afterwards involves taking the swap partition down and remove it to be able to expand the file system). I also increased the RAM from 2GB to 4GB and CPU count from 2 to 16 to give it the performance whenever needed.

Installing rclone is straightforward on Linux systems, so just follow the single-line instruction in the documentation:

sudo -v ; curl https://rclone.org/install.sh | sudo bash

Configuring a Jottacloud remote for rclone

After the installation it’s time to configure a remote. The ‘remote’ is in this case the Jottacloud service. By configuring rclone, you will set up a ‘device’ and a ‘mountpoint’ on the Jotta storage.
To compare with the Jotta GUI client, the ‘device’ is the computer being backed up, and ‘mountpoint’ is the folder to be backed up (that is one of the entries listed in the Jotta client main window).
The specifics for each service can be found on its own page in the documentation:
Jottacloud configuration for rclone
A few thing to be mentioned about the whitelabel variants of Jottacloud is that many of them requires you to select “Legacy authentication” (if you do not have the option to use Jotta-CLI and generate a login token)
You may also have to select some non-default replies in the configuration guide when you run the rclone config command. The differences I had to make compared to the description in the documentation is marked in red in the session below (my text input is marked with bold on prompts marked in red):

No remotes found, make a new one?
n) New remote
s) Set configuration password
q) Quit config
n/s/q> n
name> s3
Option Storage.
Type of storage to configure.
Choose a number from below, or type in your own value.
[snip]
XX / Jottacloud
   \ (jottacloud)
[snip]
Storage> 28 (this is currently the number in the list)

Option client_id.
OAuth Client Id.
Leave blank normally.
Enter a value. Press Enter to leave empty.
client_id>

Option client_secret.
OAuth Client Secret.
Leave blank normally.
Enter a value. Press Enter to leave empty.
client_secret>

Edit advanced config?
y) Yes
n) No (default)
y/n>

Option config_type.
Select authentication type.
Choose a number from below, or type in an existing value of type string.
Press Enter for the default (standard).
   / Standard authentication.
 1 | Use this if you're a normal Jottacloud user.
   \ (standard)
   / Legacy authentication.
 2 | This is only required for certain whitelabel versions of Jottacloud and not recommended for normal users.
   \ (legacy)
   / Telia Cloud authentication.
 3 | Use this if you are using Telia Cloud (Sweden).
   \ (telia_se)
   / Telia Sky authentication.
 4 | Use this if you are using Telia Sky (Norway).
   \ (telia_no)
   / Tele2 Cloud authentication.
 5 | Use this if you are using Tele2 Cloud.
   \ (tele2)
   / Onlime Cloud authentication.
 6 | Use this if you are using Onlime Cloud.
   \ (onlime)
config_type> 2

Do you want to create a machine specific API key?

Rclone has it's own Jottacloud API KEY which works fine as long as one only uses rclone on a single machine. When you want to use rclone with this account on more than one machine it's recommended to create a machine specific API key. These keys can NOT be shared between machines.
y) Yes
n) No (default)
y/n> y

Option config_username.
Username (e-mail address)
Enter a value.
config_username> yourjottaemail@fake.com

Option config_password.
Password (only used in setup, will not be stored)
Choose an alternative below. Press Enter for the default (n).
y) Yes, type in my own password
g) Generate random password
n) No, leave this optional password blank (default)
y/g/n> y
Enter the password:
password:
Confirm the password:
password:

Use a non-standard device/mountpoint?
Choosing no, the default, will let you access the storage used for the archive section of the official Jottacloud client. If you instead want to access the sync or the backup section, for example, you must choose yes.
y) Yes
n) No (default)
y/n> y

Option config_device.
The device to use. In standard setup the built-in Jotta device is used, which contains predefined mountpoints for archive, sync etc. All other devices are treated as backup devices by the official Jottacloud client. You may create a new by entering a unique name.
Choose a number from below, or type in your own value of type string.
Press Enter for the default (Jotta).
 1 > Jotta
 2 > your other
 3 > devices configured
 4 > from the client
config_device> deb12-xo

Option config_mountpoint.
The mountpoint to use on the non-standard device deb12-xo.
You may create a new by entering a unique name.
Choose a number from below, or type in your own value of type string.
Press Enter for the default (xcp-ng).
 1 > xcp-ng
 2 > xcpng-s3
config_mountpoint> rclone-s3

Configuration complete.
Options:
- type: jottacloud
- configVersion: 0
- client_id: yourownstringofcharacters
- client_secret: thisissecretsoIwouldnotshowit
- username: yourjottaemail@fake.com
- password:
- auth_code:
- token: {"access_token":"supersecretstuffheredonotshare","expiry":"2025-01-28T16:12:46.077725923+01:00"}
- device: deb12-xo
- mountpoint: rclone-s3
Keep this "s3" remote?
y) Yes this is OK (default)
e) Edit this remote
d) Delete this remote
y/e/d> y

Current remotes:

Name                 Type
====                 ====
s3                   jottacloud

e) Edit existing remote
n) New remote
d) Delete remote
r) Rename remote
c) Copy remote
s) Set configuration password
q) Quit config
e/n/d/r/c/s/q> q

After the configuration step, you have to connect to it for it to be created online. This is also needed because the ‘bucket’ (folder) has to be created as explained in the rclone serve s3 documentation.

To create the device (deb12-xo above) and mountpoint (rclone-s3 above), mount the remote using the rclone mount command:

mkdir s3
rclone -vv mount s3: /home/xo/s3

(you will see a warning that it is recommended to use –vfs-cache-mode for the remote, but it’s safe to ignore it in this step)

In another shell, go to the directory where you mounted the remote. Verify that the remote is mounted with df -h .
Create a folder with the name that will be your xcp-ng backup location (“bucket name”). This will create the directories (mountpoint and bucket) on the online storage. If this is not done (or just if you want), check the logs in the other shell.

In this step, I created the directory “xcp-ng” inside my S3 folder.

Now everything is prepared for configuring it within xcp-ng.
Jump out of the s3 directory (just “cd”), then break the connection and mount with ctrl-c in the other shell.

Start the s3 server (temporarily for testing):

rclone -vv serve s3 --auth-key jottatest,sUperSecret --addr=0.0.0.0:8080 s3:

Verify that you can connect using a S3 client

This is an optional step, but you might find it useful now and later.
To prevent possible mistakes when directly testing with xcp-ng, you can download some S3 client to test with first. I found S3 Browser useful enough for testing.
Account setup in this client is simple:
Display name: whatever you want
Account type: S3 Compatible Storage
API endpoint: ip address and port of machine running rclone serve command, as usual like: 10.0.0.222:8080
Access KeyID: the user name (“jottatest” above)
Secret Access Key: the password (“sUperSecret” above)

Check that uploading files works by verifying that they becomes visible online.
The path (visible, not URL) to the files at Jottacloud would be (from the Web UI):
Backups > deb12-xo > rclone-s3 > xcp-ng

Setting up S3 storage in Xen Orchestra

To set up the newly created S3 storage in Xen Orchestra, go to “Settings/Remotes”.

Set type to “Amazon Web Services S3”
Disable HTTPS (for now, the rclone server supports it, but I haven’t tested it)
AWS S3 endpoint: IP address and port of machine running rclone serve s3
AWS S3 bucket name: xcp-ng
Directory: / (blank would currently not be accepted by Xen Orchestra)
Access key ID: the user name, “jottatest”
Secret (field below): the password (“sUperSecret”)

If the test above went well, the connection in Orchestra will just go through and will be enabled and speed-tested.

Now the setup is ready for the first tests with backing up VMs through the connection. If all goes well, make the rclone command run at the start of the computer or VM it’s on. Any way you like.
It can be told to run in the background with the –daemon option. All information you need is in the documentation or in the forums.

Troubleshooting

If in some case anything goes wrong or stops working (a rare problem, as I heard of, but maybe related to using the Jotta backend or rclone for the connection and serving the S3 storage), create a new bucket and send backups to that instead of the broken one.
Split into multiple buckets if problems continues.

You can also use rclone ncdu to browse the content, and by trial and mostly error move backup folders from the broken bucket to the new one, one at a time to find out where it fails. The method I ended up using was to first rename the bucket to free the name I wanted to keep, then look for the backup folder names in ncdu and move each of them with another move command.

rclone move s3:/xcp-ng s3:xcp-ng-borked
rclone mkdir s3:/xcp-ng
rclone mkdir s3:/xcp-ng/xo-vm-backups

To avoid typing mistakes, I use a variable for the backup folder name which I copy from ncdu:

d=34ba1017-66d2-6a15-ed2a-b57f1a912431
rclone move s3:/xcp-ng-borked/xo-vm-backups/${d} s3:/xcp-ng/xo-vm-backups/${d}

Moving the backup folders like this will only take a couple of seconds, since it is done on the server side (Jotta). I measured the moving speed to about 10GB/s (294GB was moved in 33 seconds), and my largest backup folder of 500GB took 43 seconds.
That’s well spent time if you want to find out which backup is broken and stops every other backup against that remote working.

If failures continues, just start over

If the xcp-ng backups continues to fail, you can keep the old backups but just start over by configuring a new mountpoint (backup folder inside the “device”).

Before making these changes, disable all the remotes in Xen Orchestra, then shut down the “rclone serve s3” process to avoid any access to the old content.
The easiest method for keeping the old content and starting over with the new mountpoint is to rename the remote in the rclone.conf file:

[s3]
type = jottacloud
configVersion = 0
client_id = *SecretStuffHere*
client_secret = *VerySecretStuffHere*
username = not@myrealemail.se
password =

Change the remote name to anything else to free up the old name (I usually use something with “bork” in the name, such as “s3-bork-202505” to indicate when it failed).

Create a new remote as described above, but use a new mountpoint name (root folder for the buckets), then create the individual buckets (folders) by mounting the remote.

In Xen Orchestra, the configuration do not have to change at all.

Enable one remote at a time, then for each one enabled, run the backups using that remote manually once to see if it succeeds.

Creating usable sample data for WordPress

This is a side-step to my series of notes on How to preserve a WordPress site using the WP REST API

To have actual (but faked) content I can share in examples, and also allow anyone to run the API queries against for testing and examining the result, I set up a sample site at lab.webit.nu.

What I wasn’t prepared for was that it’s hard to find useful test content to fill the site with (the official “Theme Unit Test” was more or less of no use for my purpose). I finally found two candidates and decided on the second one which I describe below.

wp-cli-fixtures seems really flexible, but refused to run because of conflicts in the code. I managed to “fix” these conflicts, but I still couldn’t have it connect images to the posts. I also tested Faker which ‘wp-cli-fixtures’ is based on, but it hasn’t been updated for many years, and failed because the use of the flickr API has changed.

test-content-generator acts both as a plugin and as an extension to wp-cli. It has options to generate taxonomies (categories and tags, but not to specify which one separately), users (specify user role or randomize), add images (from picsum.photos) in a specified size, create posts and comments to them, and (from the WP backend) create pages.

Creating fake content for the test site

As mentioned (and true for all three alternatives for creating fake content) wp-cli is required since the data-creators are extensions to it.
Simple enough to install according to the instructions on the wp-cli homepage:

## download and test
curl -O https://raw.githubusercontent.com/wp-cli/builds/gh-pages/phar/wp-cli.phar
php wp-cli.phar --info
## then if it works
chmod +x wp-cli.phar
sudo mv wp-cli.phar /usr/local/bin/wp

Install the ‘test-content-generator’ plugin as described:

wp plugin install test-content-generator --activate

To have the data itself created in the right order (and to not have to type it over again if I wipe the database), I created a script to do it:

#!/bin/sh
wp test users --amount=5 --role_keys=editor,author
wp test users --amount=15 --role_keys=subscriber
wp test users --amount=3 --role_keys=contributor
wp test users --amount=10
wp test taxonomies --amount=50
wp test images --amount=20 --image_width=1500 --image_height=410
wp test posts --amount=60
wp test comments --amount=100
wp test comments --amount=33

I wanted more comments than the maximum of 100 for each command run, so this is the reason for two of this command. The limit for images is 20, so I ran this three times to create enough different images for each post. The four ‘wp test users’ commands in the beginning is to create a set amount of one kind of users, then add 10 more users with randomized roles.

I also uploaded 10 images from stocksnap.io the normal way through wp-admin to have more images to examine the database content for. Five of these will be attached to each of the test pages I create using ‘test-content-generator’ from within wp-admin.

My next post will be the continuation of the series on how to preserve that WordPress site…

Preserving a WordPress site using the WP REST API

This is not a tutorial for someone who likes to copy/paste stuff. It’s my notes on how to recreate a WordPress site where the admin login has been lost and the site is still running

Do not use the methods described here on any site you do not own or have permission to dig through. Doing intense wp-json queries might have you banned or give the site problems (bandwidth or technical).

I have blocked wp-json access to this site (tech.webit.nu) because of my posts about how to collect content. I have however set up another site, lab.webit.nu, which you are allowed to try out some fetching commands on.

The only requirement is that (at least part of) the WP REST API (wp-json) is available on the site. This will let you access most of the content visible to those who visit the site using a web browser.

I came across a site that needs to be recovered/preserved which had all its users deleted (probably including all admins as well), and access to the post comments were not possible using the API. This will later be parsed out from the saved rendered posts of the site.

The focus is on preserving, not cloning. There are plugins available for cloning sites to a new location or domain, but those requires admin access on both locations.

The WordPress REST API

Read someone else’s tutorial on this, there are a couple out there. I will only go into details on what parts of the json output belongs to what table in the WordPress database and how to get the content back where it belongs.
A few pages I stumbled on doing my research for this post:
This is a very short introduction to the API:
https://jalalnasser.com/wordpress-rest-api-endpoints/

Also, I found an article about the WordPress API on SitePoint:
https://www.sitepoint.com/wordpress-json-rest-api/

Another cloning/backup plugin (WP Migrate) claims to have the Ultimate Developer’s Guide to the WordPress Database

The WordPress REST API LinkedIn Course was probably the best resource I found to get started:
https://www.linkedin.com/learning/wordpress-rest-api-2
What I found confusing is how Morten used the term “Endpoint” for the METHOD and “Route” (which is correct) for the URL-part following “wp-json” on the URL. According to me with limited knowledge about this, the GET/POST/DELETE is what I will call “method” and I will only use “GET”. I will use the term “Endpoint” or “Route” for the part of the URL after “wp-json”.

Begin digging

The most useful endpoints are, besides “posts” and “media”, “taxonomies” and “types” which will give you all the taxonomies and post types to retrieve and parse for the parts that will be put back into a new database.
For a WordPress site without any custom post types or taxonomies, “taxonomies” will only be “categories” and “tags”, and “types” of interest will be “pages”, “posts” and “media” (“attachment”). If the site has a WooCommerce shop there are specific endpoints for product categories and tags.

Step 1: Post index

Luckily enough the site I was going to preserve had a (more or less) complete index of the public posts (probably auto-generated by the theme template), so I was able to download the rendered HTML of each post as well as the json for each of them. I didn’t really need to save json for each post, but the code I used for parsing the HTML pages will be used later when I go on recreating the comments.
At this point I had html and json for each post (but no related files or content to them)

Step 2: Get taxonomies (terms)

Taxonomies are as I described earlier the tags and categories. These can be fetched all at once and saved down to one file per type.
These can be easily inserted into the WordPress database.
There are two tables of interest in this step:
‘wp_terms’ (the words) and ‘wp_term_taxonomy’ (connecting each term to a taxonomy, and contains the description and setting for ‘parent’ for categories). A third table connecting the terms with the posts (‘wp_term_relationships’) will come in use when the posts are imported. Lastly, the table ‘wp_termmeta’ optionally contains more information for the terms (meta_key and meta_value added by plugins)

Step 3: Get json for the posts

Although I already had these as separate json files, I now reworked my script to fetch the posts in batches, so I got them in batches of 10 and 100. The sets of 100 posts per fetch is a complete set, and the files with 10 posts each will be used for testing further routines.
The API endpoint /posts is just for the post type of ‘post’.
As the ‘wp_posts’ table also contains the pages and media file information (post type “attachment”), these will have to be fetched in the next step.

Step 4: Get json for pages

As step 2, but now I get the pages. As the pages are a small amount on most sites, I decided to get these as one item per file. This to reduce the risk for parsing errors.

Step 5: Get json for entries in the media library

As the other steps for getting posts, as the media items also are a post type (‘attachment’) with some special fields (source URLs for the files). Media items were grabbed in batches of 100, as they are most likely to be problem free with the limited content of the entries.

Parsing time

Now things get more complicated when we start to parse the data we got. This will be described in part 2 of this series of notes.
Part 2: The WordPress database and parsing taxonomies

Preserving a WordPress site using the WP REST API – the WordPress database and parsing taxonomies

To make the most out of my notes, you should have your own sites (source and destination) set up for testing and analyzing the WordPress database content.

If you’re intend to try out something from my notes, you should have your own site to try things out against, or at least have access to a site you can dig into without any legal issues. You will also need to set up a destination site somewhere, and I recommend that you do it on a virtual machine with shell access somewhere (Oracle Cloud Free Tier is a forever-free alternative – and no, I’m not getting paid for recommending them, I just use and like their services – for stability AVOID their old AMD machines and only create machines on the Ampere A1 platform).
For just trying out some GET requests, I have set up lab.webit.nu and populated it with random content using wp-cli. This site might break at any time, so do not rely on it being available.

Some commands I give as examples has to be run on a Linux/Unix machine. This might also be possible in windows using microsoft ubuntu.

The WordPress database tables

It’s now a good time to examine the WordPress database tables used to store the terms. The descriptions below are my own findings in my own words. I later found a resource on the WP Staging plugin home page:
https://wp-staging.com/docs/the-wordpress-database-structure/

wp_terms
Terms such as categories, tags and menu names

+------------+-----------------+------+-----+---------+----------------+
| Field      | Type            | Null | Key | Default | Extra          |
+------------+-----------------+------+-----+---------+----------------+
| term_id    | bigint unsigned | NO   | PRI | NULL    | auto_increment |
| name       | varchar(200)    | NO   | MUL |         |                |
| slug       | varchar(200)    | NO   | MUL |         |                |
| term_group | bigint          | NO   |     | 0       |                |
+------------+-----------------+------+-----+---------+----------------+

Note: in the database from a larger site with about 3500 terms I manage, I have not seen any other value than 0 (zero) in the ‘term_group’ field.

wp_term_taxonomy
Connects the terms (tags, categories with their names) to the taxonomy they belong to. This table also holds the ‘description’ and ‘parent’ fields for the term.
“category” and “post_tag” are the most used ones.
Every term should have the corresponding entry in this table.

+------------------+-----------------+------+-----+---------+----------------+
| Field            | Type            | Null | Key | Default | Extra          |
+------------------+-----------------+------+-----+---------+----------------+
| term_taxonomy_id | bigint unsigned | NO   | PRI | NULL    | auto_increment |
| term_id          | bigint unsigned | NO   | MUL | 0       |                |
| taxonomy         | varchar(32)     | NO   | MUL |         |                |
| description      | longtext        | NO   |     | NULL    |                |
| parent           | bigint unsigned | NO   |     | 0       |                |
| count            | bigint          | NO   |     | 0       |                |
+------------------+-----------------+------+-----+---------+----------------+

wp_term_relationships
Connect page or post with term
object_id: post, page etc id (any object that supports tags or categories)
term_taxonomy_id: id in wp_term_taxonomy

+------------------+-----------------+------+-----+---------+-------+
| Field            | Type            | Null | Key | Default | Extra |
+------------------+-----------------+------+-----+---------+-------+
| object_id        | bigint unsigned | NO   | PRI | 0       |       |
| term_taxonomy_id | bigint unsigned | NO   | PRI | 0       |       |
| term_order       | int             | NO   |     | 0       |       |
+------------------+-----------------+------+-----+---------+-------+

Note: in the database from a larger site with about 3500 terms I manage, I have not seen any other value than 0 (zero) in the ‘term_order’ field.

wp_termmeta
Additional data for term items. This table is used by plugins.

+------------+-----------------+------+-----+---------+----------------+
| Field      | Type            | Null | Key | Default | Extra          |
+------------+-----------------+------+-----+---------+----------------+
| meta_id    | bigint unsigned | NO   | PRI | NULL    | auto_increment |
| term_id    | bigint unsigned | NO   | MUL | 0       |                |
| meta_key   | varchar(255)    | YES  | MUL | NULL    |                |
| meta_value | longtext        | YES  |     | NULL    |                |
+------------+-----------------+------+-----+---------+----------------+

Adding the terms to the WordPress database

At this time, only the wp_terms and wp_term_taxonomy tables are to be populated. As I later will parse objects from the media library, I will convert the json response to an associative array for easier manipulation of the meta value for images (more on that later).
PHP has the function json_decode() that has the option to return an array instead of an object.
Below is incomplete code of my fully working code, as you read this, I assume you are able to put things together from my hints.

$db = mysqli_connect(your db connection details here);
$file = "your-file-with-10-categories-or-tags.json";
$jsondata = json_decode(file_get_contents($file),true);
print count($jsondata) . " items\n";
foreach($jsondata as $post)
{
  if (!empty($post['taxonomy']))
  {
    $parent = !empty($post['parent']) ? $post['parent'] : 0;
    $name = mysqli_real_escape_string($db,$post['name']);
    $desc = mysqli_real_escape_string($db,$post['description']);
    $sql1 = <<<EOM
INSERT IGNORE INTO wp_terms(term_id,name,slug)
 VALUES({$post['id']},"{$name}","{$post['slug']}");
EOM;
  print "$sql1\n";

    $sql2 = <<<EOM
INSERT IGNORE INTO wp_term_taxonomy(term_taxonomy_id,term_id,taxonomy,description,parent)
 VALUES ({$post['id']},{$post['id']},"{$post['taxonomy']}","{$desc}",{$parent});
EOM;
    print "$sql2\n";
  }
}

After this step, you will be able to see the categories in the wp-admin backend of the destination site.

Moving Apache and MySQL to new server

This is not a guide/tutorial, just notes I made while moving the data disk from my old server to a new following my previous installation guide.

New server:
Ubuntu Server 24.04.1 LTS

Old server:
Ubuntu Server 22.04.4 LTS

Checks before trying to start anything

Did you follow any other of my guides ? You need to redo the setup using those instructions to ensure needed packages and Apache modules are installed.

  1. Do the sites you are hosting in the need of different PHP versions (will need php-fpm and associated modules), or do you run the sites using different users (will need both php-fpm and mpm-itk)?
    Running sites on different versions of PHP on the same server
    Apache HTTPd and PHP security

  2. Any sites using HTTPS (every site should use it, plain HTTP only for redirecting to HTTPS site) ?
    Install certbot as explained below. When creating the first certificate (for the ‘default’ site), the ssl module will be activated in Apache. This will however require port 80 of the newly installed server to be accessible from the outside, and only you (should) know how this is done for your specific network setup.

    apt install certbot python3-certbot-apache
    certbot --apache
    

    If you want to do offline-testing before making the new server available online, just enable the ssl module in Apache and use the existing certificates (use the ‘hosts’ file to point vhost names to the local ip address of the new server).

Troubleshooting

MySQL won’t start
UID and GID of MySQL user was changed from 114:120 to 110:110. This will give “Error: 13 (Permission denied)” when trying to start without correcting the ownership of /var/lib/mysql and its content.

Apache won’t start
The problems starting Apache on the new server is caused by either not correctly installed (but activated) modules. Rename mods-available and mods-enabled to something else (for reference) and copy in those which was working right after installing the new server.
The remaining startup-problems are caused by virtualhosts using not installed or activated modules, so disable all sites to start debugging (rename sites-enabled and create a new empty one, put back one site at a time and start with 001-default).
If you use PHP-FPM and different users on each site, you have to redo that setup on the new server. The php-fpm configurations are included on my data drive (/etc/php/8.3/fpm/pool.d/), but for these to work they need their respective PHP-FPM version installed.
Also, proxy_fcgi is needed to be able to redirect php file access to the fastcgi php handler. All of this is mentioned in my earlier guide.

Apache cannot access vhost site files
Did you enable the extra security with file protection and separate users per site according to my guide mentioned above ?
You will then also need to install and activate the mpm_itk module again.

HTTPs sites get connection refused
Do you have the Apache SSL module activated ? Is the firewall open for HTTPS (port 443) ?

Disk management in Linux

Solution to issues with moving disks between Linux systems

Recently, I had to attach the disk from another Linux system because my user had lost its ‘sudo’ permission. When trying to mount the root partition, I got the not-too-helpful error message:

mount: unknown filesystem type 'LVM2_member'

The reason for this is that a standard Linux installation uses LVM for the partitions, and surprisingly-stupid-enough gives every installation the same name of the volume group, “ubuntu-vg”, so it will collide with the running sysems VG with the same name.

The procedure
Shut down the computer you are going to transfer the disk from, then remove the disk.
(for a virtual one, you just have to keep it shut down during this operation)
Shut down (not needed for virtual) the computer which will have the disk connected and connect the disk.
Start up or reboot the computer with the disks (now with the same VG name)
(a virtual server/computer might not need to be rebooted at all, check with ‘dmesg’ if the other disk was found)

This is usually the first thing one would try for getting access to a disk from another computer. This will fail (with the error message this post is all about):

root@ubu-04:~# fdisk -l /dev/xvdb
...
Device       Start      End  Sectors Size Type
/dev/xvdb1    2048     4095     2048   1M BIOS boot
/dev/xvdb2    4096  2101247  2097152   1G Linux filesystem
/dev/xvdb3 2101248 33552383 31451136  15G Linux filesystem
..

The partition that will be mounted on /boot is directly mountable and accessible now:

root@ubu-04:~# mkdir disk
root@ubu-04:~# mount /dev/xvdb2 disk
root@ubu-04:~# ls disk/
config-5.4.0-176-generic      initrd.img-5.4.0-182-generic  vmlinuz
config-5.4.0-182-generic      initrd.img.old                vmlinuz-5.4.0-176-generic
grub                          lost+found                    vmlinuz-5.4.0-182-generic
initrd.img                    System.map-5.4.0-176-generic  vmlinuz.old
initrd.img-5.4.0-176-generic  System.map-5.4.0-182-generic

The partition with the rest of the content will give the not-so-useful error message:

root@ubu-04:~# mount /dev/xvdb3 disk
mount: /root/disk: unknown filesystem type 'LVM2_member'.
root@ubu-04:~#

lvscan identifies there is a problem:

root@ubu-04:~# lvscan
  inactive          '/dev/ubuntu-vg/ubuntu-lv' [<15.00 GiB] inherit
  ACTIVE            '/dev/ubuntu-vg/ubuntu-lv' [10.00 GiB] inherit
root@ubu-04:~#

Fix by renaming the VG
The solution I used to access the content on the attached disk was to give the VG a non-conflicting name. This can be whatever you choose, but I simply added the hostname which this disk belongs to:
Be sure to rename the correct one:
Getting the VG UUID of the one to rename can be done a couple of ways. If you do this before removing the disk you want to access on the other computer, just use the command 'vgdisplay' show the ID:

root@test-1:~# vgdisplay
  --- Volume group ---
  VG Name               ubuntu-vg
  System ID
  Format                lvm2
...
  VG UUID               90blAq-ggmA-rmsf-mBqU-3mRH-oxoS-lys4ih

or, if you found this post after stumbling on the same problem that I did, you can find the ID by using 'lvscan' on the computer with the two identical VG names:

root@ubu-04:~# lvscan -v
  Cache: Duplicate VG name ubuntu-vg: Prefer existing fSauMy-cW75-PFje-cx8s-rpUR-zYgd-PL9Bef vs new 90blAq-ggmA-rmsf-mBqU-3mRH-oxoS-lys4ih
  inactive          '/dev/ubuntu-vg/ubuntu-lv' [<15.00 GiB] inherit
  ACTIVE            '/dev/ubuntu-vg/ubuntu-lv' [10.00 GiB] inherit
root@ubu-04:~#

Rename VG and rescan

root@ubu-04:~# vgrename 90blAq-ggmA-rmsf-mBqU-3mRH-oxoS-lys4ih ubuntu-vg-test-1
  Processing VG ubuntu-vg-test-2 because of matching UUID 90blAq-ggmA-rmsf-mBqU-3mRH-oxoS-lys4ih
  Volume group "90blAq-ggmA-rmsf-mBqU-3mRH-oxoS-lys4ih" successfully renamed to "ubuntu-vg-test-1"
root@ubu-04:~# modprobe dm-mod
root@ubu-04:~# vgchange -ay
  1 logical volume(s) in volume group "ubuntu-vg-test-1" now active
  1 logical volume(s) in volume group "ubuntu-vg" now active
root@ubu-04:~# lvscan
  ACTIVE            '/dev/ubuntu-vg-test-1/ubuntu-lv' [<15.00 GiB] inherit
  ACTIVE            '/dev/ubuntu-vg/ubuntu-lv' [10.00 GiB] inherit
root@ubu-04:~#

Now the partition should be mountable:

root@ubu-04:~# mount /dev/ubuntu-vg-test-1/ubuntu-lv disk/
root@ubu-04:~# ls disk/
bin    dev   lib    libx32      mnt   root  snap      sys  var
boot   etc   lib32  lost+found  opt   run   srv       tmp
cdrom  home  lib64  media       proc  sbin  swap.img  usr
root@ubu-04:~#

Do whatever you need to do with that partition mounted (in my case, repairing sudo access for my user by adding it on the 'sudo' entry in the /etc/group file), then shut down the computer with the two disks, detacht the disk and reattach it to the computer it came from (or simply start the virtual machine which the disk came from).

Making the system bootable when the disk is put back where it belongs
Now that the VG was renamed, the system on that disk will no longer boot because it cannot mount the root partition. If you try, you will get dumped into the very limited busybox shell.

In the busybox shell, do this to make the system boot:

cd /dev/mapper
mv ubuntu--vg--test--1-ubuntu--lv  ubuntu--vg-ubuntu--lv
exit

The system will now boot up. To make the new VG name permanent (so this 'rename' thing in busybox will not be needed on every reboot), change the old VG name to the new name in '/boot/grub/grub.cfg'

sed -i s/ubuntu--vg/ubuntu--vg--test--1/g grub.cfg

The easiest method creating a (per machine) unique VG name

If the system you are taking the disk from is still in working condition, and you are able to make yourself root using 'sudo' (which I lost on one machine for some unexplained reason, probably caused by a normal update Google search for 'lost sudo after update' ), change the VG name and adjust grub.cfg while everything works..

root@test-2:~# vgdisplay |grep UUID
  VG UUID               8jzFk6-QlL8-xXL9-LJth-Qo1r-ACve-2KUmxP
root@test-2:~# vgrename 8jzFk6-QlL8-xXL9-LJth-Qo1r-ACve-2KUmxP ubuntu-vg-$(hostname)
root@test-2:~# sed -i s/ubuntu--vg/ubuntu--vg--$(hostname|sed s/-/--/g)/g grub.cfg