piStorm is an opensource project started by Claude Schwartz. The board fits inside the Amiga 500, Amiga 2000 and CDTV models and boosts their performance close to a 25MHz 68040 equipped Amiga 4000 (60-70MHz 68030).
Native boards for the A600 and A2000 (CPU slot) are under development.
Besides a fast CPU, which is provided by the Pi through the Musashi 680×0 emulator, piStorm with the recommended Raspberry Pi 3A+ gives you:
* FastRAM configurations up to and above 256MB without starving the Pi of RAM (3A+ has 512MB)
* piSCSI – allows you to mount up to 7 hard disk devices; supports hard drive images and even physical drives
* autoboot from hard drive image or physical drive
* RTG – gives you together with the P96 software 16 and 24 bit graphics in high resolution
* kickstart switch – specify which kickstart to use (but not really switch it other than changing from configuration file)
* keyboard and mouse passthrough – use the keyboard and mouse connected to the pi as Amiga devices
* real time clock (RTC) – passes the date and time over to the Amiga from the Pi
* networking (new) – allows connecting to internet or local network with the SANA-II driver and a TCP/IP stack
* folder sharing (new) – share a folder on the sd-card with the Amiga for simple file transfers
* remapping of DF0: to DF1/DF2/DF3 (new)
* remapping of slow-fast ($00C00000) as chip-RAM (new) – no more JP2/JP7A modification needed for 1MB chip-RAM
What do I need ?
* The piStorm 68000 replacement adapter
* A Raspberry Pi 3A+ or similar (Pi 3A+ is recommended because of its low profile)
* A microSD card for the piStorm software
It differs depending on how countries add expenses on imported PCBs and components and what the shipping rates for these are at the time, but you should not accept to pay (unless you really WANT to) more than 25-30 EUR for the assembled adapter board. I have (in the Discord channel) seen prices as low as about 13 EUR + shipping. Because of the ongoing semiconductor shortage, components are getting harder and more expensive to source, which drives the prices up a bit, still not anything near $149.99 or such (more close to the double mentioned above, which I have left in). List prices at retrorewind.ca should NOT be accepted (as for example, the RGBtoHDMI A500 adapter at $40, and the A2000 video slot version at $70!).
To that you have to add the cost of the recommended Pi 3A+ (about 30-35 EUR), and a suitable microSD card (up to 32GB is reasonable).
My Getting Started Guide, updated as I discover the piStorm for myself. Refer the official documentation (in the GitHub Readme.md files spread across some the repository folders) for most up-to-date information.
My Basic Configuration Guide, which also links to some advanced topics like configuration switching using ‘irexec’.
piStorm tests and reviews
The very first video-review of piStorm was published by Chris Edwards on 25 April 2021 25 April 2021: PiStorm 68K CPU replacement and more (Chris Edwards)
1 May 2021: Amiga PiStorm P2 – ROMS, Hard drives, RTG and more (Chris Edwards)
2 May 2021: PiStorm: Turbo Boost Amiga 500 With Raspberry Pi (Dan Wood)
4 May 2021: Mounting the PiStorm in the Amiga 1000 (Chris Edwards)
9-10 May 2021: Introducing the piStorm & livestream (Mikes Retro Tech)
16 May 2021: Lets build a PISTORM (CRG / Casual Retro Gamer)
18 May 2021: Amiga PiStorm – Retro Power on a Budget – Tech Nibble (RMC / Retro Man Cave)
This is a cloned article from quora (which I usually avoid visiting whenever they appear in search results).
— The reply was written by Dave Haynie, “Electrical engineer and part-time mad scientist”
—
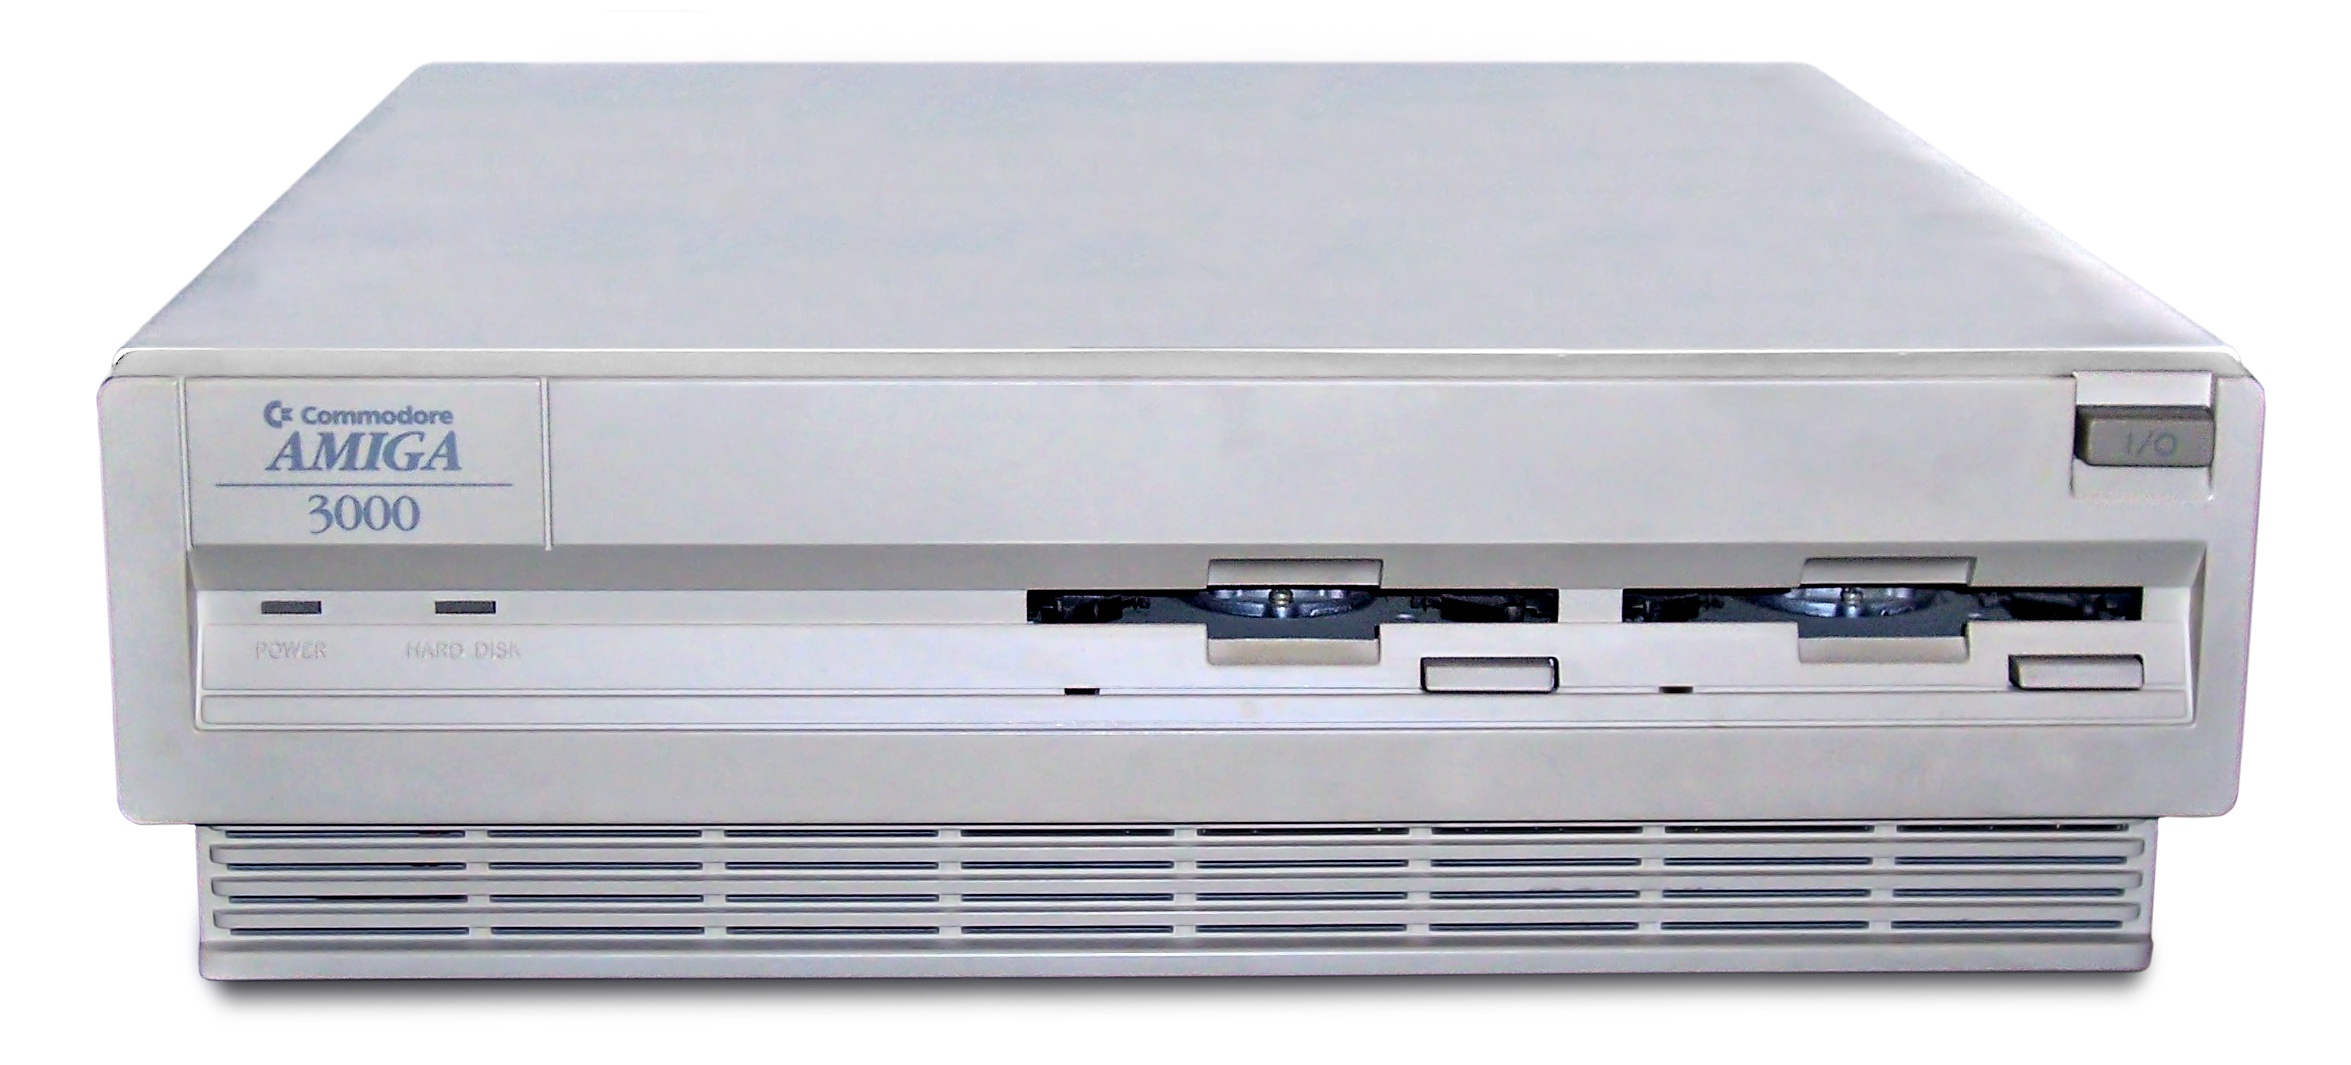
The original Amiga Computers were a series of advanced personal computers manufactured by Commodore, Inc. Commodore went into Chapter 7 bankruptcy in late April of 1994. I was one of the hardware engineers working on this computer, the Amiga 3000.
And you would think, since this starts out with a bankruptcy, the answer would be “no,” but in fact, that’s not quite the case. In fact, strangely enough, the deader the Amiga seems to get, the more options you have available. This will take a little explanation.
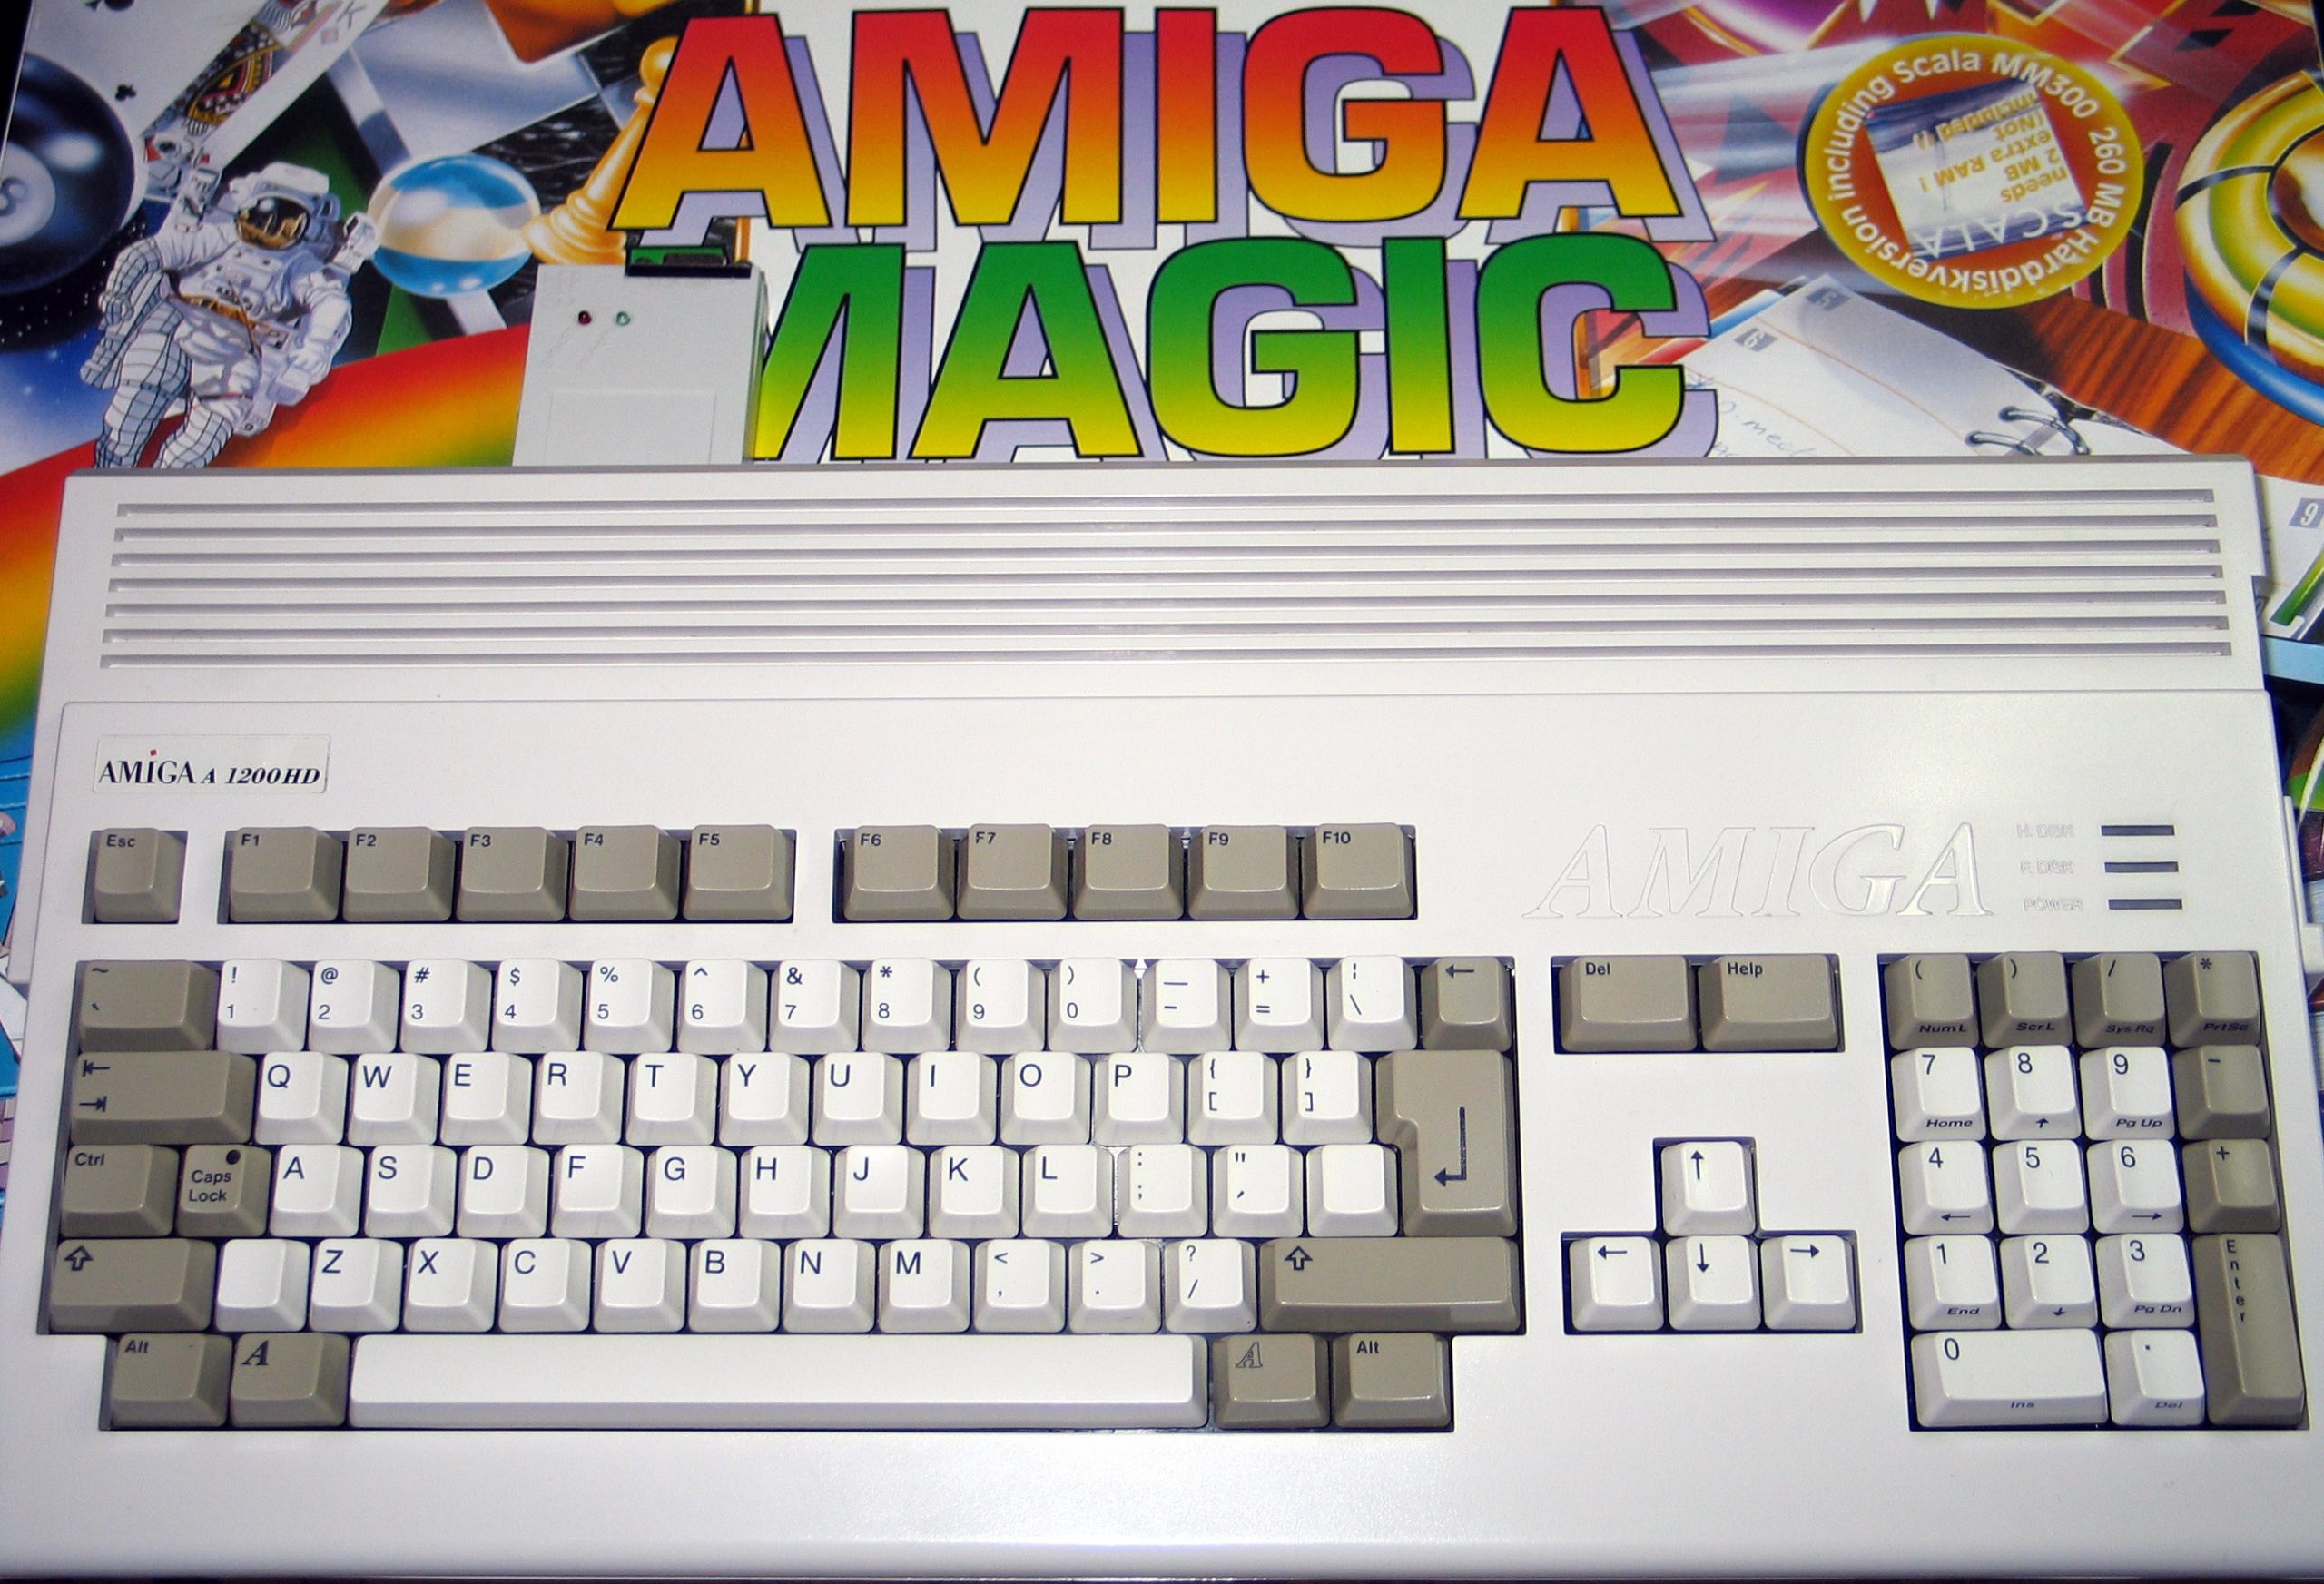
About a year later, Commodore’s assets were purchased by ESCOM Ltd., a company based in Germany. Over the course of 1995, they managed to put both the Amiga 1200 and the Amiga 4000T, the most recent Amiga models, back into production.
Unfortunately, ESCOM had been on a buying spree, and basically “guess wrong” about PC technology for the 1995 Christmas season. They were in bad financial shape going into 1996, just as their new Amiga Technologies group was collecting the resources needed to move the Amiga forward (I was a consultant on that project). ESCOM went into bankruptcy in 1996.
So, does anyone remember that PC company that put cow spots on their boxes — and apparently, their offices? Gateway 2000 ultimately bought the Amiga assets from ESCOM. For a short time, they were planning to build a new Amiga computer system and a new AmigaOS, but that never materialized. They eventually wound up doing a bunch of weird maneuvers. They licensed all things AmigaOS to a tiny company in Washington State with no reasonable ability to do much of anything with the operating system. Those guys subcontracted an operating system port of AmigaOS from the aging 680×0 ISA to PowerPC… to a video game company, Hyperion in the UK.
And it just got fuzzier after that for awhile. As Hyperion got close to delivering their version of the OS, they were pretty controlling of which computers could run AmigaOS 4.x (the PowerPC version). This was actually happening in 2000–2001, by the time that desktop-class PowerPC chips had basically become Apple proprietary. The whole idea of the AIM alliance, the idea that PowerPC based personal computer hardware could become a commodity similar to that of the IBM PC, had already failed. And so there was nothing mass produced that the Amiga/Hyperion folks allowed to run AmigaOS 4.x. Pretty frustrating.
It wasn’t until 2006 that AmigaOS 4.0, the first PowerPC version of AmigaOS, was actually released. It’s a bit telling about the whole mess of the project that it took less time to actually develop AmigaOS 1.0 from scratch than to port AmigaOS 3.x to AmigaOS 4.x. The targeted systems for this OS were single-board computers, such as the SAM440EP from A-Cube Systems, based on the PowerPC 440EP SOC from IBM. This was intended for various embedded devices, not really comparable to 2006 desktop systems. But it was certainly more than enough to run AmigaOS, which had not gained much computational weight in the move to PPC.
A-Cube systems in Italy, currently sells the upgraded SAM460EX and SAM460CR boards. These are sold as single-board computers, though the SAM460EX is available as an integrated system called AmigaOne 500.
I’d have to say the first serious effort at building a whole PowerPC Amiga came from a new company based in New Zealand, A-Eon. This company was started by Trevor Dickinson, an entrepreneur and rabid Amiga fan who had the means to create a new Amiga computer company. I was skeptical when these came out — they were very expensive. But as I grew to understand what Trevor was doing, and as an engineer myself, started to appreciate that he had managed to get anything out the door at essentially hobby-computer volumes, I started to appreciate this work. And Trevor became a very close friend, despite the miles.
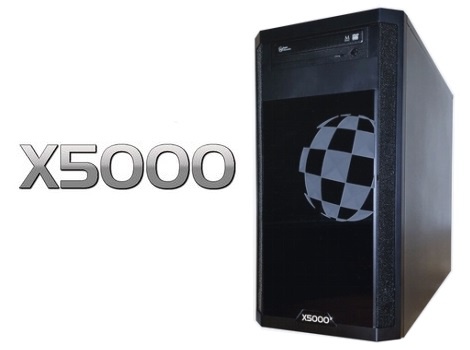
Their current machine is the A-Eon X5000, based on one of the Freescale/NXP QorIQ processors. This is a line of high-end SOCs designed for high performance networking switches and servers. That’s maybe not as weird as it sounds. Much of the MacOS years of PowerPC were bolstered by the fact that Cisco was using PowerPC in all their routers. So for awhile, IBM and Motorola (later Freescale) were happy to develop desktop-class PPC chips for IBM, Motorola, Apple, and others, knowing that, once the development was paid and the prices could drop, Cisco would take as many as they could make.
This actually stopped working because chips got big enough for high performance CPU cores to go on-chip with high speed networking and interfacing (RapidIO, then PCI Express). The desktop CPUs were going in another direction, and while Motorola and IBM might potentially see some reuse in the CPU cores, once they had all the hardware oriented toward optimizing networks, Cisco and the other networking companies didn’t need CPUs that could match AMD and Intel. Apple did… so Apple starting having to pay for a big chunk of PPC development, and as a result, those chips became exclusive for a few years. Everyone else started looking at other CPUs at the high end. But for lower-end stuff, you had a bunch of choices. And I digress…
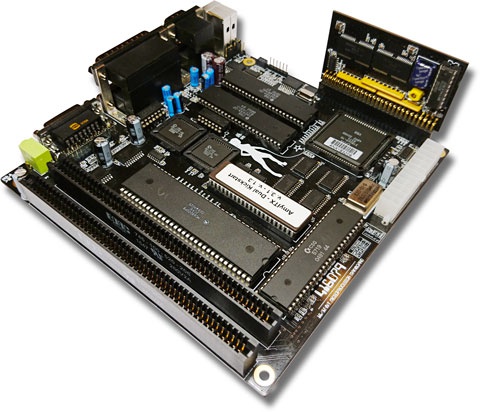
So there are quite a number of small operations working on “Classic” Amiga systems, meaning, at the least, some kind of 680×0 processor, rather than a PowerPC chip. This one is called the Amy ITX board — I was given one of these. It’s a modern system design, using the industry standard ITX form factor, but accepting all of the original Amiga chips. One of the problems Amiga users have had is that their 30-something-year-old computers are starting to die of old age. Hey, we tried! But if you have an Amiga 500 or Amiga 2000, your old chips will work in this new board.
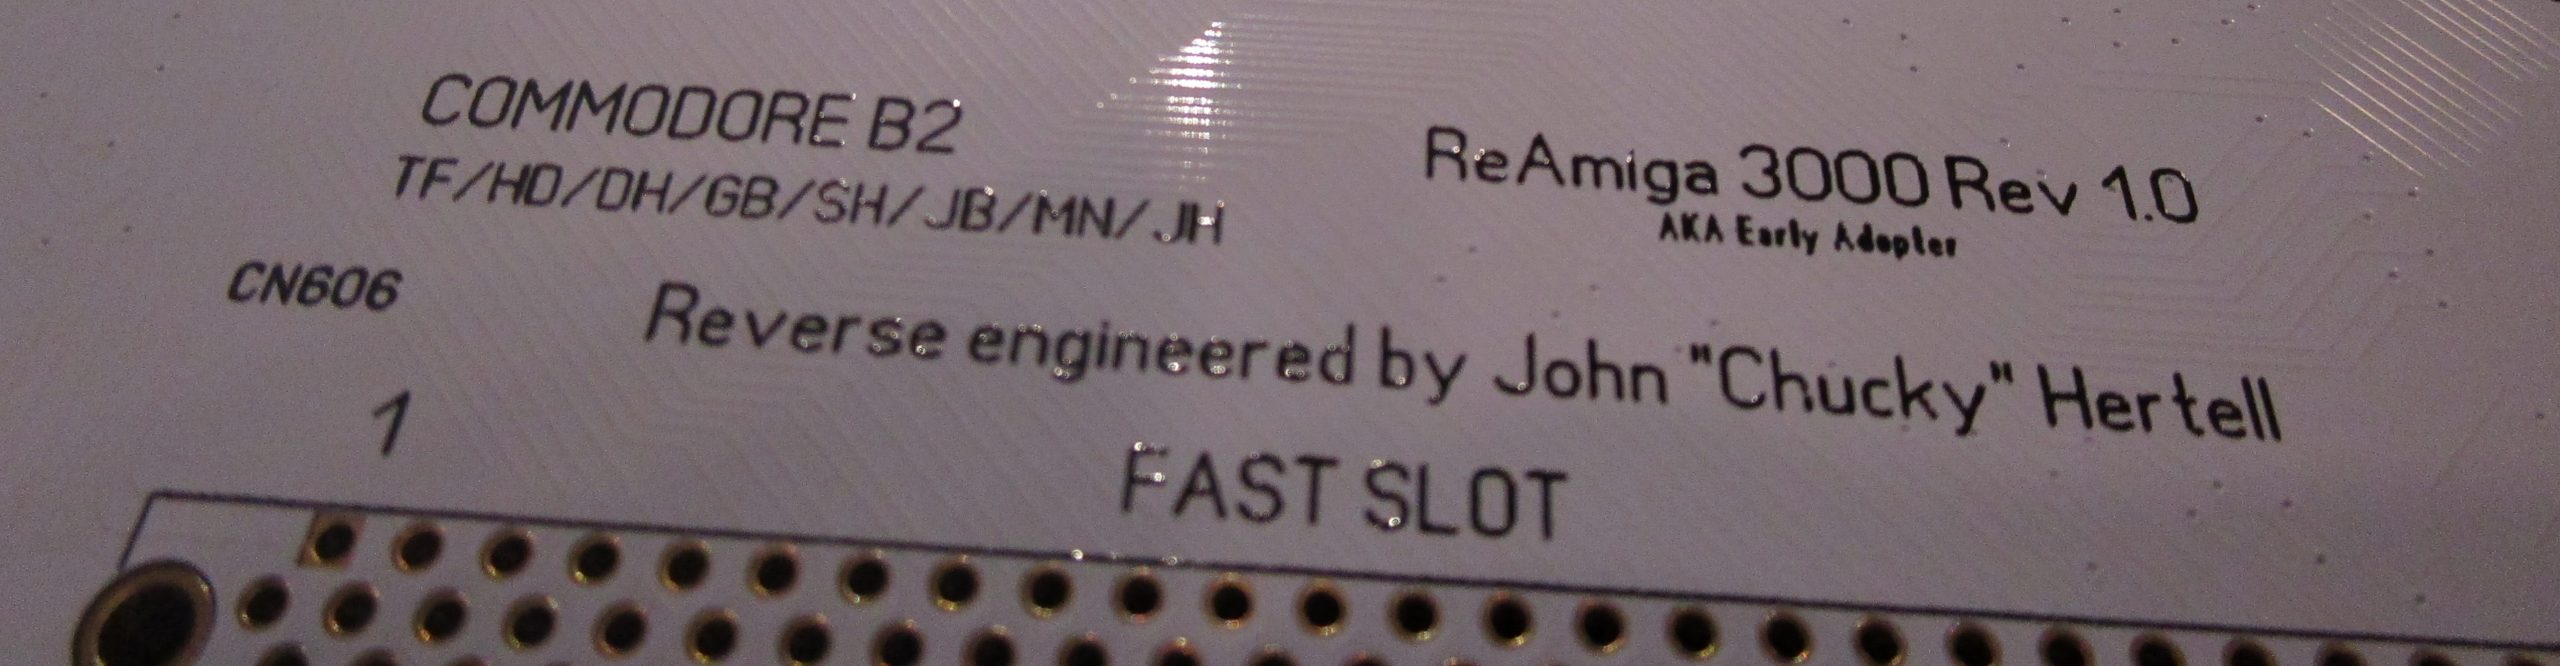
Another very, very hobbyist option is the Re-Amiga series of boards. The master of Amiga Reverse Engineering, John “Chucky” Hertell, has created a whole series of re-inventions of classic Amiga boards. They support all your corresponding chips — the ReAmiga 3000 board John gave me will take all my critical Amiga chips. But it can use more recent RAM — on SIMM modules — and it’s using standard parts you can actually get today. The trick here — you have to build it yourself, at the component level. I have not built mine yet, but I probably will…. I think I even have the SIMMs for it here! My original A3000 board is dead. He does this as a service to Amiga fans… you can see he kept all our initials on the A3000 board (Terry Fisher/Hedley Davis/Dave Haynie/Greg Berlin/Scott Hood/Jeff Boyer/Mike Nines.. and he’s welcome on that list, far as I’m concerned!) He gave Jeff Porter, the man who made the Amiga 500 possible, his A500 version at an Amiga show in Germany a few years back… Jeff was blown away!
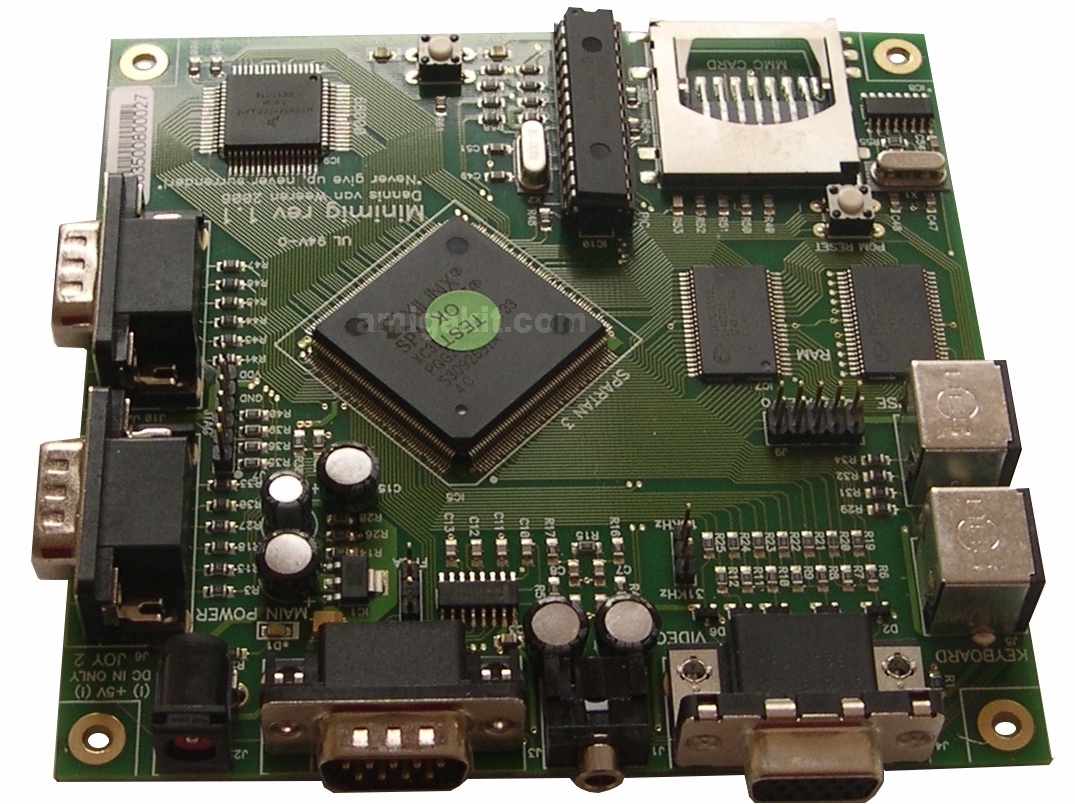
But what if you can’t get Amiga chips? This was addressed by several projects, but the most successful early on was the Minimig project in 2005 by Dennis van Weeren. This is a re-implementation of an Amiga 500 class system, done in a Field-Programmable Gate Array (FPGA) — a programmable chip. The Amiga chips are in the FPGA, while the CPU is a real 68000 processor. This was released as an open source project, so there are a number of variations and spinoffs. Work is still being done on the Minimig design. A-Cube Systems sells a version of the Minimig V1.1 board.
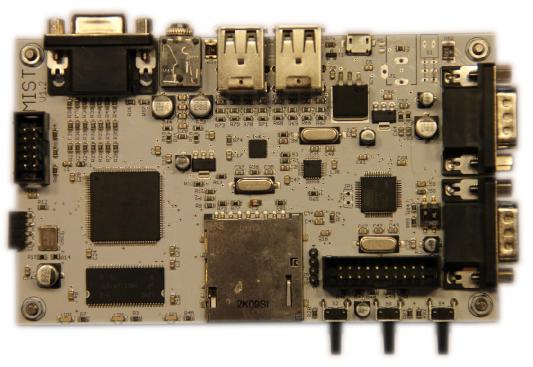
Inspired by the Minimig, Till Harbaum created the MiST board, with the intent of re-implemented the Atari ST. Unlike the Minimig, though, the MiST implemented the CPU as well as graphics chips in its FPGA. And it can load up a new FPGA “core” from its SD card! This lead to Dennis van Weeren developing an Amiga core for MiST. And by now, there are MiST cores for around thirty systems, including Apple, Macintosh, Amstrad, BBC, Sinclair; gaming consoles, and some arcade machines as well.
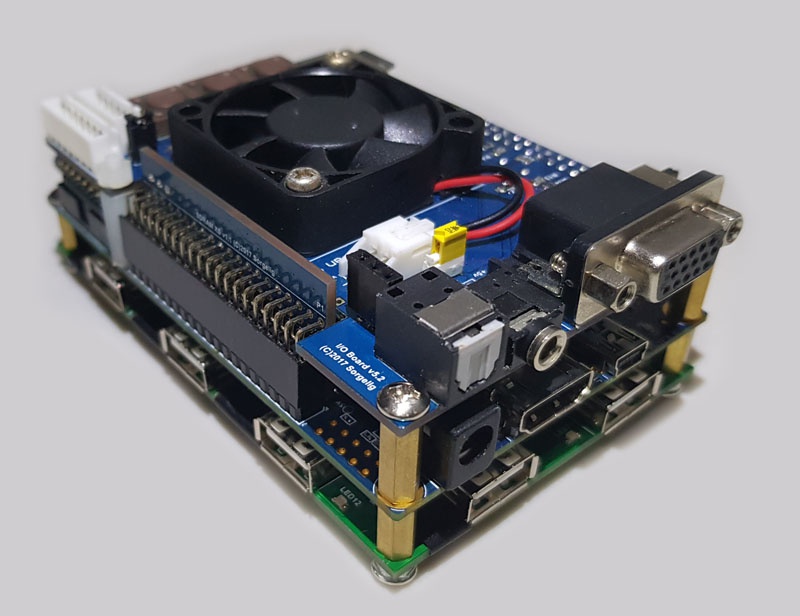
Inspired by the MiST board, Alexey Melnikov (Sorgelig) decided to see if there was an easier, more open way to do the same things, and found the Terasic DE-10 board, a board pushed by Intel for development on the Altera Cyclone V SE FPGA. This is a more substantial FPGA than used on the MiST board, and it also contains a dual “hard core” ARM Cortex A9 processor.
Since the DE-10 is a development board, it lacks general purpose on-board I/O, but it’s got a large number of signals going off-board for add-on hardware. So MiSTer systems are built of a stack of add-on boards. There are about 40 computer system cores for the MiSTer on its GIT page, 15 game consoles, hardware for I/O boards, 3D printed cases, all open source.
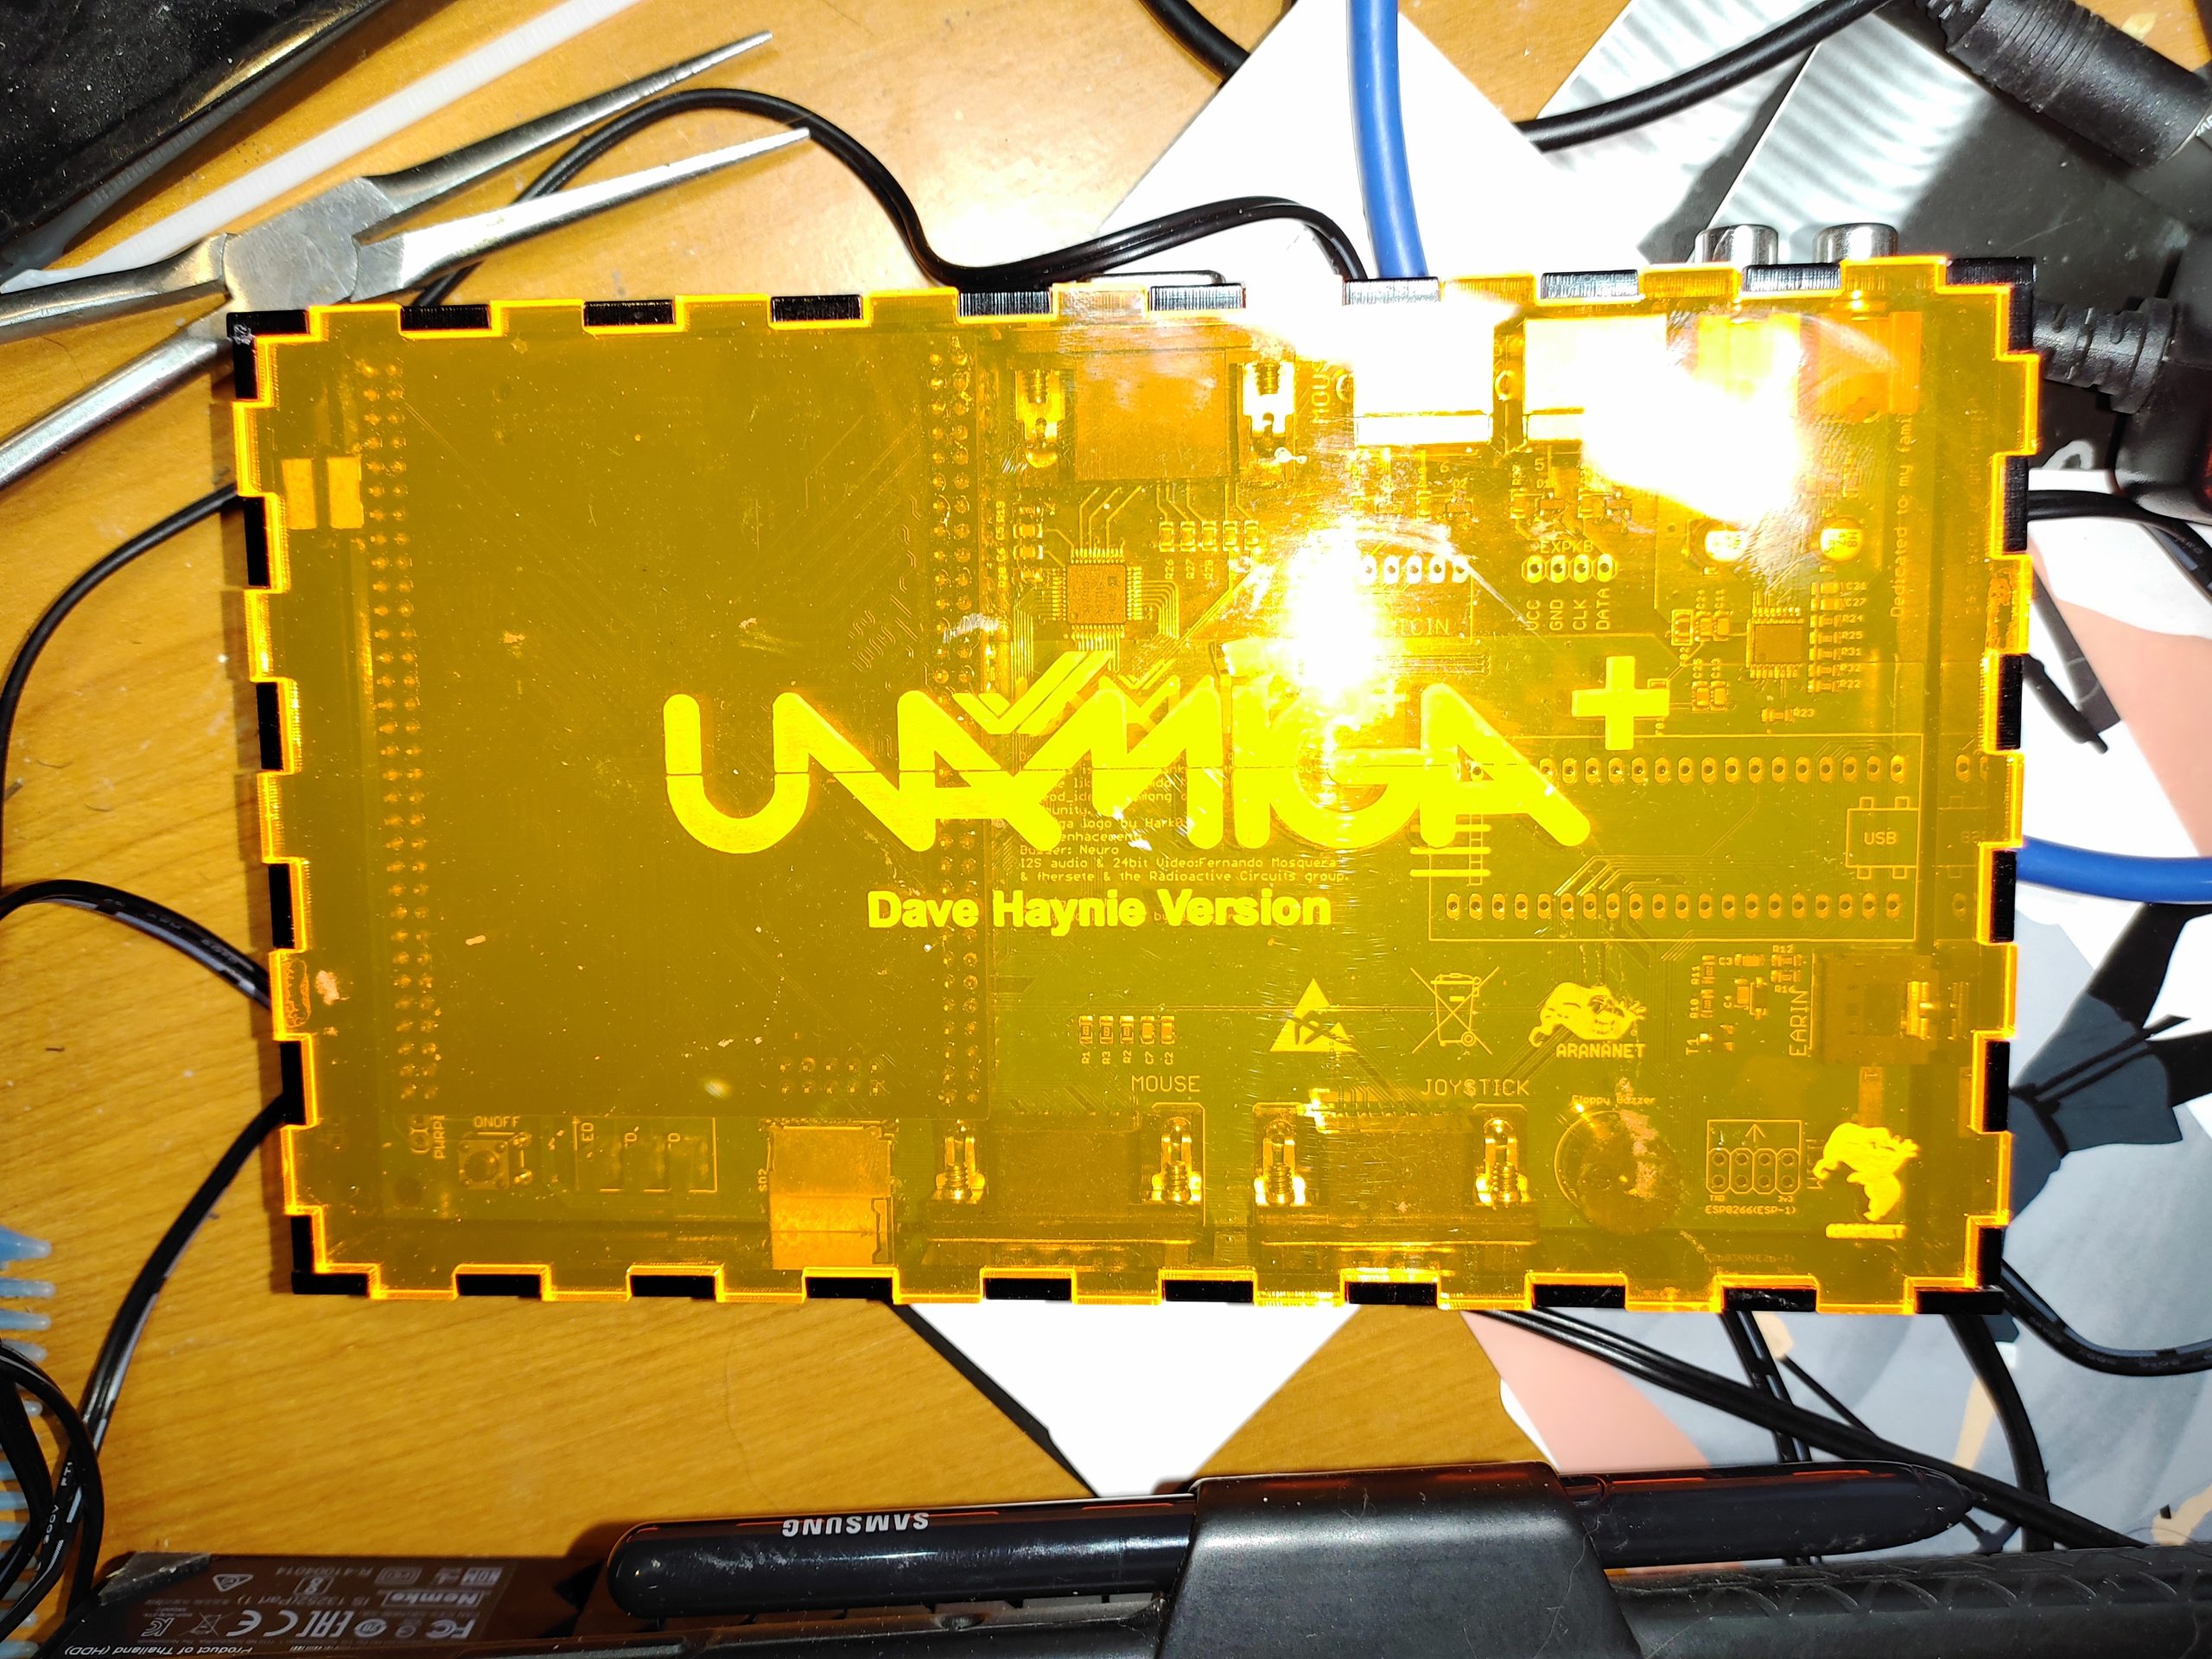
Edu Arana has created several versions of the UnAmiga board, based on the Minimig… he sent me this one (sorry for photo, it’s just a smartphone snapshot).
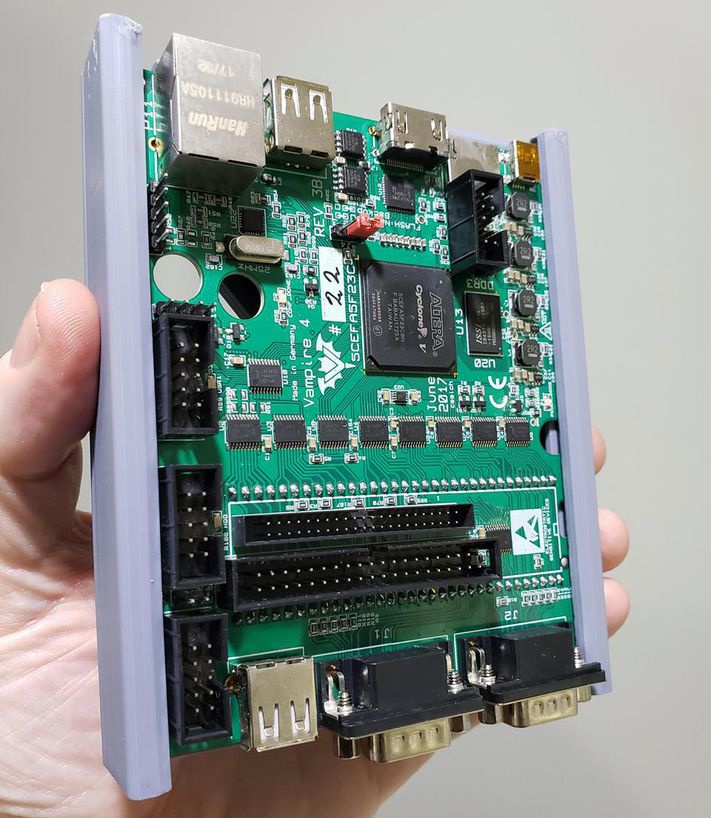
Yet another new Amiga board is the Vampire 4 Stand-alone. For some years now, Apollo Accelerators has made CPU accelerator boards for classic Amigas. The trick there is that, rather than use a faster 680×0 processor, they used their own “soft-core” 68K-compatible processor, dubbed the Apollo 68080, which is typically 3x-4x faster than an MC68060 processor.
The V4SA is their first complete computer. The fastest Amiga I have used to date, and it’s powered from a USB power brick. In fact, they even added SIMD “multimedia” instructions to the 68K instruction set, allowing this processor to play back MPEG-4 video, something no hard-core 68K ever dreamt of.
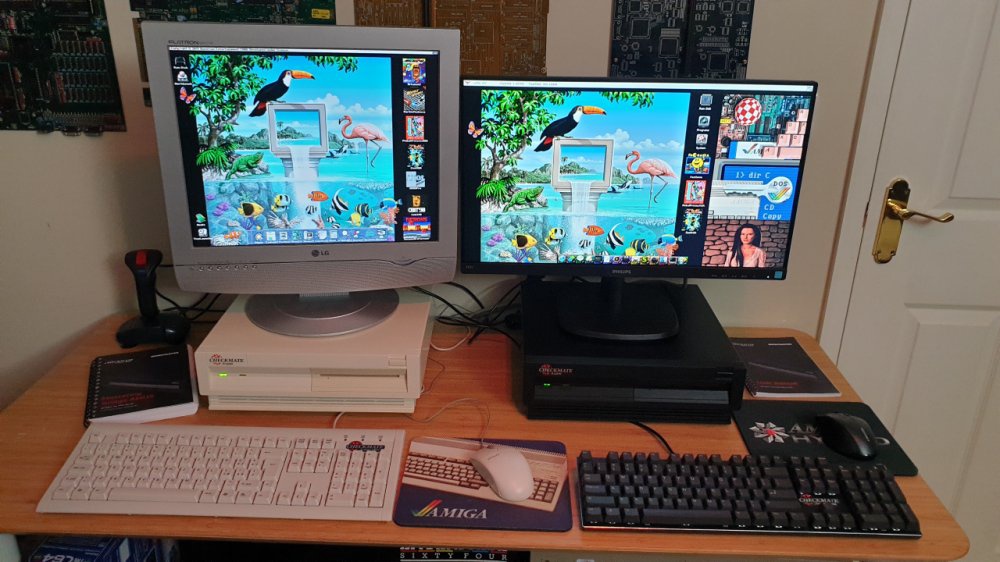
There are also professionally made cases for most of these single boards, if the makers don’t supply their own. In late 2019, Stephen Jones sent me one of his “Checkmate 1500” cases. I didn’t have immediate use for it, but it was a clone of the Amiga 3000, my absolute favorite Amiga! So when it came time to build a work PC for our shore house, I put it in the Checkmate 1500 case.
It will directly take MicroATX and ITX cases, which covers some of the Amiga boards around. But it’s actually a very clever, modular design. My system has a Blu-ray drive, a USB and memory card reader in place of a floppy, etc. There are fitting kits for Commodore Amiga boards, etc.
Now Stephen has the Checkmate 1500 Mini, which is houses a mini-ITX board and a bunch of other variations of Amiga compatible hardware today.
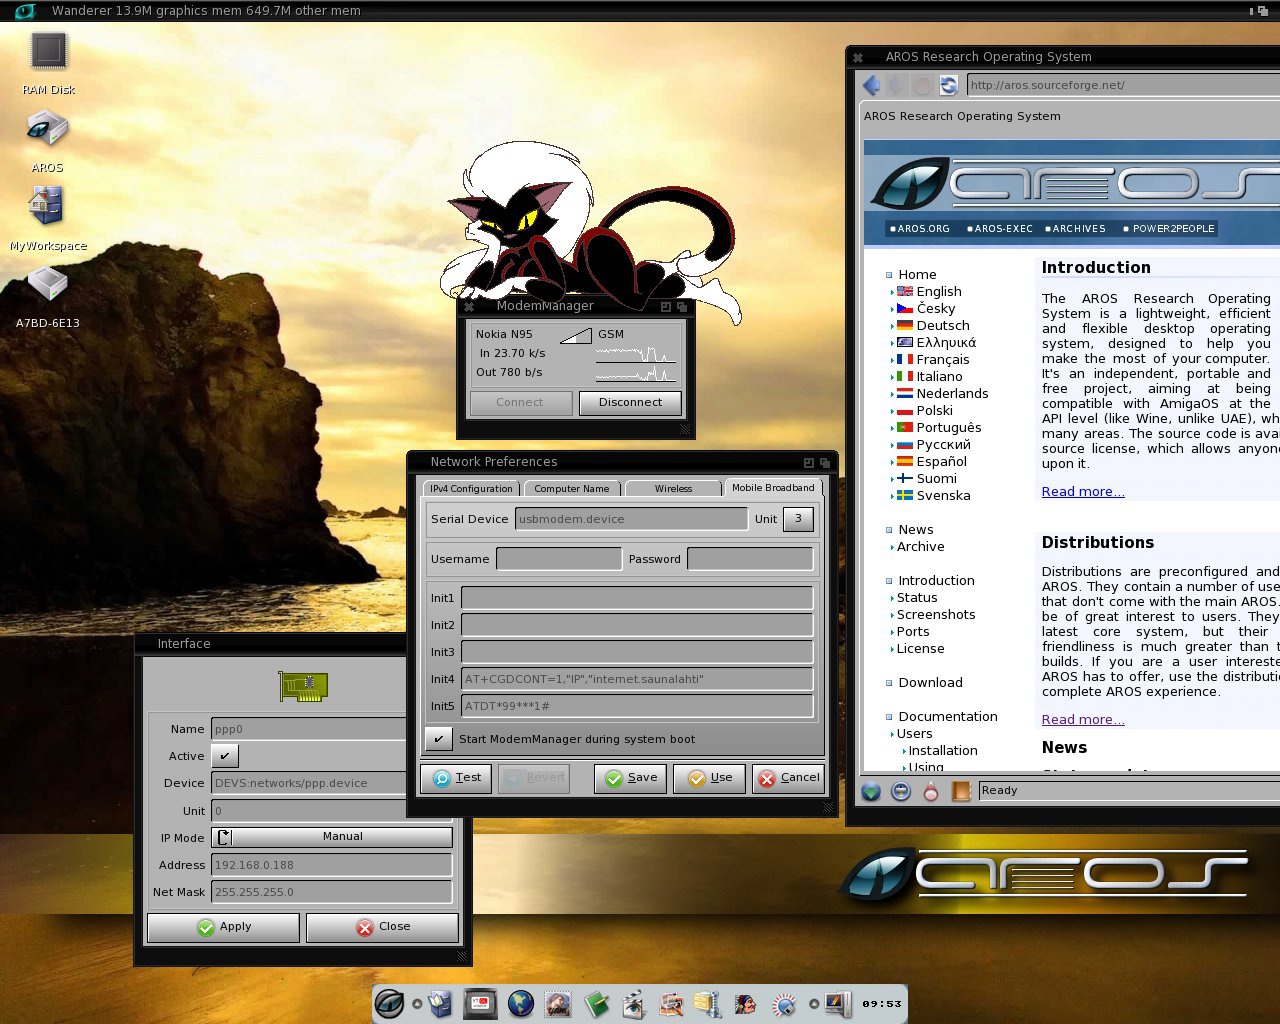
And of course, as well as the original 68K-based AmigaOS 3.x, and the PowerPC AmigaOS 4.x, there’s an open source version, known as the Amiga Research Operating System. You can run AROS in a virtual machine on any old PC these days, if you’re interested.
Paolo Besser has built a really nice distro of AROS, called Icaros Desktop, which, as with Linux distros, collects a bunch of components from different open source projects and gets them all working nicely together. Links below.
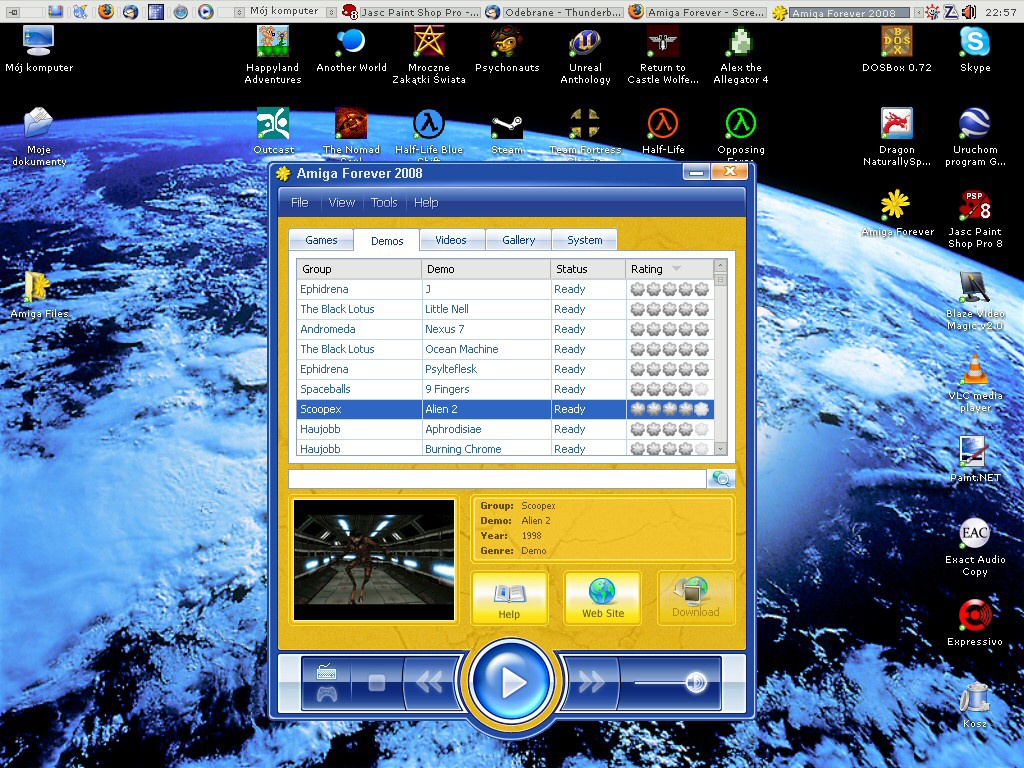
You can also dump the hardware altogether — well, the Amiga-specific hardware — and run classic AmigaOS on your PC via numerous Amiga emulators. Some of these will work on tablets and smartphones, too. A popular “distro” for Amiga emulation is Cloanto’s “Amiga Forever” commercial product.
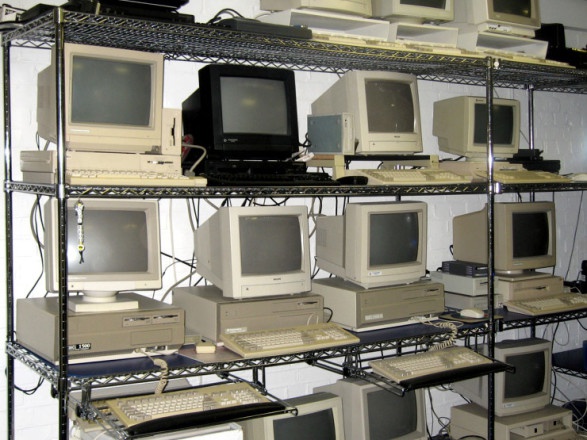
Welcome to the world of retrocomputing! One of the reasons that all of these new Amiga projects exist is the fact that interest in the Amiga systems never entirely died — but the original machines themselves do. But in fact, demand for older computer systems, at least the more popular ones, has grown in recent years, to the point that older machines are often fetching pretty crazy prices. So there’s a small market, oriented to serious hobbyists, for new hardware that runs the old operating systems.
Now, I know what you’re thinking: I’m typing this on my 16-core “Big PC” with 64GiB DRAM, 2TB PCIe SSD, dual GPUs, looking at three large screens (a total of over 8,000 pixels across), etc. I could probably fit every program ever written for Amigas… in RAM! Well, pretty close anyway.
I think part of the allure of these machines is, of course, nostalgia. But in part, it’s a better level of understanding and a different kind of computing. When I’m running a the Big PC, I’m writing, working in CAD, working on photos, working on music, etc. It’s all about the applications… and sure seems like “work” is involved quite a bit. But even for hobbies, the computer is a tool to enable those hobbies. Any computer will do as long as it runs my apps. I of course integrate my own — I’ve never bought a commercially made off-the-shelf desktop PC for myself. But even then, I just see them as tools. If one dies, the only pain I feel is in the wallet!
When folks bought personal computers in the 1970s and 1980s, they didn’t necessarily think about applications. Those did happen, but for many people, the hobby WAS the computer. May user completely mastered those computers, knowing every little bit about them. That was possible with the 8-bit generation, perhaps a bit less possible with more complex systems like the Amigas. But you could learn as much as you liked about any aspect of the system, in software, in hardware. In a modern PC, well, just how much do you understand about what’s going on in that nVidia RTX2070 GPU card?
I made a film that explains some of the reasons Commodore went under. Best watched with a few bottles of your favorite adult drink, a box of tissues, and your choice of Commodore management villain photos up on a handy cork-board. And darts, knives, or possibly hatchets.
— This also relevant reply was written by Björn David Paulsen
—
Thanks for the A2A.
Today, when we speak of an Amiga, we usually mean one of three variants.
The first is the classic Amiga. This is the OCS, ECS and AGA systems manufactured from 1985 to 1996. It includes the Amiga (later named the Amiga 1000), the A500, the A2000, the A600, the A3000, the A500+, the A3000 and the A4000.
The second variant is the modern iteration. This is the AmigaOne series of PowerPC-based computers produced by Hyperion. Some purists refuse to call them proper Amiga computers, but they are part of the lineage, and they are still produced today. In embracing the PowerPC instruction set, however, these Amigas have abandoned binary compatibility with the classic systems, opting instead to run legacy apps via built-in OS emulation.
The third Amiga type is the Vampire series of Amiga accelerator boards. These are FPGA implemented boards that effectively integrate Amiga functionality, obviating the need for custom chipsets. The last one, the Vampire 4, is a standalone machine, and it is currently in production. It runs its own nonstandard (though largely binary compatible) implementation of the 68000 instruction set, meaning programs written for the classic machines largely can be made to work on the Vampire.
The classic models are, alas, no longer in factory production. However, there is significant refurbishment of old components into fresh machines. The most well-known of these is the ReAmiga project by John “Chucky” Hertell. ReAmiga produces refurbished, fully working Amiga machines from discarded boards. If you’re a purist when it comes to the Amiga lineage, this is probably your best bet for truly authentic hardware.
The content of this article is cloned from PCWorld/IDG. The dead links from the original article has been removed (and replaced with only the text on the link). The only link that worked was “The 25 Greatest PCs of All Time” (the Amiga is on page 8).
Twenty-five years ago, Commodore released a revolutionary multimedia machine. We take a peek inside this classic computer to see what made the Amiga so amazing.
Meet the Amiga 1000
In July 1985, Commodore released an impressive new multimedia PC called the Amiga. This system, once the object of a legal fight between Atari and Commodore, made waves in the press with its high-resolution color graphics and stereo sound. The Amiga supported 32 colors on screen simultaneously (from a lush palette of 4096), at a time when IBM PCs supported only four colors and the Macintosh supported just two (white and black). The Amiga also shipped with a multitasking user interface that arguably rivaled Mac OS in power and flexibility.
Join me as I take apart this legendary machine to see what made the Amiga unique in the computer world.
Photos by Benj Edwards
Commodore’s first member of the Amiga line, shown here, launched for US$1295 with a base unit, a keyboard, and a mouse. The base unit included 256KB RAM and an 880KB floppy drive. This system shipped under the sole name “Amiga” at first, but Commodore rechristened the machine the Amiga 1000 after the launch of the Amiga 500 in 1987.
The Amiga series ran a 32-bit preemptive multitasking graphical operating system known as AmigaOS. However, AmigaOS also included a command shell called AmigaDOS for more-powerful keyboard-based input.
The Amiga shipped with two user ports that could accept mice, joysticks, or other pointing devices. To the right of those, you can see the Amiga’s only official means of expansion: a bus slot that allowed complex add-on accessories such as third-party RAM upgrades, SCSI controllers, real-time clocks, and even an IBM-compatible expansion box.
Here you can see the left half of the Amiga’s rear panel, which contains a nice array of ports. The Amiga’s responsive and well-designed detachable keyboard tucked under the bottom of the unit when not in use, and it plugged into the socket here via a phone cable. The parallel port typically hosted a printer, the serial port usually connected to a modem, and the floppy port allowed the Amiga to use a second (external) floppy drive.
Here you can see the ports that made the Amiga a multimedia powerhouse: stereo audio outputs and three separate video-output connectors that increase in display quality from right to left.
Whereas the Atari ST line found its niche in audio thanks to its MIDI ports, the Amiga specialized in live video production. Recognizing the Amiga’s graphical capabilities, numerous TV studios used the Amiga and its successors to generate on-air weather maps, station logos, captions, and other on-screen text for live newscasts well into the late 1990s.
Now it’s time to take this unit apart. After undoing a few screws on the bottom, I’ve removed the lid and set aside the metal RF shielding, giving us our first view inside the chassis. A long, bricklike power supply dominates the left side of the case, while the floppy drive sits on the right. However, the green stuff is where all the action is.
Like the creators of the original Macintosh, the team who designed the Amiga signed the molding used to cast the top half of the computer’s plastic case. As a result, the names of everyone involved are permanently embossed within every Amiga 1000 shipped. Most prominent is the signature of Jay Miner — the father of the Amiga — and the paw print of his dog Mitchy.
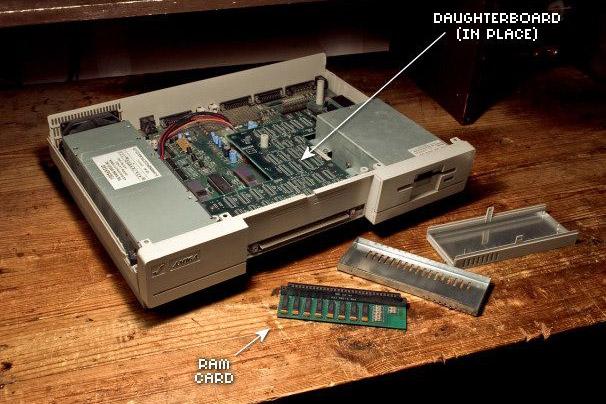
Commodore designed the Amiga to accept a user-installed 256KB RAM module, shown here, to raise the system memory to 512KB. It plugged into the front of the computer under a removable plastic panel. With third party add-ons (usually connected to the external expansion bus shown earlier), a user could bring the Amiga’s RAM up to 8MB.
When it came time to ship the Amiga in 1985, Commodore engineers found the OS too buggy to include on built-in ROM chips in the computer. (And that’s too bad, because it would have allowed the Amiga to boot instantly just as other early PCs did.) Instead, the engineers devised a workaround called the “Writable Control Store” (WCS) that fit on a daughterboard attached to the motherboard via long multipin headers where chips would normally reside. The WCS included 256KB of memory used specifically to hold a basic OS that had to be loaded from a floppy disk at boot time.
With the daughterboard set aside, I’ve now removed the front bezel of the case, getting one step closer to the ultimate goal: complete Amiga dismemberment.
The Amiga 1000 shipped with a floppy disk drive that could store 880KB per 3.5-inch disk — an impressive capacity for 1985. At the time, most IBM PC floppy drives stored 360KB on 5.25-inch disks, while Macintosh floppies held 400KB.
Here I’ve removed the motherboard from the case and set it aside. The motherboard contains all of the circuitry that truly makes the Amiga function. To the left, you can see the Amiga’s power supply sitting in the lower half of the case.
On one side of the motherboard sits the Amiga’s 16/32-bit Motorola 68000 processor, which ran at a relatively speedy 8MHz. To its left sits a pair of MOS 8520 CIA chips that handle serial and parallel communications for the computer. Below those are the Amiga’s bootstrap ROMs, which contain the firmware that tells the computer how to load a complete operating system from a floppy disk.
The secret sauce of the Amiga is in its custom-designed coprocessing chipset, visible here in the form of three chips with female nicknames. “Paula” handles the computer’s sound and controls the floppy drive. “Agnus” performs fancy memory-management magic and a few graphical coprocessor functions. “Daphne” is an early version of a later, more common chip named “Denise” that generates most of the Amiga 1000’s impressive graphical output. Together, these chips form the heart and soul of a powerful computer that, while quickly surpassed by IBM PC clones in the market, was far ahead of its time. Legions of loyal Amiga fans still cherish the machine today.
This post has been cloned from http://blog.system11.org/?p=2666
Originally written 15 Dec 2017 Some links and inline-notes, both displayed in red, has been added to this guide after cloning.
Amiga (various models) Kickstart switcher
The Amiga has had multiple firmware versions over the years, known as “Kickstart”. Unfortunately a lot of software that hits the hardware directly is affected by which version of Kickstart you’re using, leading to various hardware and software solutions.
The software ones (for example Relokick) do work, but if you have enough boot time toggles it can start getting unwieldy managing which things are resetting and why – for example booting into 68000 mode on your accelerator card, then booting Relokick to drop to Kickstart 1.3 which involves another reset. Hardware options are definitely the way to go.
There are some quite complex ones which allow you to switch on reset with keyboard strokes, but I found one main problem with these – they’re always out of stock. Additionally they only allow you to switch between two ROMs and have quite large physical footprints because for some reason people are really “purist” over Kickstart ROMs, copyright and so on meaning multiple chips or insane solutions like having to download original chips into onboard flash.
As many reading will know, I’m a member of The Dumping Union, so I don’t much care. So I made a small quad switcher board which anyone can make without having to worry about stock availability. It won’t work in all machines, if yours can cope with single 20 pin chips then you’ll be fine. This is revision 1.1, the 1.0 included a mistake which affected the logical workings of the jumpers.
So what we have is a 27C160 (16mbit) chip split into four areas by the jumpers toggling high address lines on the chip, presented to the motherboard as a standard 27C400. If you want to make life easier when you’re building this, solder the middle pin strip first, then the resistors, socket, other strip and header in that order. It should look a bit like this:
And it installs like this (photo taken in Rev 6 A2000):
However if you want to manufacture them yourself or make changes, here’s the Eagle CAD file: A2000_ks_quad_11
Parts list:
1x 27C160 EEPROM
2x 20 way male pin strip, turned pin type
2x 4.7k ohm resistor 1/2 watt
1x 4 pin right angle pin header
1x 42 pin DIL socket
2x jumpers, switches, or 2P4T rotary switch (examples)
To make the image for this chip just get your four chosen ROM images, double the size of any 2mbit (256k) images and copy the lower half into the upper half, and then compile them into a single 16mbit image. There are loads of ways of doing this, I just used a Linux command line:
As you can see I chose 1.3, 2.0, 3.1 and the awesome Amiga Diagnostic ROM (http://www.diagrom.com), once you have that image you will need to byte swap it if you’re using images used by emulators, but not if you’re using genuine chip dumps. As a sanity check when you load the file into your programmer software to burn the 27C160, look at the buffer – if you see readable headers instead of slightly scrambled ones, you’ll need to byte swap it. In fact it’s probably best to check the individual ROMs you plan to use before joining them together, that will work just as well.
As for how to actually use it – well that’s up to you. If you ground the second pin of J1 or J2 you’ll change which segment of the 27C160 is being accessed according to this table:
J1  J2
ON  ON  = ROM 1
OFF ON  = ROM 2
ON  OFF = ROM 3
OFF OFF = ROM 4
If you do this while the machine is running it will tend to crash horribly – but switching it during a reset seems to work, or by turning it off first. You could attach 2 toggle switches to it, or do as I have and wire up a 2 pole 4 throw switch – if wired correctly this will let you choose any of the 4 possible combinations. I used one of these:
So if you look at the above pinout, I connected J1-1 to A, J1-2 to 1 & 3, J2-1 to B, and J2-2 to 5 & 6.
You may not make these to sell unless you are charging a minimal amount for assembly and parts. Everything else is fine.
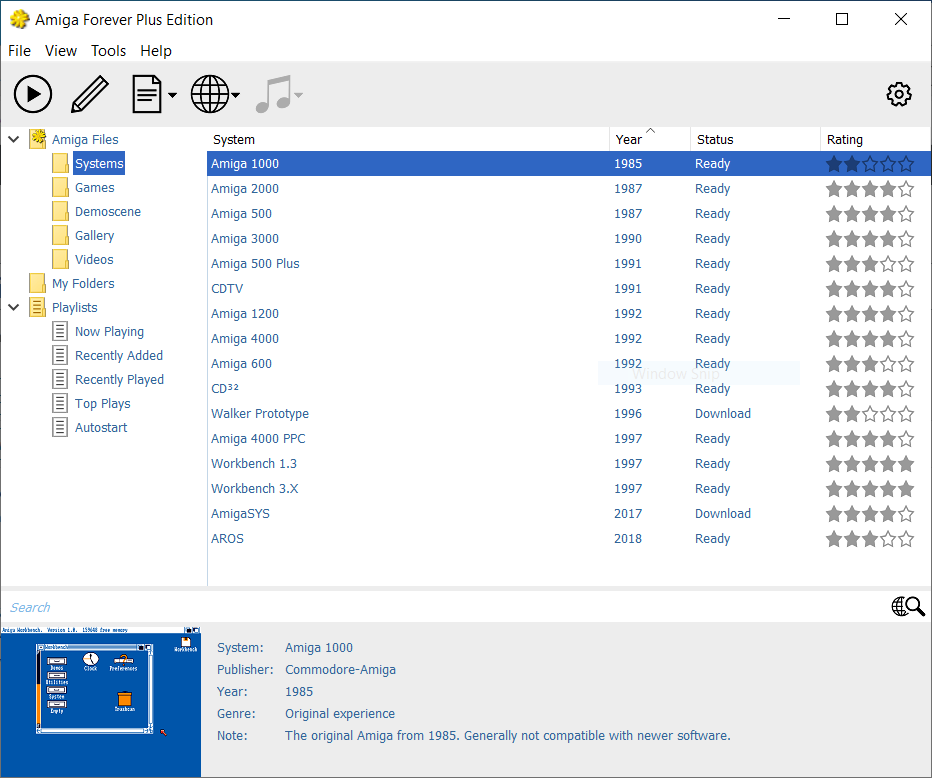
The purpose of this article is to document some parts of the pre-configured Amiga systems in Amiga Forever. Probably the most of the details given here can also be found in the documentation at amigaforever.com
Default folder and file locations
Kickstart and other ROMs:
C:\Users\Public\Documents\Amiga Files\Shared\rom
“Built-in Boot” when set to any of the floppy disk images:
C:\Users\Public\Documents\Amiga Files\Shared\adf
“Built-in Boot” when set to any of the hard disk images:
C:\Users\Public\Documents\Amiga Files\Shared\hdf
“Built-in Shared” when set to “Local folder”:
C:\Users\Public\Documents\Amiga Files\Shared\Workbench
When listed as “Shared\dir\something”:
C:\Users\Public\Documents\Amiga Files\Shared\dir
(cloned from https://www.software-by-mabe.com/blog?3&catid=2) Links and inline-notes, both displayed in red, has been added to this guide after cloning. See also: Burn Damn ROM Burn
Burning your own Amiga ROMs (EPROMs)
01/26/2019 | Amiga | Amiga ROM AmigaOS
With the release of the latest AmigaOS version (3.1.4) the package you could buy included ROM images to be used for either maprom (depending on your accelerator card tool support) or for burning it to a ROM.
Maprom is probably preferred, because it’s more flexible, but not always possible. For instance the A3440 card can’t do maprom. Or if you have no accelerator at all you can’t do maprom either.
Which leaves only a few options. Either you can buy the ROM, have someone burn it or burn it yourself.
Here I want to show how it works to burn it yourself.
What you need:
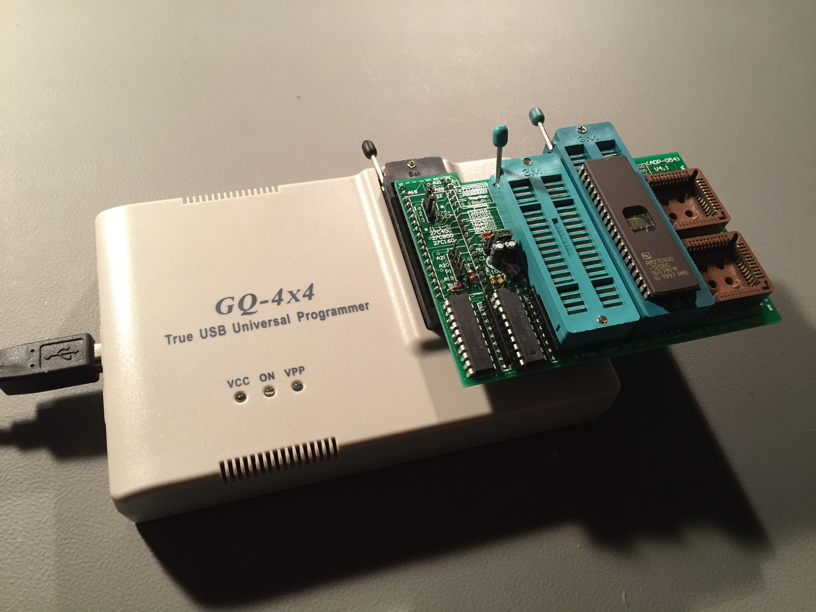
– an EPROM programmer. I have chosen the low cost GQ-4×4 USB programmer.
– an UV eraser, which can erase the EPROMs, in case something goes wrong.
– then you need EPROMs. The types used in A500/A600/A2000 are 27C400. I found the following to work which can be ordered in eBay: AMD27C400
– for burning ROMs for A1200/A4000 you need 27C800 / AMD27C800 roms, two of them to burn one ROM.
– and certainly a ROM image you want to burn.
Sometimes there are good offers at Amazon or eBay for a complete package (except the EPROMs).
You shouldn’t pay more than €150 for the GQ-4×4, the adapter board and the eraser.
(https://www.amazon.co.uk/gp/product/B011HVON3A/)
Here is a picture of the device with attached adapter board with an EPROM inside.
Then you need to download the software for the burner. That is a) the burner software itself named “GQUSBprg”. The latest version as of this writing is 7.21.
And you need the USB driver 3.0.
When you connected the burner and installed the software we can start.
Now open the burner software. Make sure that there is no EPROM put in.
1. first step is to select the device, or the EPROM to burn.
Make sure you choose either AM27C400 or 27C400.
2. Next we’ll make a voltage check to see if the burner has all voltages in order to properly burn the EPROM.
I found that while you can attached a power supply on the burner it is not required. The USB provides enough power.
3. Load the ROM image into the buffer.
When you load the image make sure you choose .bin (binary).
!!! This is important, or otherwise the programmed ROM won’t work.
After you loaded the ROM image, you have to make sure to swap bytes.
This can be done in the ‘Command’ menu of the software. Check first by selecting the “Buffer” tab. If you find some readable text in the beginning of the buffer, you need to byteswap it.
4. Now you have to put in your EPROM into the ZIF slot.
Make sure it sits tight and doesn’t move anymore.
5. Make a blank check to see if the EPROM is empty.
6. When the EPROM is blank we can write it.
When the write process is finished it’s done.
You can take out the EPROM and put it into the Amiga and it should work.
Some notes:
Partly this whole process of writing the ROM was a real pain because the GQ burner would just stop writing at some address. And in fact I had to get the package replaced including the adapter board.
I had first tried it in a virtual machine (VMware Fusion on Mac) but this doesn’t work for some reason as the GQ programmer detaches and re-attaches to the USB bus on some of the operations and that doesn’t seem to be working reliably in a VM.
Commenting on my own post:
The Amiga 4000 can only use 512k EPROMs, hence only 27C400 will work.
The Amiga 1200 can also use 27C800 (1MB).
The byte-swap, if your ROM image is already byte-swapped, then you don’t need to do this here.
Some ROM images, which are ready to burn have this already.
However, if you want to burn ROM images that are used in maprom or UAE, then you have to byte-swap.
This article was cloned for archival purposes from the now defunct site 16bitdust.wordpress.com. The directions worked up to recently when WinUAE 4.x was released. Read through the helpful comments at the end on how to make this work for version 4.
Index, or quick links to the sections
Use these quick links if you know how to do some of the steps.
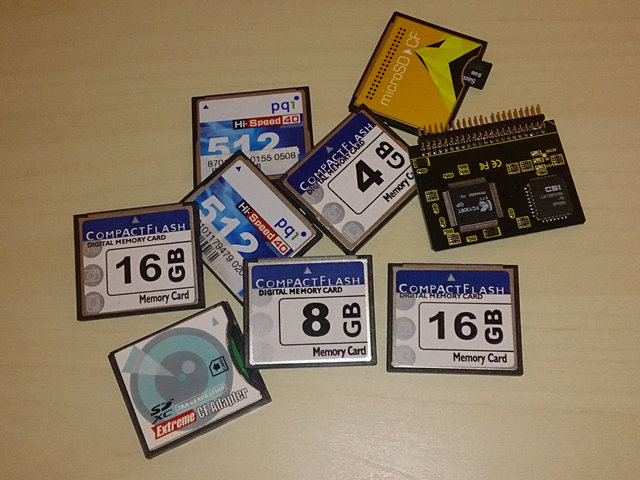
Partitioning 16 GB Compact Flash card with WinUAE and PFS3
(cloned content starts here)
Lately I’ve noticed a lot of questions on how to partition and prepare Compact Flash card (or HDD) for use with Amiga, so I’ve decided to write this tutorial on how to do it and format them as PFS3 partitions.
At least this is how I do it :). Using PC with WinUAE to prepare everything and just pop finished card in Amiga, ready to go.
Preparing Compact Flash card
Regardless if you’re going to do it with real Amiga or with WinUAE, first step is to prepare CF card. For Amiga to be able to use it we need to “clean” any file and partition structures that are present on the card. Luckily, there’s a tool included with windows to do just that, it’s called “diskpart”.
First thing first, connect your CF card to PC, it doesn’t matter how you do it. Integrated card reader, USB card reader, whatever you usually use.
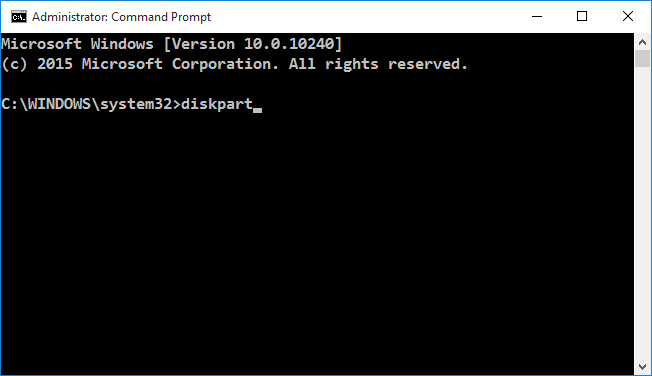
Now we need to start Command Prompt with elevated permissions, aka “as Administrator”. If you have Windows 7 and UAC turned off applications start “as Administrator” by default, but I guess most people use default settings. Anyway, press Start key on keyboard (or click Start icon on taskbar), type “cmd” (without quotes of course, every command I have written with quotes is supposed to go without them, unless explicitly state otherwise). It should find either Command Prompt or cmd.exe, in my case (Windows 10) it was Command Prompt, but if I remember correctly on Windows 7 it says only cmd.exe. Regardless, right click it and choose “Run as administrator”.
Now type “diskpart” and press enter key
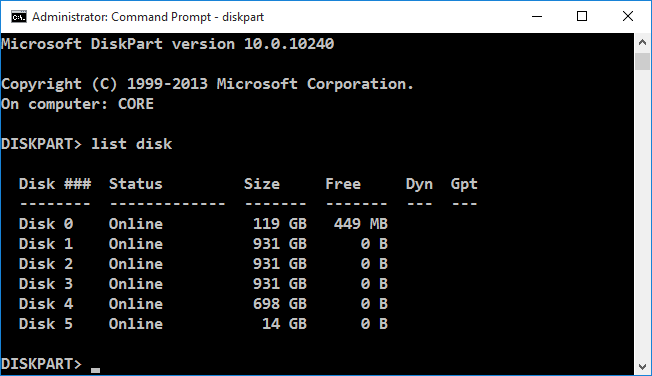
This will load diskpart. Now lets see what drives we have available, type “list disk” and press enter, this will list all disk drives that are present in your computer. Find the one representing your CF card. In my case it was 16 GB CF card so it’s the last one, where is says 14 GB. Note that it’s “Disk 5”.
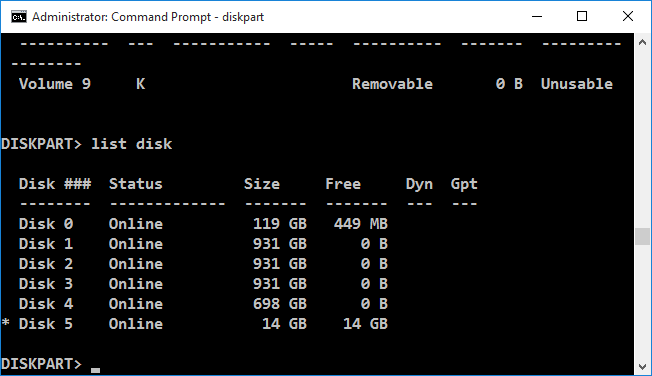
To select it type “select disk #” where # is number your CF/HDD got, followed by enter of course. In my case it was “select disk 5”
You should get message that Disk # is now the selected disk. To make sure type “detail disk” and press enter
It will output details of currently selected disk. Double check you’ve selected the correct one. If you clean wrong disk it’s bye, bye data. After you’re sure you’re sure 🙂 type “clean” and press enter. You should get a message saying it’s been successfully cleaned. If there was some kind of error make sure you’ve started Command Prompt as administrator.
And that’s it for preparing your CF/HDD. You can check with “detail disk” and/or “list disk” (selected disk will get * sign in front of it) commands to see if it’s been cleaned.
Tools and preparation
To make it a bit easier I’ve prepared small pack of tools and file systems. Simply unzip them in folder and assign the folder as hard drive in WinUAE, we’ll get into more details a bit later. Inside the archive is
Diskmaster – Norton Commnder like file manager HDInstTools HDToolBox loadmodule – command line tool, used for loading modules, we use it to load updated scsi.device that enables large hdd usage Reboot – command line soft reset tool CLI – Shell scsi.device – doobrey’s pacthed scsi.device v44.20, I use it without problems with all my A600/A1200 FS folder – I’ve included few filesystems in this folder, few versions of FFS and latest (at the moment v18.5) PFS3 AIO, you can get newest version from aminet scsi folder – Here I’ve included two scsi.device files I used so far. scsi.device.44.20 is the same one as above, scsi.device.43.45 is patched version of scsi.device 43.43 from WB3.9 BB2 update, reason I included it was because I had problems with 44.20 when used on regular A500 with KS3.1, for some reason it was crashing when it tried to load it, but this version, 43.45, worked fine. I guess it might be something to do with 68000 CPU, when I connected ACA500 with ACA1220 (68020 CPU) to this same A500 it worked fine with v44.20. So just in case, here are both versions.
We’re almost ready for actual work, almost :). First, run WinUAE as administrator, same as with command prompt. Find it’s shortcut (or WinUAE.exe), right click it and choose “Run as administrator”. This will allow WinUAE to access CF card, otherwise OS will block direct access to it.
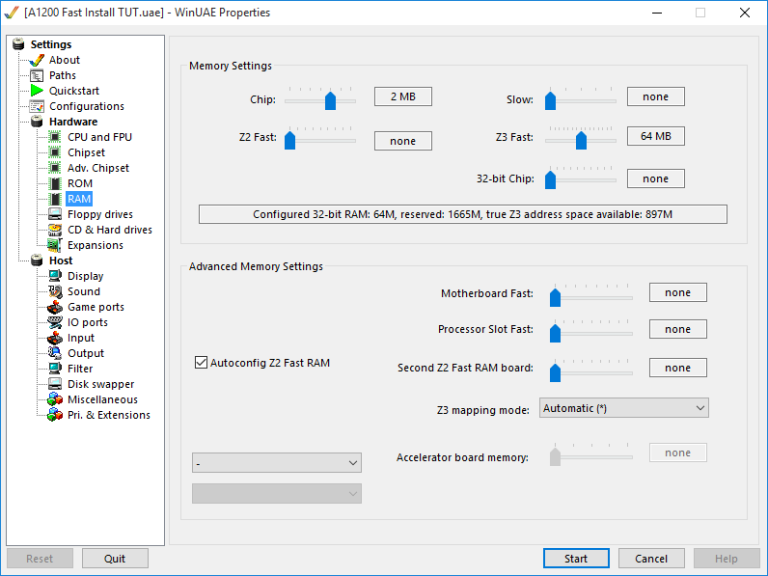
To make it a bit faster I set WinUAE to emulate a bit beefier then standard Amiga. These are setting that I use for prepping CF cards, WB installations, file copying and so on. I saved it as config so I don’t have to set it up every time.
For ROM settings use Kickstart 3.0 or 3.1, whatever you usually use, for floppy settings mount either Workbench or WorkBench Install floppy (again, either 3.0 or 3.1, whatever you usually use) and set it to turbo speed (slider to maximum left), to speed up WorkBench load.
If you use Workbench floppy instead of Workbench install floppy you’ll get one warning from HDToolBox later on, nothing important, we’ll get to that later, doesn’t really matter.
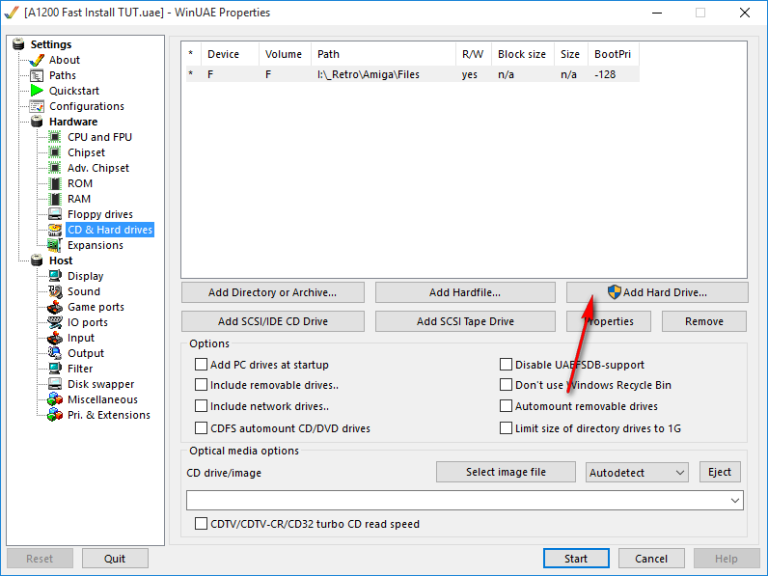
Now go to HDD settings (CD & Hard drives) and click “Add Directory or Archive…” button
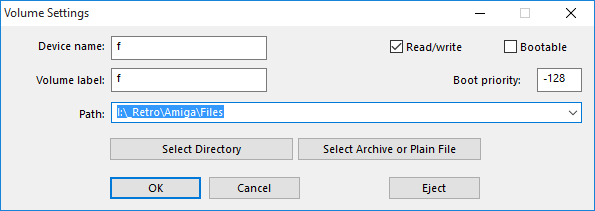
Browse to the folder you unpacked archive from previous chapter. For “Device name” and “Volume label” enter whatever you like. I simply enter “f” in those fields and I’ll use “f” throughout this tutorial. No special reason, that simply means that within workbench you’ll be able to find those files in drive “f”.
Now we need to add CF card to our virtual Amiga. Click “Add Hard Drive…” button, in new window click on the drop down menu and choose your drive.
Also, from drop down menu that says “UAE” choose “A600/A1200/A4000” and click “Add hard drive” button.
Finally, all preparation is done. All that’s left is to click “Start” button and load Workbench. You haven’t forgot to assign WB3.x floppy to floppy drive, have you?
Preparing the card
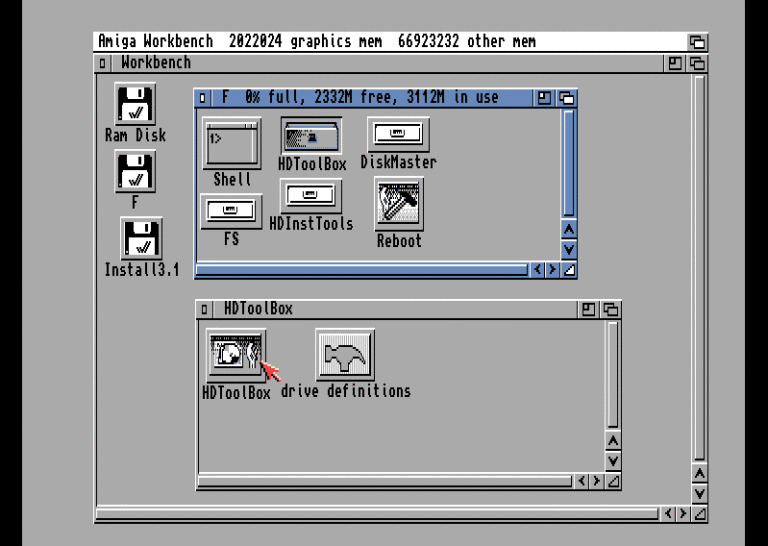
After it finishes loading you should get something like this
First thing we need to do is load patched scsi.device, original one is limited to 4GB and since our card is 16 GB we need to do something about it. If you’ll use 4 GB card you can skip this scsi.device thing, or if you use direct scsi enabled filesystem you can use up to 8 GB HDDs, like PFS3DS, but I prefer to use scsi.device approach even with 8 GB cards.
To load it we need to get to Shell. Since there’s no Shell on Workbench Install floppy I’ve included it in tools archive. Open drive “f” and you’ll find Shell there
Alternatively, if you used Workbench floppy to boot you can also find Shell in Workbench floppy, System drawer.
Switch to drive “f” by typing “f:”, followed by enter key, and finally type “loadmodule scsi.device” and press enter. This will load new scsi.device to memory and reboot our virtual Amiga. After it boots again, we can go back to shell and type “version scsi.device”, output should say version 44.20.
If you reboot from WinUAE (F12 and then “Reset” button) or stop/start emulation again, you’ll have to repeat this “loadmodule scsi.device” procedure, loadmodule survives only soft reset (ctrl + amiga + amiga, or reboot from command line, remember that Reboot file from zip archive?).
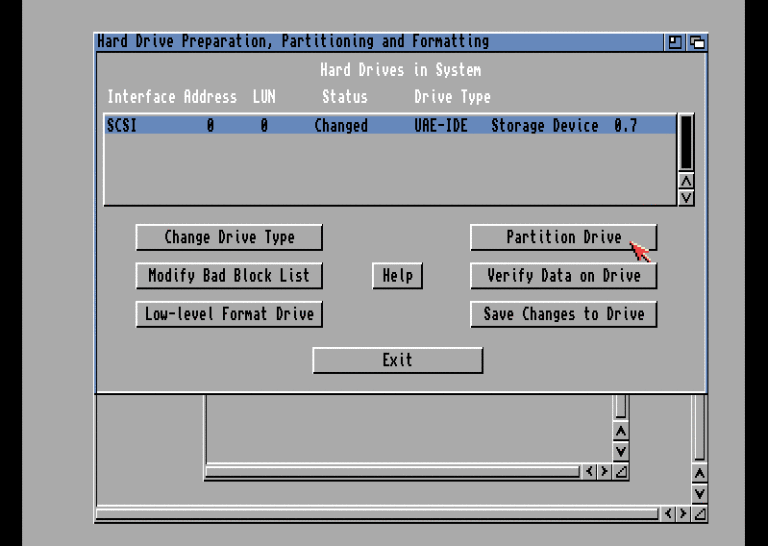
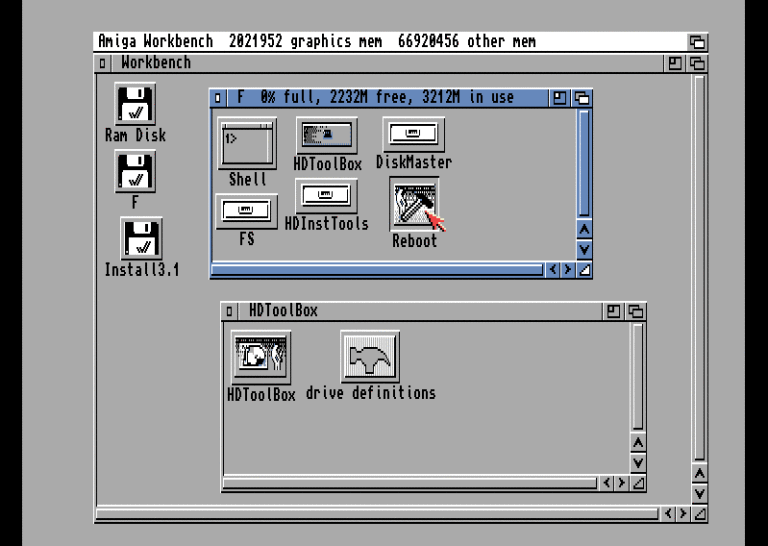
Now that we’ve loaded patched/updated scsi.device we can proceed. Open F drive, HDToolBox drawer and finally run HDToolBox.
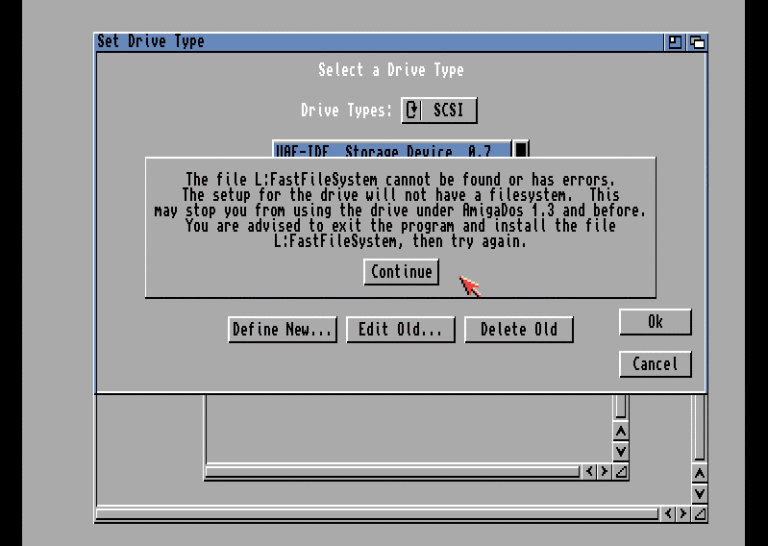
HDToolBox should load and show one unknown drive. So let’s introduce them, click “Change Drive Type” button.
Click “Define New…”
And Finally “Read Configuration”, to get drive geometry information.
You’ll get one info dialog so just click Continue and you’ll get correct geometry values. Don’t mind Size negative size. That’s only visual, HDToolBox wasn’t meant for drives so big so they never bothered to use big variables, this is simple programming variable overflow, drive will be formatted correctly.
If you want to precisely set partition sizes you can use calculator I made, at bottom left there’s link to PDF on how to use it. You just need Cylinders, Heads and Block per Track values from this HDToolBox window.
Now just click “Ok” on this and next window.
If you used Workbench floppy to boot you’ll probably get warning complaining how it can’t find L:FastFileSystem, just click continue. Reason for this is that Workbench floppy doesn’t have FFS driver on it. It’s on Install floppy, where HDToolBox usually is so it can find it automatically. If you used Workbench install floppy to boot you’ll simply be back to starting HDToolBox window.
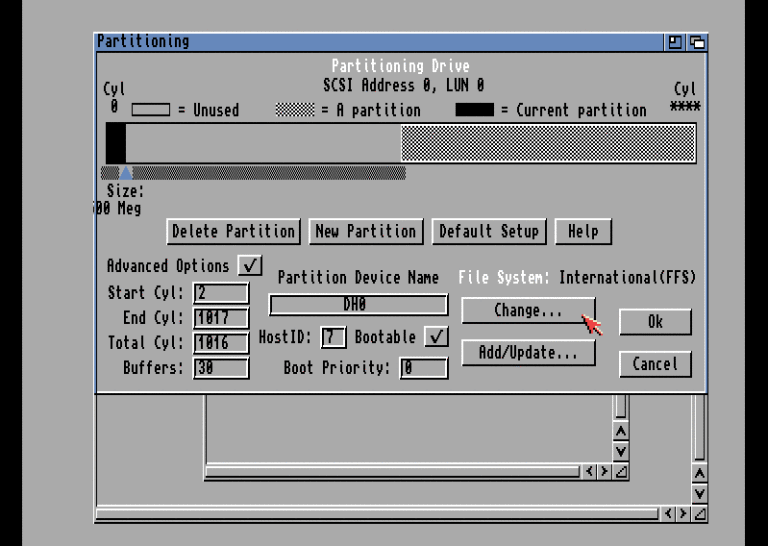
Now that we’re back at starting window, you’ll notice that all buttons have unlocked and that drive is no longer “unknown”. Click “Partition Drive” button
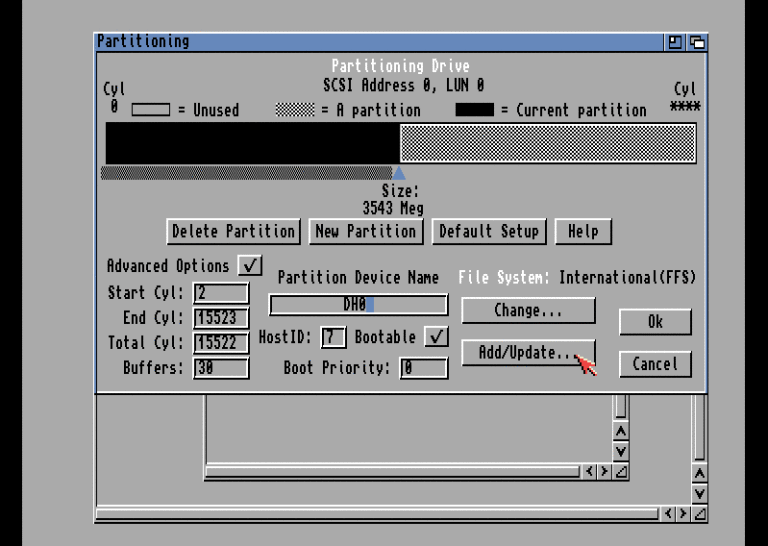
Add checkmark on “Advanced Options” checkbox
Edit “Partition Device Name” from UDH0 to DH0 (I guess it doesn’t matter, but traditionally HDD partitions are named DH0, DH1 and so on), and click on “Add/Update…” button.
Again, if you used Workbench floppy to boot, you wont’ have anything in the list. If you used Workbench install floppy you’ll have Fast File System loaded. If you don’t intend to use it, simply select it and click “Delete File System” button.
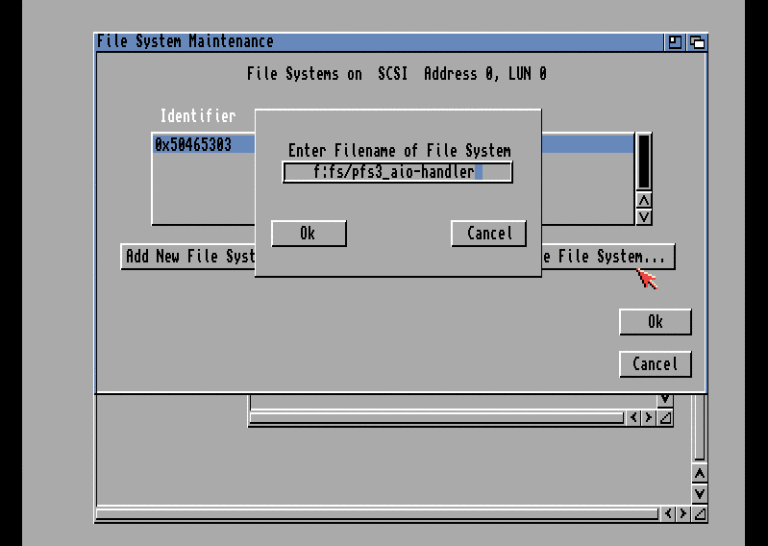
To add new file system click on “Add New File System…” button
And type path to file containing desired file system. In that zip file from beginning I’ve put them in FS folder and file name is pfs3_aio-handler, so in this case I typed “f:fs/pfs3_aio-handler”, and click “Ok” button.
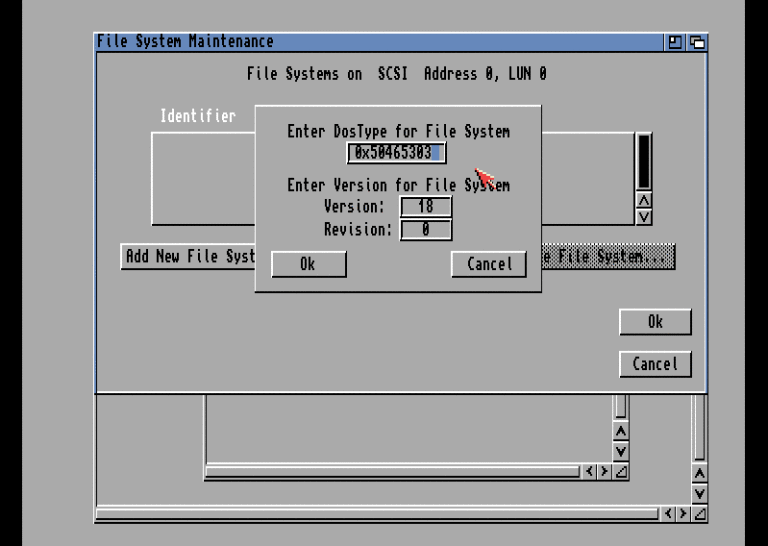
Now we need to enter DosType for PFS3, for PFS3 it’s
0x50465303
For PFS3DS aka PDS3 DosType would be 0x50445303 (pfs3_aio-handler supports PDS3, you just need to type this instead of PFS3 one, everything else is the same) and FFS would use 0x444F5301, just for info.
You can leave “Version” and “Revision” fields at default values, sometimes I edit “Revision” to 5 since this is PFS3 v18.5 but it’s not like it really matters. Again, click “Ok” button.
Now we have PFS3 loaded. We can load more filesystems, I’ve included few FFS versions in FS folder. When I started with Amigas few years ago I usually used FFS for DH0 and PFS3 for DH1, but actually there’s not much point to it, PFS3 is better (more modern) than FFS, and OS had to load two drivers so that resulted in a bit more memory used.
Now to set the partition up. I’ve resized it to 500 MB. You can do this via partition slider, which is unprecise, or by directly entering Start Cyl and End Cyl values. Which is what I did. To get those values you can use calculator I mentioned earlier. Finally, click on “Change…” button.
First click on “File System:” block thingy until it says “PFS\03” and then edit MaxTransfer value to 0x1fe00 (these are zeroes, not “O”s) AND PRESS ENTER TO CONFIRM THE VALUE. This is a “feature” on this window, if you enter the value and click “Ok” it will not apply but revert to original value. You have to press enter and then click “Ok” button.
Now set second partition to size you want. I usually use all of the rest of space for it, you can simply stretch it, no need to be precise for that. And repeat last step on it (Change…, File System, MaxTransfer). After you’re done with both (or more) partitions click “Ok” button to return to main HDToolBox window. All that’s left is to click “Save Changes to Drive” button. Only visible difference will be drive status, it will change from “Changed” to “Not Changed”.
Exit HDToolBox and reboot. In some rare occasions new partitions appeared immediately after I saved changes in HDToolBox, but in 90% of cases they didn’t. After reboot they appeared.
Easiest way is to double click Reboot icon that should be in “F” folder so do it. Or open shell again, go to drive “F” and type “reboot” followed by enter. But double clicking Reboot icon is faster/easier.
If you reboot from WinUAE control panel, you’ll have to do that “loadmodule scsi.device” thingy again. Alternative is to reboot via keyboard shortcut (Ctrl + Amiga + Amiga).
After reboot you may have to wait few seconds (3-5) for partitions to appear. But they should appear.
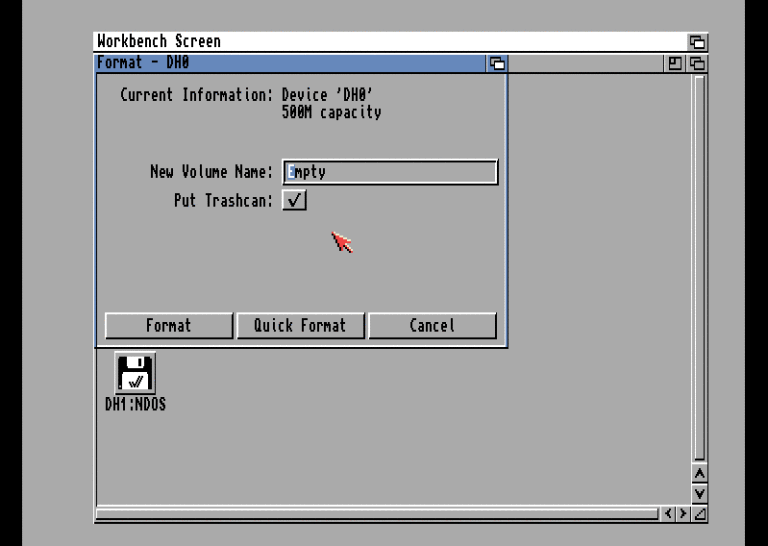
Select first one (DH0), press right mouse button and go to toolbar at the top, choose “Icons” and “Format Disk…”
Enter name you want your drive to have, like System, Main, Workbench… whatever, uncheck “Put Trashcan” checkbox if you want (I uncheck it) and click on “Quick Format” button. This is a must when using flash media like CF cards.
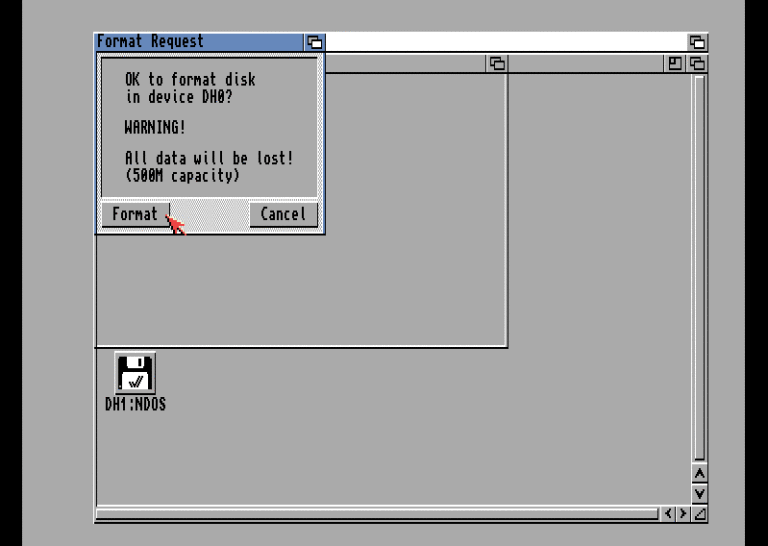
You’ll get two warnings asking you if you’re sure you want to format it, click “Format” button on both dialogs.
Lastly you’ll get one more dialog, simply informing you about some PFS3 info, click “Ok” and wait a bit for format to complete.
Repeat for second (and all consecutive ones if you made them) partition, this one might take 30-60 seconds to complete as it’s quite a bit larger. After it’s done you’ll have two partitions, 500 MB and 14+ GB formatted as PFS3.
Now you can install Workbench on it. But remember, if you make hard reset you’ll have to manually load patched scsi.device again, BEFORE you make any change to filesystem. Usually first partition will be accessible since it’s 500 MB, but DH1 will be NDOS again until you load scsi.device.
If you install Classic Workbench you can simply copy this scsi.device to DH0:DEVS folder, it will load it automatically on boot. If you install “plain” Workbench you’ll have to manually add it to startup-sequence. Tutorial on how to do this is here.
Just be sure to use same scsi.device you used to when partitioning the drive. There are more than one, others might work, but they may also result in corrupted data.
One of the best flight simulators of its time. Partial source code (the main file ‘flight.exe’) for the simulator was released for enhancement in 2016.
https://github.com/TornadoGame
Game download on myabandonware
https://www.myabandonware.com/game/tornado-41i
Tornado subforum on dogsofwar
http://dogsofwarvu.com/forum/index.php/board,50.0.html
Tornado gameplay by Frankie Kam
Digital Integration Tornado On Twitch (Frankie Kam)
Microbotics M-502 for Amiga 500 (512k SLOW or CHIP after mod) and Amiga 500+ (1MB CHIP)
This expansion uses the same RAM-chips as the later Amiga 500 models (rev. 6 and up) and harddrive controllers like the A2091 and A590: HM514256AP-10 (DIP-20 256kx4, 4 chips per 512k)
At the time of purchase I found these chips on utsource: HM514256AP-10
Golden Image RC-2000 with absolutely no identification text on the card uses 1Mx1 DIP-18 (16 needed per 2MB).
At the time of purchase I found these chips at Elgood OY / Partco in Finland: TARIC 81C1000-70
Testing the installed memory
There are some generic software based memory testers around for the Amiga. Just to name a few we have Amiga Test Kit and my own software (which runs from Workbench and an alternate version which runs from CLI: MemoryTest (Aminet: util/misc/MemoryTest.
Usually the memory expansion boards have a “test” jumper which disables autoconfig of RAM and allows that to be tested with the expansion specific tester included on the installation disk. These bootable disks are available at least for Supra 500RX, Oktagon and A590. Oktagon tests the RAM in 4MB chunks, so it will first say “4MB gefunden”, then “2MB gefunden” when it is done testing 4MB out of 6MB installed on the board.